Packages - How to Manage Packages
This lesson will describe how to edit and delete packages.
Please refer to the Quick Start Guide - Packages for information on basic concepts and rules relating to packages, terms, and products and/or:
Products - How to Create a Package Part 1: Create, Name, Attach Forms
Products - How to Create a Package Part 2: Package Terms
Products - How to Create a Package Part 3: Attach / Remove / Create a Product for complete detail on creating packages.
OPEN THE "MANAGE PACKAGES" WINDOW
1. Select SETUP from the main menu.

2. Select PACKAGES from the sub-menu.

This will bring you to a window displaying an alphabetical list of all products with the option to expand, edit, and/or delete each package. (See below)
To quickly find a package, use the Search functionality at the top of the page or use the page-through to move from page to page.
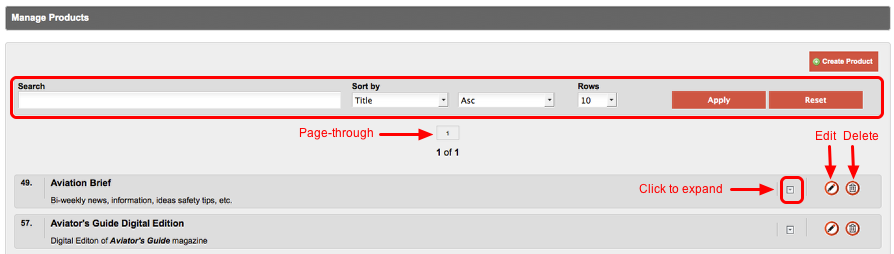
QUICK EDIT
Click on the Expand icon to expand and show package details.

This will expand the package to show the Terms and Products attached to the package.
From this expanded view, you can edit a term, create a new term, remove a product, or add an existing product.
To edit a term, click on the edit icon beside the term.
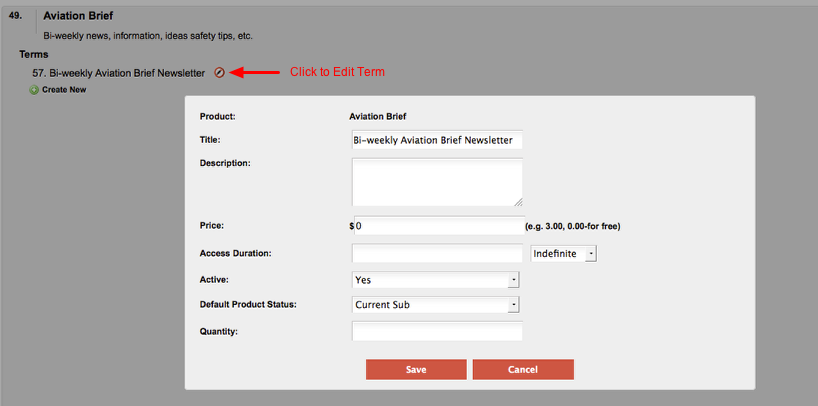
This will open a pop-up window where you can quickly edit and save the term.
To create a new term, click on "+ Create New".
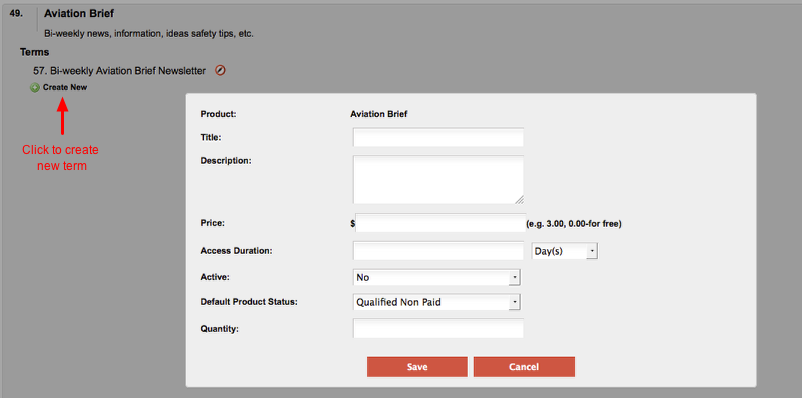
This will open a pop-up window where you can quickly create and save the term.
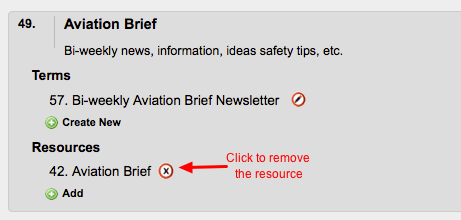
To remove a product, click the remove icon beside the product.
To add a new product, click "+ Add".
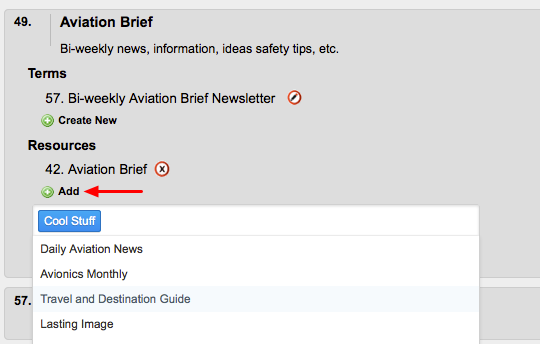
After clicking "+ Add", an empty drop-down menu will appear. Clicking in the empty space will bring up the drop-down menu to scroll through and select, or you can type in the name of the product and select.
To close the drop-down, click anywhere outside of it.
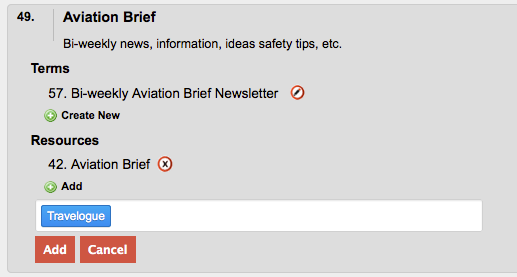
To add the selected product(s), click the "Add" button. To cancel the addition, click "Cancel". (See below.)
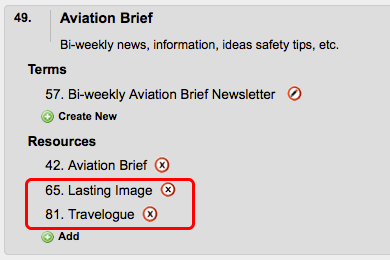
Newly added products will now appear in the list of products for the package. (As shown below)
FULL EDIT
Click the Edit icon to the right of the package name.

This will bring you to the "Edit Package" window where you can make changes to Package Name, Package Description, Primary Form, Forms Attached, Terms, and Products.

(1) For further directions on editing Part 1, see "How to Create a Product: Part 1 - Create New Product, Name it, and Attach Forms".
(2) For further directions on editingPart 2, see "How to Create a Product : Part 2 - Create Product Terms".
(3) For further directions on editing Part 3, see "How to Create a Product: Part 3 - Attach / Remove / Create a Resource ".
DELETE A PACKAGE
Click the delete icon.

A confirmation window will pop up where you can select "OK" to delete the product or "Cancel" to cancel the deletion process.
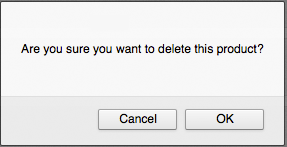
Click "OK" to delete the product or "Cancel" to cancel the deletion.
Search all Documentation:
Failed to execute the [panel] macro. Cause: [Missing macro content: this macro requires content (a body)]. Click on this message for details.
org.xwiki.rendering.macro.MacroExecutionException: Missing macro content: this macro requires content (a body)
at org.xwiki.rendering.wikimacro.internal.DefaultWikiMacro.validate(DefaultWikiMacro.java:220)
at org.xwiki.rendering.wikimacro.internal.DefaultWikiMacro.execute(DefaultWikiMacro.java:118)
at org.xwiki.rendering.wikimacro.internal.DefaultWikiMacro.execute(DefaultWikiMacro.java:61)
at org.xwiki.rendering.internal.transformation.macro.MacroTransformation.transform(MacroTransformation.java:311)
at org.xwiki.rendering.internal.transformation.DefaultRenderingContext.transformInContext(DefaultRenderingContext.java:183)
at org.xwiki.rendering.internal.transformation.DefaultTransformationManager.performTransformations(DefaultTransformationManager.java:88)
at org.xwiki.display.internal.DocumentContentAsyncExecutor.executeInCurrentExecutionContext(DocumentContentAsyncExecutor.java:396)
at org.xwiki.display.internal.DocumentContentAsyncExecutor.execute(DocumentContentAsyncExecutor.java:269)
at org.xwiki.display.internal.DocumentContentAsyncRenderer.execute(DocumentContentAsyncRenderer.java:112)
at org.xwiki.rendering.async.internal.block.AbstractBlockAsyncRenderer.render(AbstractBlockAsyncRenderer.java:157)
at org.xwiki.rendering.async.internal.block.AbstractBlockAsyncRenderer.render(AbstractBlockAsyncRenderer.java:54)
at org.xwiki.rendering.async.internal.DefaultAsyncRendererExecutor.syncRender(DefaultAsyncRendererExecutor.java:290)
at org.xwiki.rendering.async.internal.DefaultAsyncRendererExecutor.render(DefaultAsyncRendererExecutor.java:267)
at org.xwiki.rendering.async.internal.block.DefaultBlockAsyncRendererExecutor.execute(DefaultBlockAsyncRendererExecutor.java:125)
at org.xwiki.display.internal.DocumentContentDisplayer.display(DocumentContentDisplayer.java:67)
at org.xwiki.display.internal.DocumentContentDisplayer.display(DocumentContentDisplayer.java:43)
at org.xwiki.display.internal.DefaultDocumentDisplayer.display(DefaultDocumentDisplayer.java:96)
at org.xwiki.display.internal.DefaultDocumentDisplayer.display(DefaultDocumentDisplayer.java:39)
at org.xwiki.sheet.internal.SheetDocumentDisplayer.display(SheetDocumentDisplayer.java:123)
at org.xwiki.sheet.internal.SheetDocumentDisplayer.display(SheetDocumentDisplayer.java:52)
at org.xwiki.display.internal.ConfiguredDocumentDisplayer.display(ConfiguredDocumentDisplayer.java:68)
at org.xwiki.display.internal.ConfiguredDocumentDisplayer.display(ConfiguredDocumentDisplayer.java:42)
at com.xpn.xwiki.doc.XWikiDocument.display(XWikiDocument.java:1428)
at com.xpn.xwiki.doc.XWikiDocument.getRenderedContent(XWikiDocument.java:1564)
at com.xpn.xwiki.doc.XWikiDocument.displayDocument(XWikiDocument.java:1514)
at com.xpn.xwiki.doc.XWikiDocument.displayDocument(XWikiDocument.java:1483)
at com.xpn.xwiki.api.Document.displayDocument(Document.java:821)
at jdk.internal.reflect.GeneratedMethodAccessor302027.invoke(Unknown Source)
at java.base/jdk.internal.reflect.DelegatingMethodAccessorImpl.invoke(DelegatingMethodAccessorImpl.java:43)
at java.base/java.lang.reflect.Method.invoke(Method.java:569)
at org.apache.velocity.util.introspection.UberspectImpl$VelMethodImpl.doInvoke(UberspectImpl.java:571)
at org.apache.velocity.util.introspection.UberspectImpl$VelMethodImpl.invoke(UberspectImpl.java:554)
at org.apache.velocity.runtime.parser.node.ASTMethod.execute(ASTMethod.java:221)
at org.apache.velocity.runtime.parser.node.ASTReference.execute(ASTReference.java:368)
at org.apache.velocity.runtime.parser.node.ASTReference.value(ASTReference.java:704)
at org.apache.velocity.runtime.parser.node.ASTExpression.value(ASTExpression.java:75)
at org.apache.velocity.runtime.parser.node.ASTSetDirective.render(ASTSetDirective.java:242)
at org.apache.velocity.runtime.parser.node.ASTBlock.render(ASTBlock.java:147)
at org.apache.velocity.runtime.parser.node.SimpleNode.render(SimpleNode.java:439)
at org.apache.velocity.runtime.parser.node.ASTIfStatement.render(ASTIfStatement.java:190)
at org.apache.velocity.runtime.parser.node.ASTBlock.render(ASTBlock.java:147)
at org.xwiki.velocity.internal.directive.TryCatchDirective.render(TryCatchDirective.java:86)
at org.apache.velocity.runtime.parser.node.ASTDirective.render(ASTDirective.java:304)
at org.apache.velocity.runtime.parser.node.SimpleNode.render(SimpleNode.java:439)
at org.apache.velocity.Template.merge(Template.java:358)
at org.apache.velocity.Template.merge(Template.java:262)
at org.xwiki.velocity.internal.InternalVelocityEngine.evaluate(InternalVelocityEngine.java:233)
at com.xpn.xwiki.internal.template.VelocityTemplateEvaluator.evaluateContent(VelocityTemplateEvaluator.java:107)
at com.xpn.xwiki.internal.template.TemplateAsyncRenderer.evaluateContent(TemplateAsyncRenderer.java:219)
at com.xpn.xwiki.internal.template.TemplateAsyncRenderer.renderVelocity(TemplateAsyncRenderer.java:174)
at com.xpn.xwiki.internal.template.TemplateAsyncRenderer.render(TemplateAsyncRenderer.java:135)
at com.xpn.xwiki.internal.template.TemplateAsyncRenderer.render(TemplateAsyncRenderer.java:54)
at org.xwiki.rendering.async.internal.DefaultAsyncRendererExecutor.lambda$syncRender$0(DefaultAsyncRendererExecutor.java:284)
at com.xpn.xwiki.internal.security.authorization.DefaultAuthorExecutor.call(DefaultAuthorExecutor.java:98)
at org.xwiki.rendering.async.internal.DefaultAsyncRendererExecutor.syncRender(DefaultAsyncRendererExecutor.java:284)
at org.xwiki.rendering.async.internal.DefaultAsyncRendererExecutor.render(DefaultAsyncRendererExecutor.java:267)
at org.xwiki.rendering.async.internal.block.DefaultBlockAsyncRendererExecutor.render(DefaultBlockAsyncRendererExecutor.java:154)
at com.xpn.xwiki.internal.template.InternalTemplateManager.render(InternalTemplateManager.java:904)
at com.xpn.xwiki.internal.template.InternalTemplateManager.renderFromSkin(InternalTemplateManager.java:866)
at com.xpn.xwiki.internal.template.InternalTemplateManager.render(InternalTemplateManager.java:853)
at com.xpn.xwiki.internal.template.InternalTemplateManager.renderNoException(InternalTemplateManager.java:808)
at com.xpn.xwiki.internal.template.InternalTemplateManager.renderNoException(InternalTemplateManager.java:800)
at com.xpn.xwiki.internal.template.DefaultTemplateManager.renderNoException(DefaultTemplateManager.java:79)
at com.xpn.xwiki.internal.template.DefaultTemplateManager.renderNoException(DefaultTemplateManager.java:73)
at org.xwiki.template.script.TemplateScriptService.render(TemplateScriptService.java:54)
at jdk.internal.reflect.GeneratedMethodAccessor301585.invoke(Unknown Source)
at java.base/jdk.internal.reflect.DelegatingMethodAccessorImpl.invoke(DelegatingMethodAccessorImpl.java:43)
at java.base/java.lang.reflect.Method.invoke(Method.java:569)
at org.apache.velocity.util.introspection.UberspectImpl$VelMethodImpl.doInvoke(UberspectImpl.java:571)
at org.apache.velocity.util.introspection.UberspectImpl$VelMethodImpl.invoke(UberspectImpl.java:554)
at org.apache.velocity.runtime.parser.node.ASTMethod.execute(ASTMethod.java:221)
at org.apache.velocity.runtime.parser.node.ASTReference.execute(ASTReference.java:368)
at org.apache.velocity.runtime.parser.node.ASTReference.render(ASTReference.java:492)
at org.apache.velocity.runtime.parser.node.ASTBlock.render(ASTBlock.java:147)
at org.apache.velocity.runtime.directive.VelocimacroProxy.render(VelocimacroProxy.java:217)
at org.apache.velocity.runtime.directive.RuntimeMacro.render(RuntimeMacro.java:331)
at org.apache.velocity.runtime.directive.RuntimeMacro.render(RuntimeMacro.java:261)
at org.apache.velocity.runtime.parser.node.ASTDirective.render(ASTDirective.java:304)
at org.apache.velocity.runtime.parser.node.ASTBlock.render(ASTBlock.java:147)
at org.apache.velocity.runtime.parser.node.ASTIfStatement.render(ASTIfStatement.java:171)
at org.apache.velocity.runtime.parser.node.ASTBlock.render(ASTBlock.java:147)
at org.apache.velocity.runtime.parser.node.SimpleNode.render(SimpleNode.java:439)
at org.apache.velocity.runtime.parser.node.ASTIfStatement.render(ASTIfStatement.java:190)
at org.apache.velocity.runtime.parser.node.SimpleNode.render(SimpleNode.java:439)
at org.apache.velocity.Template.merge(Template.java:358)
at org.apache.velocity.Template.merge(Template.java:262)
at org.xwiki.velocity.internal.InternalVelocityEngine.evaluate(InternalVelocityEngine.java:233)
at com.xpn.xwiki.internal.template.VelocityTemplateEvaluator.evaluateContent(VelocityTemplateEvaluator.java:107)
at com.xpn.xwiki.internal.template.TemplateAsyncRenderer.evaluateContent(TemplateAsyncRenderer.java:219)
at com.xpn.xwiki.internal.template.TemplateAsyncRenderer.renderVelocity(TemplateAsyncRenderer.java:174)
at com.xpn.xwiki.internal.template.TemplateAsyncRenderer.render(TemplateAsyncRenderer.java:135)
at com.xpn.xwiki.internal.template.TemplateAsyncRenderer.render(TemplateAsyncRenderer.java:54)
at org.xwiki.rendering.async.internal.DefaultAsyncRendererExecutor.lambda$syncRender$0(DefaultAsyncRendererExecutor.java:284)
at com.xpn.xwiki.internal.security.authorization.DefaultAuthorExecutor.call(DefaultAuthorExecutor.java:98)
at org.xwiki.rendering.async.internal.DefaultAsyncRendererExecutor.syncRender(DefaultAsyncRendererExecutor.java:284)
at org.xwiki.rendering.async.internal.DefaultAsyncRendererExecutor.render(DefaultAsyncRendererExecutor.java:267)
at org.xwiki.rendering.async.internal.block.DefaultBlockAsyncRendererExecutor.render(DefaultBlockAsyncRendererExecutor.java:154)
at com.xpn.xwiki.internal.template.InternalTemplateManager.render(InternalTemplateManager.java:904)
at com.xpn.xwiki.internal.template.InternalTemplateManager.renderFromSkin(InternalTemplateManager.java:866)
at com.xpn.xwiki.internal.template.InternalTemplateManager.render(InternalTemplateManager.java:853)
at com.xpn.xwiki.internal.template.InternalTemplateManager.renderNoException(InternalTemplateManager.java:808)
at com.xpn.xwiki.internal.template.InternalTemplateManager.renderNoException(InternalTemplateManager.java:800)
at com.xpn.xwiki.internal.template.DefaultTemplateManager.renderNoException(DefaultTemplateManager.java:79)
at com.xpn.xwiki.internal.template.DefaultTemplateManager.renderNoException(DefaultTemplateManager.java:73)
at org.xwiki.template.script.TemplateScriptService.render(TemplateScriptService.java:54)
at jdk.internal.reflect.GeneratedMethodAccessor301585.invoke(Unknown Source)
at java.base/jdk.internal.reflect.DelegatingMethodAccessorImpl.invoke(DelegatingMethodAccessorImpl.java:43)
at java.base/java.lang.reflect.Method.invoke(Method.java:569)
at org.apache.velocity.util.introspection.UberspectImpl$VelMethodImpl.doInvoke(UberspectImpl.java:571)
at org.apache.velocity.util.introspection.UberspectImpl$VelMethodImpl.invoke(UberspectImpl.java:554)
at org.apache.velocity.runtime.parser.node.ASTMethod.execute(ASTMethod.java:221)
at org.apache.velocity.runtime.parser.node.ASTReference.execute(ASTReference.java:368)
at org.apache.velocity.runtime.parser.node.ASTReference.render(ASTReference.java:492)
at org.apache.velocity.runtime.parser.node.ASTBlock.render(ASTBlock.java:147)
at org.apache.velocity.runtime.directive.VelocimacroProxy.render(VelocimacroProxy.java:217)
at org.apache.velocity.runtime.directive.RuntimeMacro.render(RuntimeMacro.java:331)
at org.apache.velocity.runtime.directive.RuntimeMacro.render(RuntimeMacro.java:261)
at org.apache.velocity.runtime.parser.node.ASTDirective.render(ASTDirective.java:304)
at org.apache.velocity.runtime.parser.node.SimpleNode.render(SimpleNode.java:439)
at org.apache.velocity.Template.merge(Template.java:358)
at org.apache.velocity.Template.merge(Template.java:262)
at org.xwiki.velocity.internal.InternalVelocityEngine.evaluate(InternalVelocityEngine.java:233)
at com.xpn.xwiki.internal.template.VelocityTemplateEvaluator.evaluateContent(VelocityTemplateEvaluator.java:107)
at com.xpn.xwiki.internal.template.TemplateAsyncRenderer.evaluateContent(TemplateAsyncRenderer.java:219)
at com.xpn.xwiki.internal.template.TemplateAsyncRenderer.renderVelocity(TemplateAsyncRenderer.java:174)
at com.xpn.xwiki.internal.template.TemplateAsyncRenderer.render(TemplateAsyncRenderer.java:135)
at com.xpn.xwiki.internal.template.TemplateAsyncRenderer.render(TemplateAsyncRenderer.java:54)
at org.xwiki.rendering.async.internal.DefaultAsyncRendererExecutor.lambda$syncRender$0(DefaultAsyncRendererExecutor.java:284)
at com.xpn.xwiki.internal.security.authorization.DefaultAuthorExecutor.call(DefaultAuthorExecutor.java:98)
at org.xwiki.rendering.async.internal.DefaultAsyncRendererExecutor.syncRender(DefaultAsyncRendererExecutor.java:284)
at org.xwiki.rendering.async.internal.DefaultAsyncRendererExecutor.render(DefaultAsyncRendererExecutor.java:267)
at org.xwiki.rendering.async.internal.block.DefaultBlockAsyncRendererExecutor.render(DefaultBlockAsyncRendererExecutor.java:154)
at com.xpn.xwiki.internal.template.InternalTemplateManager.render(InternalTemplateManager.java:904)
at com.xpn.xwiki.internal.template.InternalTemplateManager.renderFromSkin(InternalTemplateManager.java:866)
at com.xpn.xwiki.internal.template.InternalTemplateManager.renderFromSkin(InternalTemplateManager.java:846)
at com.xpn.xwiki.internal.template.InternalTemplateManager.render(InternalTemplateManager.java:832)
at com.xpn.xwiki.internal.template.DefaultTemplateManager.render(DefaultTemplateManager.java:91)
at com.xpn.xwiki.internal.template.DefaultTemplateManager.render(DefaultTemplateManager.java:85)
at com.xpn.xwiki.XWiki.evaluateTemplate(XWiki.java:2569)
at com.xpn.xwiki.web.Utils.parseTemplate(Utils.java:180)
at com.xpn.xwiki.web.XWikiAction.execute(XWikiAction.java:650)
at com.xpn.xwiki.web.XWikiAction.execute(XWikiAction.java:338)
at com.xpn.xwiki.web.LegacyActionServlet.service(LegacyActionServlet.java:108)
at javax.servlet.http.HttpServlet.service(HttpServlet.java:764)
at org.apache.catalina.core.ApplicationFilterChain.internalDoFilter(ApplicationFilterChain.java:227)
at org.apache.catalina.core.ApplicationFilterChain.doFilter(ApplicationFilterChain.java:162)
at com.xpn.xwiki.web.ActionFilter.doFilter(ActionFilter.java:122)
at org.apache.catalina.core.ApplicationFilterChain.internalDoFilter(ApplicationFilterChain.java:189)
at org.apache.catalina.core.ApplicationFilterChain.doFilter(ApplicationFilterChain.java:162)
at org.xwiki.wysiwyg.filter.ConversionFilter.doFilter(ConversionFilter.java:61)
at org.apache.catalina.core.ApplicationFilterChain.internalDoFilter(ApplicationFilterChain.java:189)
at org.apache.catalina.core.ApplicationFilterChain.doFilter(ApplicationFilterChain.java:162)
at org.apache.tomcat.websocket.server.WsFilter.doFilter(WsFilter.java:53)
at org.apache.catalina.core.ApplicationFilterChain.internalDoFilter(ApplicationFilterChain.java:189)
at org.apache.catalina.core.ApplicationFilterChain.doFilter(ApplicationFilterChain.java:162)
at org.xwiki.container.servlet.filters.internal.SetHTTPHeaderFilter.doFilter(SetHTTPHeaderFilter.java:63)
at org.apache.catalina.core.ApplicationFilterChain.internalDoFilter(ApplicationFilterChain.java:189)
at org.apache.catalina.core.ApplicationFilterChain.doFilter(ApplicationFilterChain.java:162)
at org.xwiki.resource.servlet.RoutingFilter.doFilter(RoutingFilter.java:132)
at org.apache.catalina.core.ApplicationFilterChain.internalDoFilter(ApplicationFilterChain.java:189)
at org.apache.catalina.core.ApplicationFilterChain.doFilter(ApplicationFilterChain.java:162)
at org.xwiki.container.servlet.filters.internal.SavedRequestRestorerFilter.doFilter(SavedRequestRestorerFilter.java:208)
at org.apache.catalina.core.ApplicationFilterChain.internalDoFilter(ApplicationFilterChain.java:189)
at org.apache.catalina.core.ApplicationFilterChain.doFilter(ApplicationFilterChain.java:162)
at org.xwiki.container.servlet.filters.internal.SetCharacterEncodingFilter.doFilter(SetCharacterEncodingFilter.java:117)
at org.apache.catalina.core.ApplicationFilterChain.internalDoFilter(ApplicationFilterChain.java:189)
at org.apache.catalina.core.ApplicationFilterChain.doFilter(ApplicationFilterChain.java:162)
at org.apache.catalina.core.StandardWrapperValve.invoke(StandardWrapperValve.java:197)
at org.apache.catalina.core.StandardContextValve.invoke(StandardContextValve.java:97)
at org.apache.catalina.authenticator.AuthenticatorBase.invoke(AuthenticatorBase.java:541)
at org.apache.catalina.core.StandardHostValve.invoke(StandardHostValve.java:135)
at org.apache.catalina.valves.ErrorReportValve.invoke(ErrorReportValve.java:92)
at org.apache.catalina.valves.AbstractAccessLogValve.invoke(AbstractAccessLogValve.java:687)
at org.apache.catalina.core.StandardEngineValve.invoke(StandardEngineValve.java:78)
at org.apache.catalina.connector.CoyoteAdapter.service(CoyoteAdapter.java:360)
at org.apache.coyote.http11.Http11Processor.service(Http11Processor.java:399)
at org.apache.coyote.AbstractProcessorLight.process(AbstractProcessorLight.java:65)
at org.apache.coyote.AbstractProtocol$ConnectionHandler.process(AbstractProtocol.java:890)
at org.apache.tomcat.util.net.NioEndpoint$SocketProcessor.doRun(NioEndpoint.java:1743)
at org.apache.tomcat.util.net.SocketProcessorBase.run(SocketProcessorBase.java:49)
at org.apache.tomcat.util.threads.ThreadPoolExecutor.runWorker(ThreadPoolExecutor.java:1191)
at org.apache.tomcat.util.threads.ThreadPoolExecutor$Worker.run(ThreadPoolExecutor.java:659)
at org.apache.tomcat.util.threads.TaskThread$WrappingRunnable.run(TaskThread.java:61)
at java.base/java.lang.Thread.run(Thread.java:840)
More INVENTORY Documentation:
Click here to expand...
Quick Start Guide - Products & Resources
Products - How to Create a Product Part 1: Create, Name, Attach Forms
Products - How to Create a Product Part 2: Product Terms
Products - How to Create a Product Part 3: Attach/Remove/Create a Resource
Products - How to Manage Products
Quick Start Guide - Questions and Forms
Question Builder - Create and Manage Questions
Forms - How to Enable/Disable Lookup/Login Page
Brand - How to Create and Manage Brands
Resources - How to Create a Resource
Resources - How to Manage Resources
Promo Codes - How to Create and Manage Promo Codes