Forms - How to Manage Forms
This lesson will describe how to use the Forms functionality to manage forms. This includes previewing a form; obtaining URL links to a form; viewing products that are available for subscription/purchase on a form; creating a QR code for a form; editing, copying, and deleting a form; and attaching products to a form.
Please refer to the Quick Start Guide - Forms for information on basic concepts and rules relating to forms.
OPEN THE "MANAGE FORMS" WINDOW
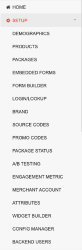
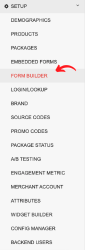
Select SETUP from the main menu.
Select "Forms" from the sub-menu.
This will bring you to Manage Forms, displaying an alphabetical list of all forms with the option to create a new form and/or perform other functions on existing forms. (See below.)
To quickly find a form, use the Search functionality at the top of the page or use the page-through to move from page to page. (See below.)
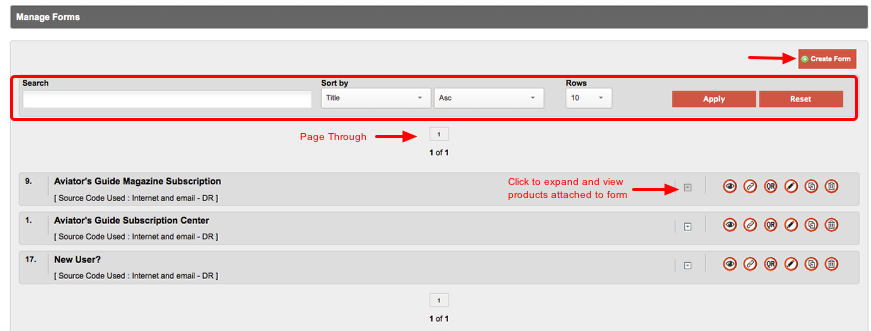
To create a new form, click "Create Form" and follow directions in Forms - How to Create a Form (v. 11.x).
See below for more detail on managing forms.
MANAGING FORMS
Expanded View / Attach Product(s)
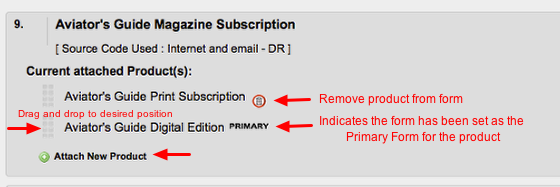
When the form view is expanded (by clicking on the down arrow to the right of the form name, you'll see the products attached to the form and have the options of changing the order of products and/or attaching or removing additional products.
Removing a product from a form DOES NOT delete the product. It only removes it from appearing on the form.
You cannot remove a product that has the form designated as PRIMARY. To change a product's primary form, you must do so in the Product Manager. Once the primary form has been changed, you can then remove it from the form by changing its position to "0" in the Product Manager (or by returning to the form manager and removing it).
To change the order products appear on the form, click on the dark gray bars to the left of the product name, drag and drop to desired position.
Select "Attach New Product" to attach a new product to the form. (See detail below.)
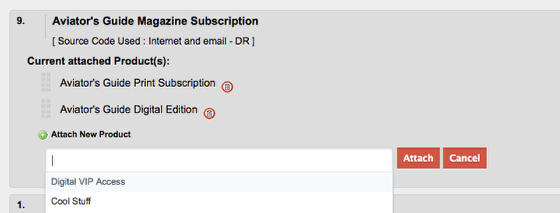
When you click on "Attach New Product", a blank field will appear. Clicking inside the field will bring up a drop-down list of products to choose from. Alternatively, you can begin typing in the name of the product to find it more quickly.
Once you've selected the name of the product, click the "Attach" button, or "Cancel" to cancel the action.
Preview: To preview a form (see what it will look like to the user on the front end), click on the "preview" icon.
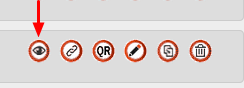
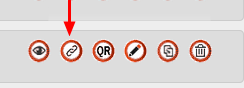
Get Links: To view various links to the form, including links that can be used on your website or in a newsletter/email blast, click the "get links" icon.
A new window will open, showing various links to the form. See details on the links below. (Note important information on "Form Linkout" and "Renewal Link".)

In all of the above links, replace the DOMAIN_NAME variable with the domain name you want to link to. For example, if you want to link to a renewal form on gcnmedia.com, the link would be http://ocreg.gcnmedia.com/onecount/reg/registerForm.cgi?form=70&renewal=true.
These links may be used on your website and/or in a newsletter or email blast to direct users to your form.
Types of Links:
Form Linkout: This is the URL of the form. If a user/subscriber's information is in the ONEcount database (and he/she is logged on to the site where the form is located) and this linkout is used, ALL fields/question responses (regardless of whether the question is designated to auto populate when creating or editing the form) for which there is data will be pre-populated. (See How to Create a Form for more information on designating questions to Auto Populate.)
Example: Form #999 has the question "email" designated to auto populate but not the question "street address". If the Form Linkout is used and user/subscriber information is in the ONEcount database (and the user is logged on to the site where the form is located), then both "email" and "street address" will be pre-populated (even though "street address" was not designated to auto populate) when the user accesses the form.
Renewal Link: This is the same link construction as the Form Linkout described above but has "&renewal=true" appended to the end. Per audit rules, you cannot pre-populate certain demographics, even if the information is in your database. Use the Renewal Link construction if you want only those fields/questions you designated to auto populate when creating or editing the form to be pre-populated. ** If user's/subscriber's information is in the ONEcount database (and he/she is logged on to the site where the form is located), this URL will bring him/her to the form with only those fields designated to auto populate when creating or editing the form pre-populated. (See How to Create a Form for more information on designating questions to Auto Populate.) Use this link construction in conjunction with the "Auto Populate" feature when creating/editing forms to be sure you are following BPA and/or other audit bureau reporting rules on what fields can be pre-populated in a form.
Example: Form #999 has the question "email" designated to auto populate but not the question "street address". If the Renewal Link is used and user/subscriber information is in the ONEcount database (and the user is logged on to the site where the form is located), then only "email" will be pre-populated and not "street address".
Email Engine Links: You can place these smartlinks* anywhere in your newsletter/email message sent out through the ONEcount Email Engine to direct users to a personal renewal and/or personal edit profile/unsubscribe form.
Personal Renewal Link: The system will automatically replace OCVALIDATE with each user's email and ONEcount id when the message is sent out via email so that if a user clicks on the link, he/she will be automatically logged in and brought to his/her current account information to renew.
Edit Profile/Unsubscribe Link: The system will automatically replace OCVALIDATE with each user's email and ONEcount id when the message is sent out via email so that if a user clicks on the link, he/she will be automatically logged in and brought to his/her current account information to either edit or unsubscribe.
*A smartlink is any link that has parameters for identifying the user appended to the end of the URL. These parameters vary based on the email marketing platform you use (e.g. ONEcount's integrated Email Engine, Real Magnet/Magnet Mail, Silverpop, etc.) Uponclicking on a smartlink, two things will happen: 1) the user will be authenticated automatically for access-controlled content; and 2) the user will be identified in the system as a ONEcount user and a cookie will be set, allowing you to track as a Known user all activities across your online properties.
Appending a Source Code to a Link
Overriding the source code of a form can be useful for tracking users from specific email/newsletter blasts.
To do this:
1) Create a new source code for the email/newsletter blast using the Source Codes tool under INVENTORY.
2) Once the code is created, copy the Code ID which is found to the left of the Code name. (Get back to Manage Source Codes window by clicking the "back" button on your browser twice.)
3) Retrieve the URL of the form you wish to attach the code to as described above in Get Links > Form Linkout.
4) Attach the new source code by appending the following text to the end of the URL: &src_code=X . X is the Code ID. (e.g. &src_code=8)
Example URL with source code: http://www.gcnmedia.com/ONEcount/reg/registerForm.cgi?pid=21&src_code=8
Get QR Code: Click the "QR CODE" icon to create a QR Code that will store the URL of the form.
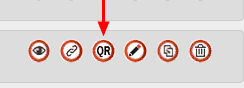
Mobile devices can capture the QR Code, which stores the URL of the form and, when read by the mobile device, brings the user directly to the form on your web site.
Edit: Click the "edit" icon to edit the form.
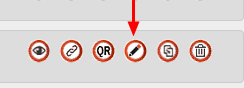
Editing the form will bring you to the same screen used when you created the form, with the header "Edit Form" where you can then change the form (e.g. change the form name, header text, change or add a source code, change the order of questions, set questions as required or auto-populated, change the question text, edit the Response Type and/or possible responses, duplicate questions, create/change question aliases, create/change report headers, and/or add new questions as described in How to Create a Form).
Copy: Click the "copy" icon to copy a form.
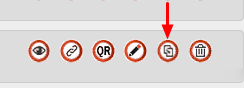
Copying a form DOES NOT create duplicate data fields/questions. It only creates an identical form using the same data fields/questions from the pool of data fields/questions, in the same order, with the same settings as the original form.
After clicking the "copy" icon the Form Builder window will appear, as shown below. You will know it is a copied form by addition of "(copy)" in the Form Builder header and in the Form Name.
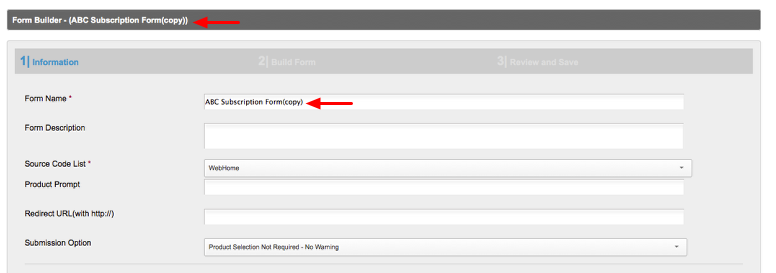
Here you can give the form a new Form Name, Description, Source Code, etc. and edit any of the questions, and/or add new questions. (See How to Create a Form for more detail.)
Copying a form is useful if you want to modify a form slightly but keep the original as well...you don't have to go through the entire process of creating a new form this way.
Delete: To delete a form, click the "delete" link. (See explanation and warning below.)
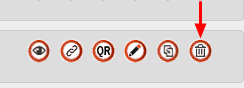
A confirmation window will appear as shown below.
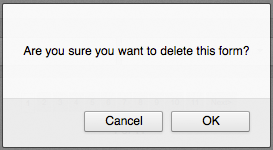
Select "OK" to delete or "Cancel" to cancel the operation.
Delete will delete the form but will not delete the questions or, if the form has been in use, user information in the ONEcount database that has already been collected by the form.
Warning: Be sure that the form is not being used by any products before deleting it. If you delete the form and it is attached to a product/is being used to subscribe to a product, the form will not be available for users to subscribe.