

How-To: AccuZip Address Validation
1. What AccuZip Does
AccuZip is the address validation service integrated into the ONEcount Fulfillment module. When you close an issue and generate the label/mail file (RPT-19), AccuZip processes your entire subscriber file through three USPS-certified services:
- CASS Certification (Coding Accuracy Support System) — standardizes every address to USPS delivery-point level. Adds ZIP+4, carrier route, delivery point barcode, and DPV (Delivery Point Validation) confirmation. Identifies vacant addresses, addresses that don't exist, and residential vs. business classification.
- NCOALink (National Change of Address Link) — matches your subscriber file against the USPS change-of-address database. Detects subscribers who have moved in the last 48 months and updates their address automatically. Also identifies deceased individuals and closed businesses. This is required by USPS Move Update regulations — you cannot mail Periodicals-class mail without a current NCOALink processing within 95 days of your mail date.
- Postal Presorting — sorts your file by ZIP code, carrier route, and delivery point to qualify for the lowest USPS postage rates. Generates the required USPS documentation (Mailing Statement, CASS Certificate, Qualification Report, NCOALink Certificate, Presort Summary) as a single bookmarked PDF.
All three services run through AccuZip's cloud API. Your subscriber addresses are uploaded, processed, and the results are written back to ONEcount automatically. You do not need to log into AccuZip's website or use their desktop software.
2. Before You Start
Prerequisites:
- Your organization has an active AccuZip account. Each ONEcount tenant contracts directly with AccuZip and supplies their own API credentials. Contact AccuZip at api@accuzip.com to set up an account if you don't have one.
- Your AccuZip account includes the Direct Mail API subscription (level 2 or higher). The API key is a GUID in the format 039DEF9F-1035-4A03-814D-94FC7D0D07F0.
- For NCOALink processing, a signed Processing Acknowledgment Form (PAF) must be on file with AccuZip. Complete the electronic PAF at accuzip.com/products/ncoalink/paf/new. Without a PAF, CASS and presort will still work but NCOALink will be skipped.
- Your AccuZip account has sufficient credits. Credits are consumed per file upload. Check your balance via the Test Connection button in Setup.
- You have the fulfillment.setup permission to configure the API key, and fulfillment.close_issue to run RPT-19.
3. Setting Up AccuZip in ONEcount
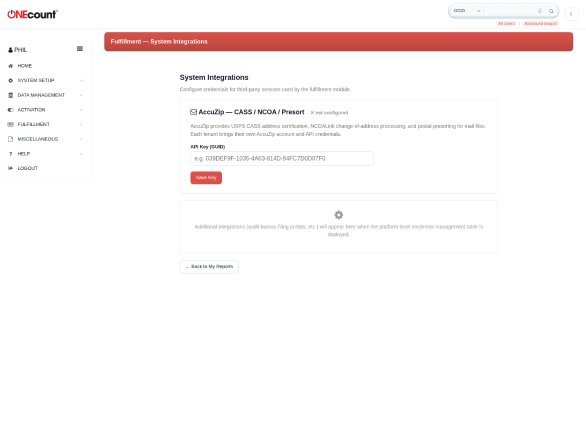
AccuZip is configured once per tenant. After setup, every RPT-19 run for every publication in the tenant will use the same AccuZip account.
3.1 Enter your API key
- Navigate to Fulfillment, then Setup, then System Integrations.
- In the AccuZip card, enter your API key in the API Key (GUID) field. The key is masked after save — only the first 8 and last 4 characters are shown.
- Click Save Key.
3.2 Test the connection
- After saving the key, click Test Connection.
- If successful, the page shows a green confirmation with your account type, access level, services enabled, and credits remaining.
- If the test fails, you will see one of these messages:
- "AccuZip credentials invalid" — the API key is wrong or expired. Check with your AccuZip account representative.
- "AccuZip unavailable" — the AccuZip cloud service is down or unreachable from this server. Try again in a few minutes or check AccuZip's status page.
3.3 Connection states
Throughout the fulfillment module, AccuZip's connection status is shown with a colored indicator:
- Green dot (ready) — AccuZip is connected and responding normally.
- Orange dot (slow) — AccuZip is reachable but responding slowly (over 2 seconds). Processing will work but may take longer than usual.
- Grey X (not configured) — No API key has been entered. Go to Setup, then System Integrations.
- Red X (auth failed) — The API key was rejected by AccuZip. Update the key in Setup.
- Red X (unavailable) — AccuZip is not responding. Retry or check their status page.
4. Address Validation from the Issue Builder
The recommended way to run AccuZip validation is from the Issue Builder — before you lock the issue. This lets you see deliverability metrics (DPV results, NCOA moves, CASS corrections) while you can still adjust the subscriber cohort.
4.1 When to validate
After saving an issue in the Issue Builder, an Address Validation card appears at the bottom of the page. You should run validation:
- Before locking the issue — so you can see how many addresses are invalid or have moved, and decide whether to clean the file first.
- After importing ACS kills — to confirm the removals have taken effect and your DPV numbers have improved.
- After editing audience sources — if you added or replaced a query or list, the cohort has changed and should be re-validated.
4.2 Running validation
Click Run Address Validation on the Issue Builder page. The system sends the entire subscriber cohort to AccuZip for CASS + NCOALink processing. This typically takes 30-90 seconds for a 30,000-record file.
When complete, a summary grid appears showing six metrics:
- Cohort — total subscribers in the issue.
- DPV Confirmed — addresses confirmed as valid USPS delivery points.
- DPV Invalid — addresses that failed Delivery Point Validation. These are likely undeliverable.
- CASS Corrected — addresses that AccuZip standardized (ZIP+4, suite normalization, spelling corrections).
- NCOA Moves — subscribers who have filed a change of address with the USPS in the last 48 months.
- Vacant — addresses flagged as unoccupied for 90+ days.
The validation timestamp and summary are stored on the issue record. You can re-run validation at any time by clicking Re-run Validation.
4.3 How validation feeds into RPT-19
When you reach RPT-19 Step 2 (CASS / NCOA verification), the wizard shows the cached validation results from the Issue Builder. If the validation is within 7 days, a green indicator confirms the data is fresh. If it is older than 7 days, an amber warning suggests re-validating from the Issue Builder.
You still need to click Check AccuZip Connection at Step 2 to verify that the AccuZip service is reachable. But you do not need to re-run the full CASS/NCOA batch — that was already done from the Issue Builder.
4.4 RPT-19 Generate (automatic processing)
When you click Generate at RPT-19 Step 5, the wizard runs a multi-step atomic saga. One step is AccuZip batch processing:
- Materialize the per-subscriber lot assignments.
- Send the file to AccuZip for CASS + NCOALink + postal presort. AccuZip processes the file in their cloud and returns results.
- Update per-subscriber cass_certified_at and ncoa_processed_at timestamps on the fulfillment subscription metadata.
- Download the USPS documentation PDF from AccuZip and save it as an artifact on this run.
- Write the issue serve log to Cassandra.
- Render the label file artifacts (CSV, XLSX, JSON).
If any step fails — including the AccuZip step — the entire saga rolls back. You will not have a label file without successful address validation.
4.5 Output (USPS documentation)
After Generate completes, the artifacts available for download include:
- labels.csv — the label file in CSV format for your lettershop.
- labels.xlsx — the same data in Excel format (Cover + Data sheets).
- mail-file.json — structured JSON for API integrations.
- usps-documentation.pdf — the USPS documentation package from AccuZip: Mailing Statement, CASS Certificate, Qualification Report, NCOALink Certificate, and Presort Summary. This is the documentation your lettershop needs for postal acceptance at the USPS Business Mail Entry Unit (BMEU).
Download the USPS documentation PDF and include it with the label file when you transmit to your lettershop. The lettershop presents this documentation to the USPS at the time of mailing.
5. What AccuZip Does to Your Data
When AccuZip processes your file, it makes the following changes to subscriber records in ONEcount:
5.1 Timestamps updated
- cass_certified_at — set to the current date/time for every subscriber in the file. This is the timestamp RPT-19 Step 2 checks for recency.
- ncoa_processed_at — set to the current date/time for every subscriber in the file. This is the timestamp RPT-19 Step 2 checks against the 95-day USPS Move Update requirement.
These timestamps are stored on the fulfillment_subscription_meta record for each subscriber (both MySQL and Cassandra). They persist across issues — if you close a second issue two weeks later, the timestamps from the first close are still valid and Step 2 will show them as recent.
5.2 Address corrections
AccuZip returns CASS-corrected addresses for every record: standardized street name spelling, corrected ZIP+4 codes, normalized suite/apartment numbers, and confirmed delivery points. In the current implementation, the corrected address data is downloaded and saved as a CSV artifact (accuzip-processed.csv) but is not automatically written back to the subscriber's ONEcount address record. Address writeback via the DExTr update path is planned for a future release.
5.3 DPV results
For each address, AccuZip returns a Delivery Point Validation (DPV) result that indicates whether the USPS can deliver mail to that specific address:
- DPV Confirmed (Y) — the address is a valid, deliverable USPS address. Both the primary number (street number) and secondary number (apartment/suite) are confirmed.
- DPV Confirmed, secondary missing (D) — the primary address is valid but secondary information (apartment number) is missing. Mail will likely be delivered but may be delayed.
- DPV Confirmed, secondary unconfirmed (S) — the primary address is valid but the secondary number could not be confirmed. The apartment or suite number may be wrong.
- DPV Not Confirmed (N) — the address failed DPV. The primary number does not match any known delivery point. This address may be undeliverable.
- Vacant (V) — the address is valid but has been vacant for at least 90 days. Mail sent here will likely be returned.
DPV results are summarized in the run's result data and appear in the RPT-19 artifact metadata (dpv_confirmed, dpv_failed, vacant counts).
5.4 NCOALink results
For each subscriber, AccuZip checks the USPS NCOALink database for change-of-address filings in the last 48 months. Possible outcomes:
- No move — the subscriber has not filed a change of address.
- Move applied — the subscriber moved and AccuZip has the new address. The corrected address is in the processed CSV.
- Move, no forwarding address — the subscriber moved but did not leave a forwarding address. This record should be suppressed from the mailing (RPT-19 Step 4 handles this automatically).
- Deceased — the USPS has a deceased indicator for this address.
- Business closed — the business at this address is closed.
6. AccuZip Credit Usage
AccuZip uses a credit-based pricing model. Credits are consumed each time you upload a file for processing. The number of credits consumed depends on your AccuZip plan and the services requested.
You can check your current credit balance at any time by going to Setup, then System Integrations, and clicking Test Connection. The response shows your total, monthly, and annual credits remaining.
Tips for managing credits:
- Use the Step 2 Re-validate button only when needed. If your CASS and NCOA timestamps are already green (within window), you do not need to re-validate — the Step 5 Generate will run AccuZip automatically.
- If you re-validate at Step 2 AND then run Generate at Step 5, the system is smart enough to skip the AccuZip step at Generate if it already ran at Step 2 for the same file.
- AccuZip allows a limited number of free test jobs for new integrations (typically 10). Use these during initial setup to verify everything works before going live.
- Contact AccuZip at api@accuzip.com to discuss credit packages and volume pricing for your publication's circulation size.
7. The USPS Documentation Package
When AccuZip processes your file and runs the postal presort, it generates a bookmarked PDF containing all the USPS documentation your lettershop needs. This PDF is saved as an artifact on the RPT-19 run and is available for download at Step 6.
The PDF includes:
- Mailing Statement (PS Form 3541 pre-populated) — the postage statement your lettershop submits to the USPS Business Mail Entry Unit. Shows piece counts by presort level, postage rates, and total postage due.
- CASS Certificate — certifies that the file was processed through a CASS-certified system. Required by USPS for Periodicals and Standard Mail presort discounts.
- Qualification Report — shows how many pieces qualified for each presort level (5-digit, 3-digit, SCF, NDC, mixed) and the estimated postage savings vs. single-piece rate.
- NCOALink Certificate — certifies that the file was processed through a licensed NCOALink service. Required by USPS Move Update regulations.
- Presort Summary — detailed breakdown of presort containers (trays/sacks), destination facilities, and piece counts per container.
Your lettershop presents this PDF package to the USPS clerk at the BMEU when dropping off the mailing. The USPS uses it to verify postage calculations and presort compliance.
8. ACS Kills Import
When the USPS returns mail as undeliverable (nixie returns), your mail house provides an ACS (Address Change Service) kills file listing the affected subscribers. ONEcount's ACS Import tool processes this file and updates subscriber records.
8.1 Accessing the ACS Import tool
From the left navigation, choose Fulfillment then ACS Import. The page has three phases: Upload, Preview, and Execute.
8.2 Phase 1 — Upload
To upload an ACS return file:
- Select the publication from the dropdown.
- Choose your ACS return file (CSV format). The system reads the header row and auto-detects which columns contain OCID, first name, last name, address, city, state, ZIP, and IMb barcode.
- Review the column mapping. Adjust if the auto-detection missed a column. At minimum, you need either an OCID column or a last name + ZIP combination for matching.
- Click Upload and Match. The system parses the file and matches each record to a subscriber in ONEcount.
8.3 Phase 2 — Preview and confirm
After matching, the Preview phase shows a summary: total records parsed, how many matched to ONEcount subscribers, how many could not be matched, and the proposed actions.
For each matched subscriber, the system proposes an action:
- Kill — set the subscriber's status to ACS Kills. The subscriber is removed from active circulation. This is the default action when the subscriber has no email address on file.
- Convert to Digital — instead of killing the subscriber, change their delivery format from print to digital. The subscriber stays on file as active. This option is only available when the subscriber has an email address on file.
The default action is controlled by a publication-level setting: ACS Digital Conversion. When enabled, subscribers with email addresses default to Convert to Digital instead of Kill. You can override individual rows using the Action dropdown in the preview table.
The Default action dropdown at the top of the preview changes all rows at once. Use this to quickly switch between 'kill all' and 'convert where possible' strategies.
Unmatched records are shown in a collapsible section below the preview table. Review these to identify records that could not be matched — they may need manual attention.
8.4 Phase 3 — Execute
When you are satisfied with the proposed actions, click Execute Changes. The system processes each decision:
- For kills: the subscriber's status is changed to acs_kills and a removed_undeliverable / UNDELIVERABLE_ACS entry is written to the adds/removals log.
- For digital conversions: the subscriber's current_format is changed to digital_replica and a format_change / ACS_DIGITAL_CONVERT entry is written to the adds/removals log. The subscriber remains active — this is NOT a removal.
After execution, a results summary shows the number of kills applied, digital conversions applied, and any errors. A Download Summary CSV button lets you download the full list of actions taken for your records.
The import is recorded as an ACS_IMPORT run in My Reports for audit trail purposes.
8.5 After importing ACS kills
After an ACS import, you should:
- Re-run address validation from the Issue Builder if you have an open issue for this publication. The validation summary will reflect the updated subscriber file.
- Review the RPT-09 Additions and Removals report for the current issue to confirm the ACS kills appear in the removed_undeliverable category.
- Check the RPT-13 Issue Close Preliminary report — the pending ACS count should decrease after the import.
9. Troubleshooting
AccuZip shows 'not configured' at RPT-19 Step 2
No API key has been entered. Navigate to Fulfillment, then Setup, then System Integrations. Enter your AccuZip API key and click Save Key. Then return to the RPT-19 wizard and click Check AccuZip Connection.
AccuZip shows 'auth failed'
The API key was rejected by AccuZip. This can happen if the key has expired, the account is suspended, or the key was entered incorrectly. Go to Setup, then System Integrations, re-enter the key, and click Test Connection. If it still fails, contact your AccuZip account representative or email api@accuzip.com.
AccuZip shows 'unavailable'
AccuZip's cloud service is not responding. This is usually temporary. Wait a few minutes and try again. If the problem persists, check AccuZip's status page or contact their support.
NCOA is blocked (red) — older than 95 days
USPS Move Update regulations require NCOALink processing within 95 days of the mail date. This is a hard block — you cannot proceed without re-validating. Click Re-validate file through AccuZip at Step 2 to run a fresh NCOALink pass. This will update the ncoa_processed_at timestamp for every subscriber in the file.
Generate failed with 'AccuZip API error'
The AccuZip cloud service returned an error during file processing. Common causes: insufficient credits (check your balance), file too large for your plan tier, or a transient cloud error. The full error message appears in the wizard's error banner. If the error is transient, simply click Generate again — the saga pattern ensures no partial state from the failed attempt.
Generate timed out
Very large files (over 100,000 records) can exceed the default processing timeout. The system will report the timeout and you can retry. If timeouts persist, consider splitting the issue into smaller lots or contacting AccuZip about a higher-tier plan with faster processing.
I don't see the USPS documentation PDF at Step 6
The USPS documentation PDF is only generated when AccuZip runs successfully. If AccuZip was not configured or the processing step was skipped (because timestamps were already current), the PDF will not be present. To force it, go back to Step 2 and click Re-validate, then re-run Generate.
My lettershop says the presort is wrong
The presort configuration (mail class, piece size, drop ZIP) is set in the AccuZip processing step. In the current implementation, default presort settings are used. If your lettershop requires specific presort parameters (e.g. Standard Mail instead of First Class, flat instead of letter), contact your ONEcount administrator to configure the presort defaults.
10. Where to Learn More
- AccuZip API documentation: docs.accuzip.com
- AccuZip support: api@accuzip.com (typically responds within 30 minutes on weekdays)
- NCOALink PAF form: accuzip.com/products/ncoalink/paf/new
- USPS Move Update requirements: pe.usps.com (search 'Move Update')
- RPT-19 Label / Mail File manual: docs/fulfillment/manuals/RPT-19-label-mail-file.md
- System Administration Guide (AccuZip setup section): docs/fulfillment/system-admin/fulfillment-system-admin-guide.docx
- Issue Close How-To (Phase 4): docs/fulfillment/howto-issue-close/fulfillment-issue-close-howto.docx