

How-To: Setup a Magazine
Creating publications, reporting periods,
rate-base declarations, and your first issue
1. Overview
Before you can run fulfillment reports, close issues, or generate mail files, you need to set up at least one magazine (publication) in the Fulfillment module. This guide walks through every step, from creating the publication record through building your first issue.
The setup process has six steps:
- Create the Publication record (required).
- Create Reporting Periods for the publication (required for RPT-11 Publisher's Statement and most audit reports).
- Declare a Rate Base (required if your publication claims a guaranteed circulation).
- Create your first Issue via the Issue Builder (required before running any issue-level reports).
- Configure third-party integrations (AccuZip for address validation, optional but recommended).
- Run the Setup Health check to verify everything is wired correctly.
Steps 1-3 are done under Fulfillment, then Setup. Step 4 is done under Fulfillment, then Issues. Steps 5-6 are back under Setup.
You need the fulfillment.setup permission to access the Setup pages. If you don't see the Setup menu item under Fulfillment, ask your administrator to grant this permission.
2. Before You Start
Before creating a publication, make sure:
- The fulfillment schema has been applied to this silo. If you see a yellow warning banner on any Setup page saying a table hasn't been applied, contact your system administrator to run the fulfillment SQL scripts.
- You have a Magazine Resource (type 14) set up under Products with at least one term. This is the product definition that ties subscriptions to the magazine. If your magazine doesn't have a resource yet, create one under Products, then New Product (type: Magazine). When you select Magazine as the type, the form will show inline term fields -- fill in the term title, format (e.g., Print, Digital Replica, Print + Digital), price, and duration. The resource and its terms are saved together in one step. You can add more terms later from the Terms section on the product edit page.
- If your publication will be audited by AAM (Alliance for Audited Media), you should have your demographic survey questions set up in the Form Builder. The publication setup form lets you link specific questions for RPT-05 cross-tabulation.
3. Step 1: Create the Publication
3.1 Navigate to Publications
Go to Fulfillment, then Setup, then Publications. You will see the publications list. If this is a new installation, the list will be empty with a prompt to add your first publication.
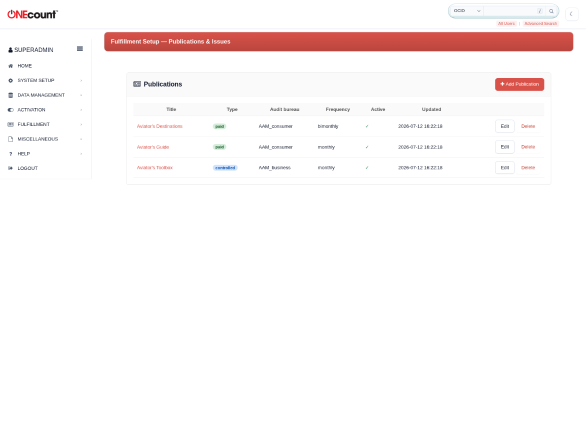
3.2 Click Add Publication
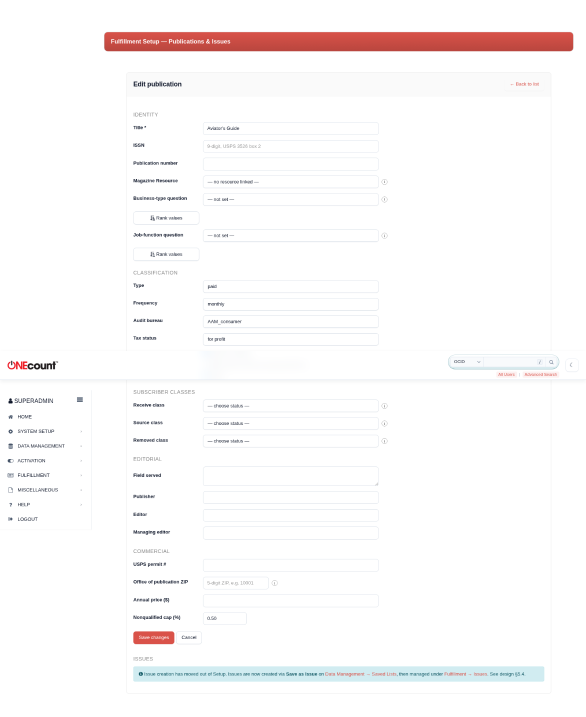
Click the red Add Publication button in the upper right. The publication form opens with five sections: Identity, Classification, Subscriber Classes, Editorial, and Commercial.
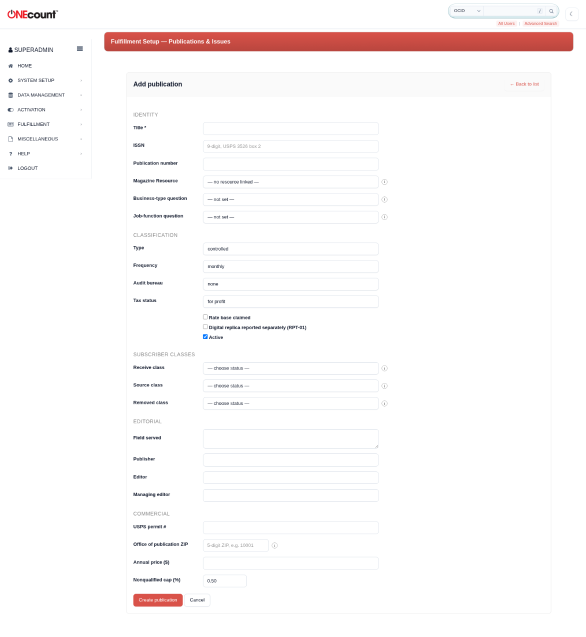
3.3 Fill in the Identity section
The Identity section at the top has four fields:
- Title (required) -- The magazine name as it appears in all reports and throughout the module. Example: "Aviator's Guide".
- ISSN -- The 9-digit International Standard Serial Number. Used by USPS Form 3526 (box 2). Leave blank if your publication doesn't have an ISSN.
- Publication number -- Your organization's internal identifier for this title. Optional.
- Magazine Resource -- Links this publication to an existing type-14 Magazine resource. This is how the fulfillment module knows which subscriptions (packages/terms) belong to this magazine. Reports query terms linked via the resource. Select your magazine resource from the dropdown. If your magazine resource isn't in the list, create it under Products first.
3.4 Demographic questions (AAM publications)
Below the Identity section are two demographic question pickers. These are optional for non-audited publications but important for AAM Business magazines:
- Business-type question -- The demographic survey question that captures the subscriber's business type (e.g., "General Aviation", "Business Aviation"). This drives RPT-05 Para 3a.
- Job-function question -- The demographic survey question that captures the subscriber's job function (e.g., "Private Pilot", "Flight Instructor"). This drives RPT-05 Para 3b.
Both pickers show only finite-response questions (Select, Radio, or Checkbox type) from your Form Builder. Text fields and textareas cannot be cross-tabulated and won't appear.
After saving the publication, you can return to the edit view and click Rank values next to each question. This opens a drag-and-drop modal where you prioritize the response values. When building an issue, subscribers with higher-ranked values are added first.
3.5 Fill in the Classification section
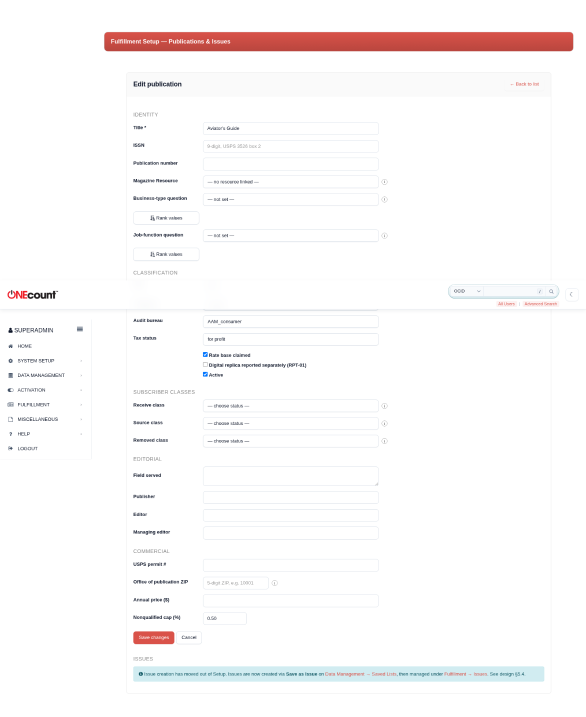
The Classification section has four fields and three checkboxes:
- Type -- "paid" (subscription revenue), "controlled" (free qualified circulation), or "mixed" (both paid and controlled subscribers). This affects how RPT-01 and RPT-02 break down circulation.
- Frequency -- How often the magazine publishes: weekly, biweekly, monthly, bimonthly, quarterly, semiannual, annual, or irregular. RPT-02 uses this to compute the expected number of issues per reporting period.
- Audit bureau -- "none" if not audited, "AAM_consumer" for AAM consumer magazines, or "AAM_business" for AAM business publications (Chapter D). This setting enables or disables audit-specific reports and fields throughout the module.
- Tax status -- "for profit", "nonprofit", or "has changed in last 12 months". Used by USPS Form 3526 (box 12).
Checkboxes:
- Rate base claimed -- Check this if your publication guarantees advertisers a minimum circulation. When checked, RPT-12 (Rate Base Compliance Dashboard) becomes active for this publication.
- Digital replica reported separately (RPT-01) -- Check this if your digital edition should appear as a separate line on RPT-01 (Circulation by Issue) rather than being combined with print.
- Active -- Uncheck to retire a publication without deleting it. Inactive publications don't appear in report wizards but their historical data is preserved.
3.6 Set the Subscriber Classes
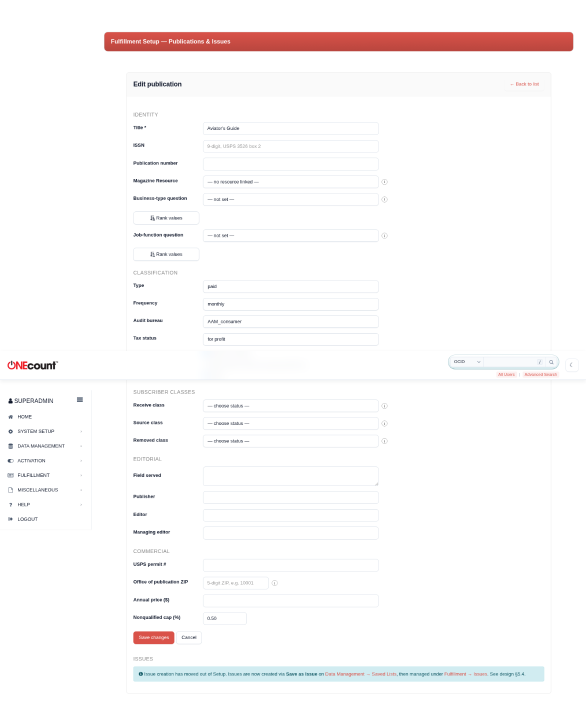
Subscriber classes tell the Issue Builder what subscriber statuses to use when building and managing issues. There are three pickers, each showing the subscriber status values configured for your silo:
- Receive class -- The status assigned to subscribers who are actively receiving this publication. When the Issue Builder adds a subscriber to an issue, it sets their status to this value.
- Source class -- The status pool that subscribers are drawn from when building an issue. These are your prospect or reserve subscribers who are eligible to receive the magazine but haven't been assigned to an issue yet.
- Removed class -- The status assigned when a subscriber is removed from the active file. When a subscriber is dropped from an issue (e.g., expired, unqualified, moved), the Issue Builder sets their status to this value.
3.7 Fill in the Editorial section
Four fields that appear on reports and official forms:
- Field served -- A free-text description of the magazine's editorial focus area. Example: "General and business aviation for active pilots and aircraft owners." Used in AAM filings.
- Publisher -- The name of the publisher.
- Editor -- The name of the editor.
- Managing editor -- The name of the managing editor.
3.8 Fill in the Commercial section
Four fields used by mailing and audit reports:
- USPS permit # -- Your USPS mailing permit number for this publication. Used by RPT-19 (Label / Mail File) and USPS Form 3526.
- Office of publication ZIP -- The 5-digit ZIP code of the magazine's office of publication. RPT-10 (USPS Form 3526) uses this to determine in-county vs. outside-county circulation (items 15b(1) and 15b(2)). You can enter a ZIP+4; the system normalizes to the leading 5 digits.
- Annual price ($) -- The annual subscription price in dollars. Used by RPT-03 (Average Subscription Price) and USPS Form 3526 (box 6).
- Nonqualified cap (%) -- The threshold for nonqualified circulation. RPT-15 shows a warning when nonqualified share exceeds this percentage. Default is 0.50%.
- ACS digital conversion -- When checked, the ACS Import tool defaults to converting nixie-returned subscribers to digital delivery instead of killing them, provided the subscriber has an email address on file. If unchecked, all ACS returns default to kills. The operator can override either default on a per-record basis during the import preview.
3.9 Save
Click Create publication. The system creates a row in fulfillment_publication and redirects you to the publications list. Your new publication now appears in every report wizard's publication picker.
4. Step 2: Create Reporting Periods
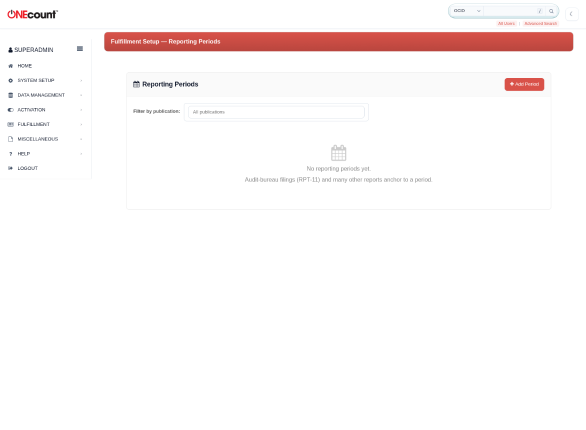
A reporting period defines an audit window -- typically a half-year (H1 or H2) for AAM publications. RPT-11 (Publisher's Statement) and several other reports anchor to a reporting period. You need at least one reporting period before you can close an issue.
4.1 Navigate to Reporting Periods
Go to Fulfillment, then Setup, then Reporting Periods.
4.2 Click Add Period
Click the red Add Period button. The form has five fields:
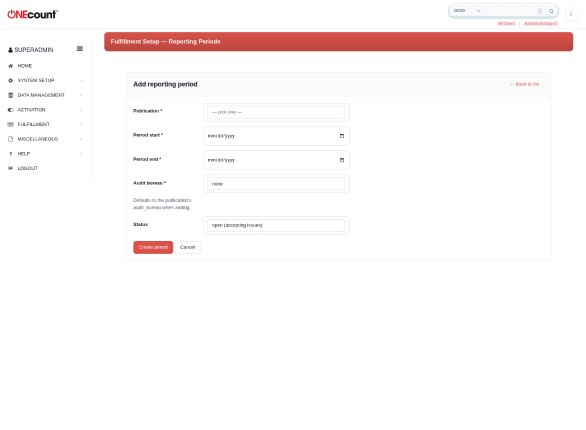
- Publication (required) -- Select the publication this period applies to.
- Period start (required) -- The start date of the reporting window in YYYY-MM-DD format. For an H1 period, this would be January 1 (e.g., 2026-01-01).
- Period end (required) -- The end date. For H1, this would be June 30 (e.g., 2026-06-30).
- Audit bureau -- Defaults to the publication's audit bureau but can be overridden per period.
- Status -- Defaults to "open" (accepting issues and activity). Set to "closing" when you're ready to prepare the Publisher's Statement. The "filed" status is set automatically by RPT-11 when the statement is finalized -- you cannot set it manually.
4.3 Status lifecycle
Reporting periods move through three statuses:
- open -- The period is active. You can create issues, run reports, and make changes.
- closing -- You've decided to finalize the period. RPT-11 (Publisher's Statement) will only finalize when the period is in this state.
- filed -- RPT-11 has been finalized. The period is locked. No edits are allowed from this page. Reopening requires both the fulfillment.setup and fulfillment.statement_file permissions.
4.4 Typical setup
Most publications need two periods per year. For a monthly magazine audited by AAM, create:
- H1 2026: January 1, 2026 through June 30, 2026
- H2 2026: July 1, 2026 through December 31, 2026
Issues whose issue dates fall within a period are automatically associated with it.
5. Step 3: Declare a Rate Base
If your publication guarantees advertisers a minimum circulation (a "rate base"), you declare it here. RPT-12 (Rate Base Compliance Dashboard) reads this to monitor whether your actual average circulation meets the commitment. Skip this step if your publication does not claim a rate base.
5.1 Navigate to Rate Base
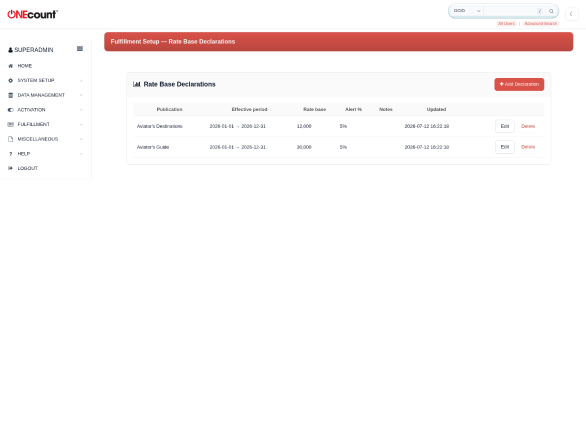
Go to Fulfillment, then Setup, then Rate Base.
5.2 Click Add Declaration
Click the red Add Declaration button. The form has five fields:
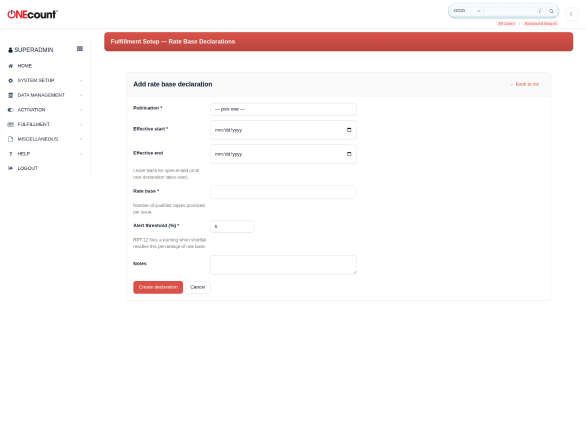
- Publication (required) -- Select the publication.
- Effective start (required) -- The date this rate base takes effect. Usually aligned with a reporting period start.
- Effective end -- The date it expires. Leave blank for open-ended (the declaration stays active until a new one is created).
- Rate base (required) -- The number of qualified copies promised per issue. Example: 50,000.
- Alert threshold (%) -- RPT-12 fires a warning when your actual average circulation falls below this percentage of the declared rate base. Default is 5%.
6. Step 4: Create Your First Issue
An issue represents a single mailing of the magazine. It ties together the subscriber list (who gets this issue), the mail date, and the reporting period. You create issues through the Issue Builder.
6.1 Navigate to Issues
Go to Fulfillment, then Issues. The issues list shows all issues across publications with their status, dates, and subscriber counts.
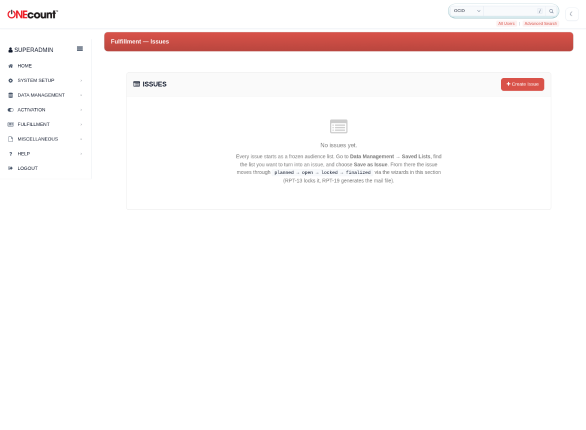
6.2 Open the Issue Builder
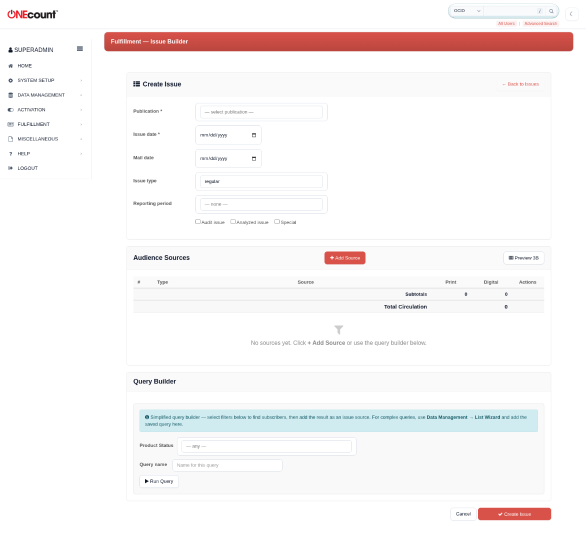
Click Create Issue to open the Issue Builder. The Issue Builder lets you compose an issue from one or more subscriber sources (saved queries or saved lists).
6.3 Set the issue metadata
At the top of the Issue Builder, set:
- Publication -- The magazine this issue belongs to.
- Issue date -- The cover date of the issue (YYYY-MM-DD). This determines which reporting period the issue falls into.
- Mail date -- The planned mail date (YYYY-MM-DD). Used for CASS/NCOA recency checks at RPT-19.
- Reporting period -- Auto-selected based on the issue date. If the issue date falls within a defined reporting period, it's linked automatically.
6.4 Add subscriber sources
Click Add Source to add subscriber rows to the issue. Each source can be:
- A saved query from the List Wizard -- The query runs at issue build time and pulls the current matching subscribers. Print and digital counts are auto-classified from term format. You can adjust counts with +/- buttons and set an aging preference (newest or oldest first).
- A saved list -- A frozen snapshot of subscriber OCIDs. Use this when you want an exact, pre-determined set of recipients. Counts are auto-classified but fixed (no +/- adjustment).
- Other -- A manual entry for counts that don't come from a query or list. Enter a label (e.g., "bulk subs", "advertiser copies", "sponsored") and type the print and digital numbers directly. Use this for non-subscriber circulation components.
The Issue Builder auto-classifies query and list source rows into Print and Digital columns based on the product format. Other source rows have their counts entered directly. All source types contribute to the running subtotals and total circulation at the bottom of the table.
6.5 Preview and save
- Click Preview 3B to see the live RPT-05 Para 3B cross-tab -- a sanity check showing the demographic breakdown of the issue audience.
- Click Save Issue to merge all sources into a composite saved list and create the issue record.
- The issue status is set to "open" and appears on the Issues list.
6.6 Issue lifecycle
After creation, an issue moves through four statuses:
- planned -- Placeholder issue, not yet populated with subscribers.
- open -- Active issue with a subscriber list attached. Ready for reports.
- locked -- RPT-13 (Issue Close Preliminary) has been run, locking the subscriber file.
- finalized -- RPT-19 (Label / Mail File) has been generated and the serve log written to Cassandra. The issue is complete.
7. Step 5: Configure Integrations (Optional)
The Integrations page lets you connect third-party services. The most important integration is AccuZip for address validation.
7.1 AccuZip
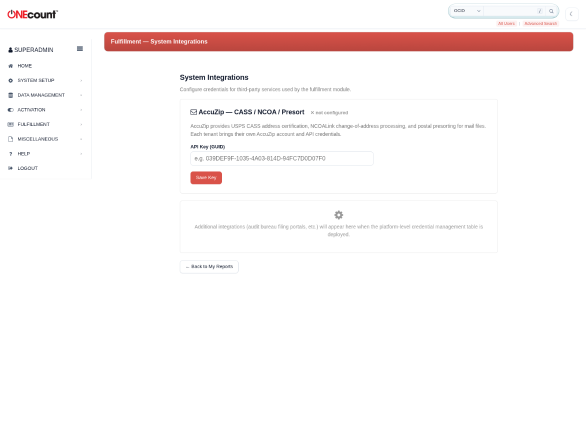
AccuZip provides CASS certification, NCOALink change-of-address processing, and postal presorting. When configured, RPT-19 automatically validates your subscriber addresses through AccuZip before generating the mail file.
- Navigate to Fulfillment, then Setup, then System Integrations.
- In the AccuZip card, enter your API key (GUID format) and click Save Key.
- Click Test Connection to verify. The page shows your account type, services enabled, and credits remaining.
For a detailed AccuZip setup walkthrough, see the separate How-To guide: fulfillment-accuzip-howto.docx.
8. Step 6: Run the Setup Health Check
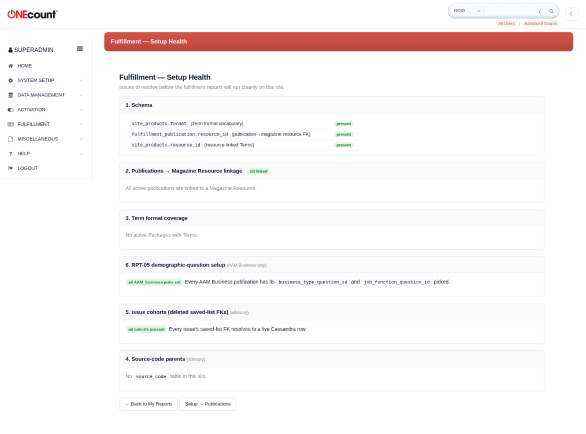
After completing your setup, run the health check to make sure everything is wired correctly.
8.1 Navigate to Setup Health
Go to Fulfillment, then Setup, then Setup Health.
8.2 What it checks
- All required fulfillment tables exist in the database.
- Each publication is linked to a valid Magazine Resource.
- Term format coverage -- the publication's resource has terms covering print, digital, or both, as expected.
- Reporting periods are defined and current.
- No orphaned configuration (e.g., a rate base pointing to a deleted publication).
If any issues are found, the health check shows one-click fix buttons where possible. Address any warnings before proceeding with your first issue close.
9. What to Do Next
With your magazine set up, you're ready to use the fulfillment reports. Here are the typical next steps:
- Run RPT-13 (Issue Close Preliminary) to lock an issue's subscriber file. See the Issue Close How-To guide for the full workflow.
- Run RPT-19 (Label / Mail File) to generate the printer-ready label file. If AccuZip is configured, this step also validates addresses.
- Run RPT-01 (Circulation by Issue) to see the circulation breakdown for a closed issue.
- At the end of a reporting period, set the period status to "closing" and run RPT-11 (Publisher's Statement) to generate the audit filing.
9.1 Related guides
- Fulfillment Module End-User Guide -- comprehensive reference for all 20 reports. See docs/fulfillment/user-guide/.
- Issue Close How-To -- end-to-end issue close workflow from saved list through mail file. See docs/fulfillment/howto-issue-close/.
- AccuZip How-To -- AccuZip address validation setup and usage. See docs/fulfillment/howto-accuzip/.
- AAM Filing How-To -- how to file your Publisher's Statement with AAM. See docs/fulfillment/howto-aam-filing/.
- USPS Form 3526 How-To -- annual USPS Statement of Ownership filing. See docs/fulfillment/howto-usps-3526/.
- System Administration Guide -- permissions, configuration, and maintenance. See docs/fulfillment/system-admin/.
Appendix: Quick Reference
A.1 Publication fields at a glance
Required fields:
- Title
Recommended fields:
- Magazine Resource (links subscriptions to this publication)
- Type (paid, controlled, or mixed)
- Frequency (monthly, quarterly, etc.)
- Audit bureau (none, AAM_consumer, or AAM_business)
- Subscriber classes (receive, source, removed)
Optional fields:
- ISSN, Publication number
- Business-type question, Job-function question (AAM only)
- Tax status
- Rate base claimed, Digital replica reported separately
- Field served, Publisher, Editor, Managing editor
- USPS permit #, Office of publication ZIP
- Annual subscription price, Nonqualified cap %
A.2 Permissions required
- fulfillment.setup -- Access all Setup pages (Publications, Reporting Periods, Rate Base, Integrations, Health).
- fulfillment.view -- See the Fulfillment menu and view reports.
- fulfillment.run -- Launch and complete reports.
- fulfillment.close_issue -- Authorize RPT-13 issue close.
- fulfillment.statement_file -- Finalize RPT-11 Publisher's Statement.
A.3 Setup page locations
- Fulfillment > Setup > Publications -- create and manage magazine records.
- Fulfillment > Setup > Reporting Periods -- define audit windows.
- Fulfillment > Setup > Rate Base -- declare guaranteed circulation.
- Fulfillment > Setup > System Integrations -- AccuZip, AAM, USPS credentials.
- Fulfillment > Setup > Setup Health -- verify configuration.
- Fulfillment > Issues -- create and manage issues via Issue Builder.