Packages - How to Create a Package Part 2: Package Terms
After you enter the package name, package description, and primary form (and optionally attach the package to other forms) and click Save, the window will expand. (See below.) You can now create the product terms.
A term – – is the selling element for that package. It contains the price and duration defined for the package. Adding a term allows you to set the price and duration of a subscription/registration/purchase, set the package as active or not, assign a default package status (status that is applied upon subscription/registration/purchase and that can be used as criteria for generating lists – as described in the Lists and Reports > List Wizard section), and enter quantities.
Please refer to the Quick Start Guide - PackagesQuick Start Guide - Packages and Products for information on basic concepts and rules relating to packages, terms, and products.

1. Click on "Create New" link.

This will bring you to the "New Term" window as shown below.
2. Title: Enter the name of the term here

It is recommended to name the term with detail about the Package, e.g. Sample Magazine - Print, rather than just "Sample Magazine". Adding " - Print" clarifies the subscription is for a print, not digital, magazine. This is important for front end users' understandability of term(s).
The Term Title is also used when selecting packages to subscribe to during an import and when generating a list in the List Wizard, so it needs to be descriptive enough to tell what package and term you are subscribing a user to when importing a file or generating a list in the List Wizard.
3. Description: Enter a brief description of the term here.

The description will appear in italics after the title on the form.
4. Price: Enter the price here.

If a product is free, enter 0.00 .
5. Access Duration: Use the text field and drop-down menu to enter the duration of the subscription/registration/purchase here.

For example, if you want the duration to be six months, type 6 in the text field and select Month(s) from the drop-down menu.
No entry in the text field is required for "Indefinite".
6. Active: Select Yes or No from the drop-down to make the term active or not.

Yes = Active term – The term will appear on the form(s) the package is attached to.
No = Inactive term – The term will not appear on the form(s) the package is attached to.
You may want to complete all steps of creating the package (including adding packages, as described below) prior to selecting "Yes", as once the selection is made and terms saved, the package will appear on forms.
2. Setting a package to not active prevents the package from being displayed on a form and under the list of User Packages in User Detail. Use this setting when you:
• want to remove a package from a form (in which case you can simply change to inactive);
• want to create a package to be placed on a particular form at a later date (in which case you would simply change from inactive to active);
• wish to create a package that you don't intend to display on a form, e.g. when creating a package for back-end purposes only - such as for an import of extra, inactive records you wish to import into the system or a "dummy" package for imports to update existing records. Creating such a "dummy" package will allow you to select a package on import (an import requirement) , but the package won't be visible on any front-end forms so no users can subscribe to it.
7. Default Package Status: Select the default package status to be applied to a user's record in ONEcount when they subscribe to this term.

A package status defines that status of a user during the registration/subscription term for a package. Using a qualified print magazine as an example:
- If subscribers must meet certain qualification criteria to receive the print magazine for free, you could assign a default package status of "Pending Review".
- Whenever a user is subscribed to the print magazine, their record will have the package status of "Pending Review" attached to it.
- When you're reviewing the qualifications of new subscribers, you can change the status of those who meet qualification standards to, e.g., "Qualified Subscriber" (using the Bulk Operation feature) and keep them subscribed to the print magazine.
- You can change the status of those who don't qualify to, e.g., "Non-Qualified Digital" and change their subscription to a free digital edition (using the Bulk Operations feature)
Or, if anyone, regardless of qualifications, is eligible to subscribe to a package, upon subscription the status applied may simply be "Current Subscriber".
Default package statuses are assigned here and are the default status to be applied when a user is subscribed to this term. They may be be changed using the Bulk Operation tool to make status and/or package changes, or subscribes. A package status must also be selected when editing a user's subscription(s) in User Detail.
If performing a bulk unsubscribe, there is no option to select a package status, as they only apply to packages a user is subscribed to.
Package Statuses are created in the INVENTORY module under "Package Status". You can create as many statuses as you wish.
Package Status for each product and transaction (if applied) can be seen in the Subscription History section of the User Detail Page. When generating lists using the List Wizard, you can use Package Status to filter subscribers to a package by a specified package status(es).
8. Quantity: Enter a quantity ONLY if your terms and pricing differ based on quantity. Leave blank if quantity is not a factor in terms.*
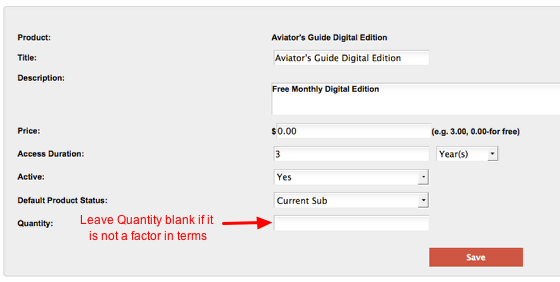
- In the example above, quantity is not a factor. Each subscriber is subscribing to receive one monthly digital edition for free.
- In the example below, quantity is a factor. The subscriber/registrant is purchasing registrations for an event, and the price varies based on the number of registrants: It is $200 per registrant for 1-9 registrants. (Although not shown in this screenshot, a separate term has been created that sets the price at $175 per registrant for 10-20 registrants.)
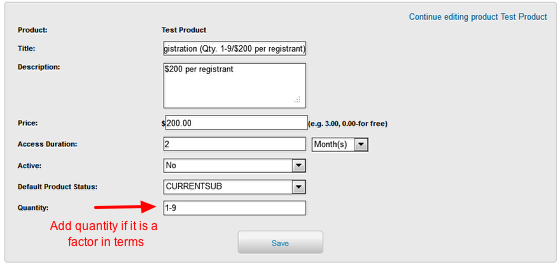
Quantity can be entered as #-# (as above, 1-9) or as #,#,#,#,#... (e.g. 1,2,3,4,5,6,7,8,9).
9. Save: Click the "Save" button to save the term.

To return to the Edit Package window, click on "Continue editing package..." link as shown above. You will see your terms displayed as shown in the screen shot below.
You can then create another term, add a resource (See How to Create a Product - Part 3), or preview the form to see the package on the form. (Click on "Manage Forms" link beside Primary Form drop-down menu for a list of forms. Select the Preview Form icon for the form you wish to preview.)

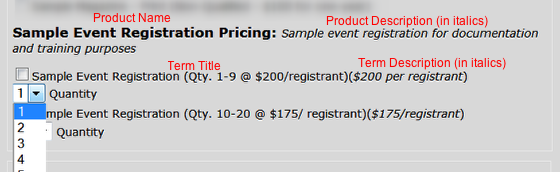
SAMPLE FORM SHOWING PACKAGES AND TERMS
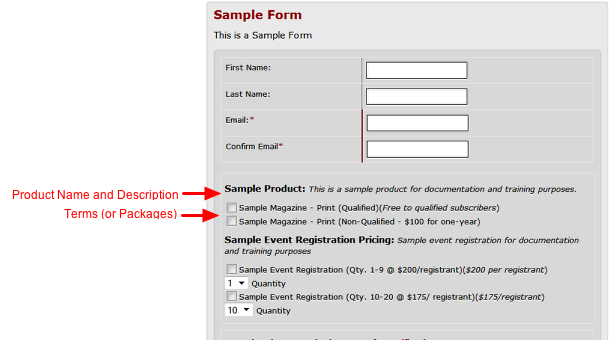
See screen shot below for detail on product / terms display.
Search all Documentation:
Unknown macro: livesearch. Click on this message for details.
Search INVENTORY Documentation:
Unknown macro: pagetreesearch. Click on this message for details.
More INVENTORY Documentation: