Dashboard Reports -- Create Feed Report
Creating a Feed Report allows you to create custom mappings for advertiser-specific reporting, save the feed criteria as jobs, automatically generate specified reports at a set frequency, and automatically upload the reports via ftp.
BECAUSE THESE FEED REPORTS ARE THIRD PARTY-SPECIFIC, YOU WILL NEED TO CREATE QUESTION(DATA FIELD)/REPONSE AND TRANSACTIONAL DATA MAPPINGS PRIOR TO RUNNING THE DASHBOARD AND CREATING THE FEED REPORT.
This mapping is done in the Mapping Builder. See UTILITIES - Mapper documentation for detail on creating mappings.
RUN DASHBOARD
See Run Dashboard documentation for details on how to make selections for dashboard reporting.
CREATE FEED REPORT
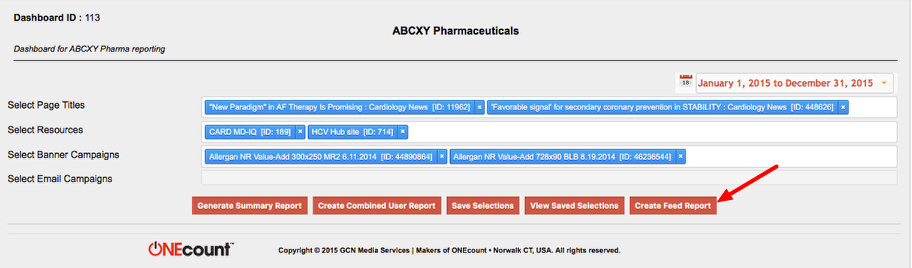
Once you've set the date range and made your selections, click on "Create Feed Report". When you do, a pop-up as shown below will be presented. This is where you'll make your selections for the report.
Note that you will select a time period for the feed report separate than that selected for the dashboard.
Set Feed Criteria
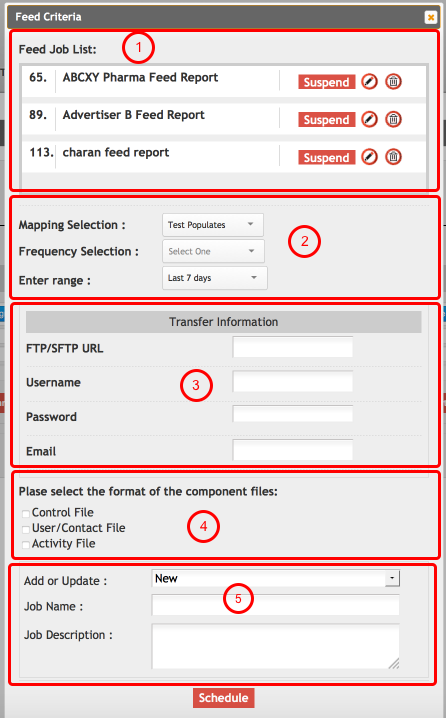
Feed Criteria is in four parts. Detail on each section is provided below.
1. Feed Job List – Listing of existing/scheduled jobs.
2. Mapping and frequency selections and date range for the feed report.
3. FTP/SFTP transfer information
4. Desired format/output of the report.
5. Add or Update Template based on criteria selected.
1 – Feed Job List
All existing Feed Jobs are displayed here. If there are none listed, then none have been created.
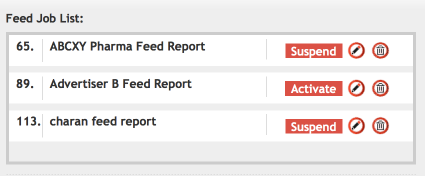
Once a job is created and scheduled, you can Suspend, Edit, or Delete it.
Suspend: This will suspend the job from running. Once a job is suspended, the "Suspend" button will change to "Activate", so you can edit and/or activate it at another time.
Edit: All feed criteria for that job will be pre-populated and you can change the mapping selection and frequency selections, transfer information, report format selections, and name and description of the job in Section 5 shown in the screenshot above. YOU MUST SELECT "Update" in the Add or Update section (Section 5 in screenshot above), or a new job will be created and placed in the queue to run.
Delete: This deletes the job.
Dashboard Reports -- Create Feed ReportTo Create a New JobDashboard Reports -- Create Feed Report:
1. Skip the Feed Job List.
2. Set mapping and frequency selections, and date range.
3. Enter transfer information.
4. Select format(s) for the report.
5. Select "New" in the "Add or Update" drop-down. Give the job a name (required) and description (optional).
6. Click "Schedule".
Further detail on Steps 2-5 is provided below.
2 – Mapping and Frequency Selections and Date Range for the Feed Report
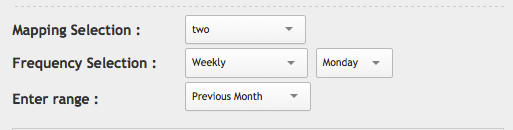
Mapping Selection: Select the data mapping to use for the feed report.*
*Because the feed reports are third party-specific, questions (data fields)/responses and transactional data need to be mapped before running the dashboard and creating the feed report. This mapping is done in the Mapping Builder. See Mapping Builder documentation for detail on creating mappings.
Frequency Selection: Options are Daily, Weekly, Monthly. Daily allows you to select what time of day to run the reports, Weekly allows you to select what day of the week to run, and Monthly allows you to select what day of the month to run the report on. Note that if you select 31 for Monthly, the day run will be the last day of the month if that month doesn't have 31 days (i.e. February, April, June, September, November)
Enter Range: Options are Last 7 Days, Previous Month, and Enter Days. Enter Days = number of days back from current date, e.g. if the date is the 15th and you enter 10, the report contain data for the 10 days prior to the 15th.
3 – Transfer Information
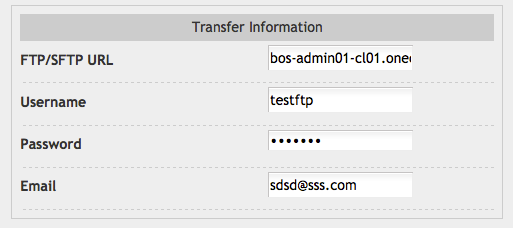
Enter the FTP/SFTP URL and credentials (Username and Password).
Enter the email you want the system to send alert to when upload completed.
4 – Desired Format(s)/Report(s) Output

Control File: Contains file name, number of records, date
User/Contact File: Contains designated demo fields for each record
Activity File: Contains all collected activities (i.e. banner, e-newsletter, web)
5 – Add or Update Job
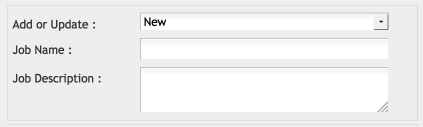
New: After making all selections and completing ftp information, select "New" from the drop-down and enter the name and description of the job. When you click the "Schedule" button, a new job will be created and placed in the queue.
Update: Select "Update" from the drop-down when you are editing an existing job. When you click the "Schedule" button, the job will be updated with any changes you've made and re-placed in the queue.
Schedule

To save the criteria you've selected and schedule the job to run, click the Schedule button. You'll be returned to the Dashboard, and a message indicating the job has been scheduled will be displayed. When you select "Create Feed Report" again, the job will appear in the list of jobs in Section 1 - Feed jobs, described above.
Search all Documentation:
Unknown macro: livesearch. Click on this message for details.
Search Dashboards Documentation:
Unknown macro: pagetreesearch. Click on this message for details.
Click here to expand...