Dashboard Reports - Combined User Report
This report is a breakdown of activity and demographics by individual user for each page, resource, banner campaign, and email campaign within the date range selected. Demographics to include in the report are selected at the time of report generation. This is a horizontal report, with one Known user and all activity for that user – web, banner, and newsletter – per row. So, each Known user from each section of the dashboard – Page, Resource, Ad/Banner, and Newsletter – will appear only once on the report with ALL of their engagement activity.
For example:
If John Smith accessed a particular resource, saw three banner ads, and opened and clicked on two newsletters, his name and demo information will appear once, with all engagement activity for all selections in the dashboard shown displayed in one row. If there were five banner ads selected in the dashboard and he only saw three of them, only the data for those three banners will be included.
You can select to run an Engagement Report that shows each user and all of their engagement or a User Report which only includes selected demographic information for users (and not engagement).
SELECT REPORT CRITERIA
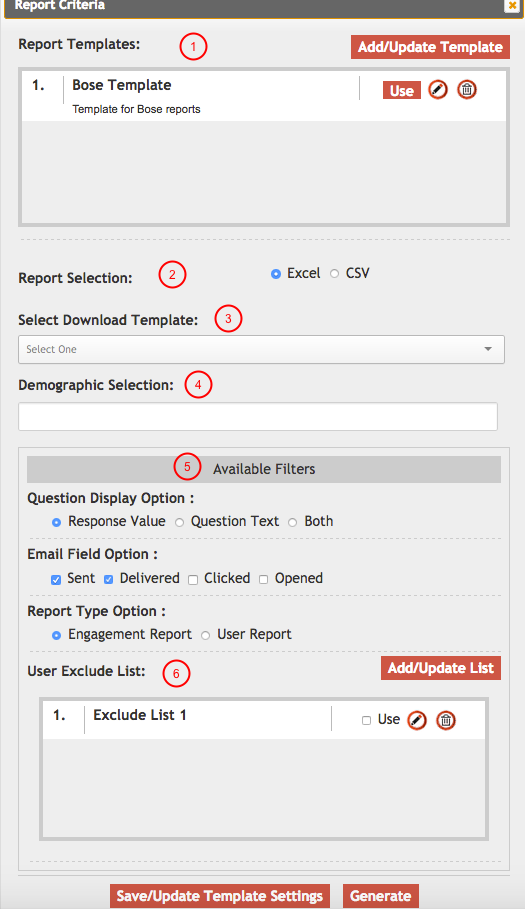
1 - Report Templates – Select an existing template to use and/or update or create a new template.
To create a new template, click on Add/Update Template and the window will expand to include a section to enter New or Update (Select Add), the template name, and description.
So, the process is Add/Update Template > Select "New" from the drop-down > enter template name and description > move on to the sections below to define the criteria, i.e. output format, download template and/or demographics to be included in the report, available filters, exclusion list selection > click Save/Update Template Settings button > click Generate.
To update an existing template, click on the "Use" button for the template, which will populate all criteria with the selections for that template, then select Update from the drop-down, edit the template name and description (optional).
So the process is click on "Use" for the template you wish to update > select "Update" from the drop-down > edit the template name and/or description (optional) > change any criteria selections, i.e. i.e. output format, download template and/or demographics to be included in the report, available filters, exclusion list selection (optional) > click Save/Update Template Settings button > click Generate.
2 – Report Selection -- Select either Excel or CSV output. Excel format will include some standard formatting that CSV doesn't.
3 – Select Download Template (optional) -- Select a download template for demographic selections.
4 – Demographic Selection(optional) -- If using a Download Template, this field will be automatically populated with the demographics included in that template. You have the option of removing or adding demographic selections at this point. If not using a Download Template, make demographic selections here.
5 – Available Filters
- Question Display Option – For demographic selections, select to display only the questoin response value (database value), the question test, or both.
- Email Field Option -- Select what data to display.
- Report Type Option -- Engagement Report: Will include demographic information and engagement activity for all page, resource, banner, and newsletter selections in the dashboard.
- User Report: Will include on demographic information for all page, resource, banner, and newsletter selections in the dashboard.
6 – User Exclude List -- A User Exclude List will exclude defined users from the report, e.g. your internal staff and/or anyone who may be engaging with various content that you don't want to appear on the report.
- Select an existing list to use and/or update or create a new list.
- To create a new list, click on Add/Update List and the window will expand > select "New" > enter list name, description, and user ocids.
- To update an existing list, check the "Use" box for the list you wish to update > click "Add/Update List" > select "Update" > change the list name (optional), description (optional), and add/remove ocids to be excluded (optional) > click Save/Update.
When done with all selections, click Generate. Or, if you wish to Save or Update the Template settings, click Save/Update Settings.
SAMPLE OUTPUT

1
Search all Documentation:
Unknown macro: livesearch. Click on this message for details.
Search Dashboards Documentation:
Unknown macro: pagetreesearch. Click on this message for details.
Click here to expand...