List Wizard - Run Queries and Generate Lists
With the List Wizard you can run from simple to the most complex counts and user lists, matching user demographic data with e-mail or web site response. You can view, export, and save demographic and product reports based upon the the counts/lists generated in the List Wizard.
The following lesson will provide instruction on using the List Wizard to generate counts and export lists.
OPEN THE LIST WIZARD MAIN WINDOW
Select DATA MANAGEMENT from the main menu.
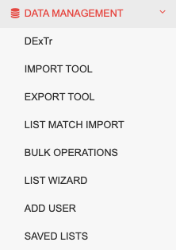
Select List Wizard from the sub-menu.
This will bring you to the List Wizard main window. (See below.)

DEFINITIONS
Definitions are in order that they appear in the List Wizard window. (See screenshot above.)
View Saved Filters - Queries may be saved for later/repeated use. The Saved Query button brings you to a list of all saved queries. (See screenshot below.)
Users - This is a running count of the number of users in a list at any time. This metric excludes any users who have been deleted in your ONEcount database.
Known - This is a running count of known users in the system.
Applied Filters - Filters that have been applied to generate a count/list will appear under the "Applied Filter" heading. In the screenshot above, no filters have been applied. Clicking on the "x" beside an applied filter allows you to clear or edit that individual filter. Clicking on "clear" will clear ALL filter selections.
Available Filters - Filters are used to generate counts/lists based on selected criteria. Available Filters are:
Package Selection
Include in List- Allows you to select users/subscribers based upon what packages they are subscribed to, have renewed, and/or unsubscribed from during a specific date range. These users will be included in the count/list. The selected date range will query on Request Date (Not Transaction Date).
Exclude from List - Further, allows you to filter out those users who subscribed, renewed, or unsubscribed from the same set of packages as selected in Include in List in a different date range. These users will not be included in the count/list.
Exclude Packages - Allows you to filter out users/subscribers to a different set of packages than those selected in Package Selection during a specified date range. These users will not be included in the count/list. The selected date range will query on Request Date (Not Transaction Date).
Package Expiration - Allows you to filter users/subscribers by expiration date for a specified package(s).
Product Selection
Include in List- Allows you to select users/subscribers based upon what products they are subscribed to, and/or unsubscribed from during a specific date range. These users will be included in the count/list. The selected date range will query on Request Date (Not Transaction Date).
Exclude from List - Further, allows you to filter out those users who subscribed, renewed, or unsubscribed from the same set of products as selected in Include in List in a different date range. These users will not be included in the count/list.
Exclude Products - Allows you to filter out users/subscribers to a different set of products than those selected in Product Selection during a specified date range. These users will not be included in the count/list. The selected date range will query on Request Date (Not Transaction Date).
Demographics - Allows you to filter users/subscribers by selecting certain demographic criteria. All of your database fields/questions are available for selection.
Source Codes - Allows you to filter users/subscribers by Source Code. A Source Code is used to track the source of the name/transaction. When assigned to a form it's used to track the form a user/subscriber completed. On import, it can be used to track what list a user came from, or to show which e-mail campaign a user came from. (Further information about Source Codes can be found in Form Manager documentation.)
E-Deliverability - Allows you to filter users/subscribers by e-mail deliverability status (unconfirmed or blacklisted).
Newsletter Activity - Allows you to filter users/subscribers based on their newsletter activity. For example, you can filter users who have (or who have not) opened and/or clicked on a newsletter(s) campaign during a specified date range.
Web Activity - Allows you to filter users/subscribers based on web activity. For example, you can filter users who have viewed a specified web page or section of a site during a specified date range.
Ad Activity - Allows you to filter users/subscribers based on banner views by advertiser. For example, you can filter users who have viewed an ad during a specified date range. Specific ads can be selected by advertiser.
Saved Filters
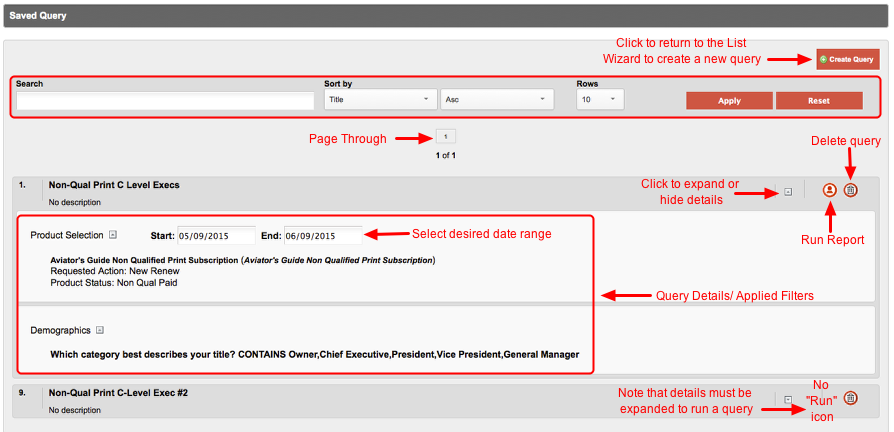
To run a saved query:
- Expand the details by clicking on the "expand/hide" icon to the right of the saved query name. When you do so, the "Run Report" icon will appear, as shown above.
- Be sure to change the dates to fit your desired date range. Start: date defaults to one month prior to the current date and End: date defualts to the current date. **
- Click on the "Run Report" icon.
To delete a saved query:
Click on the "Delete" icon. You'll get a confirmation pop-up asking if you're sure you want to delete the query. Click "OK" to delete and "Cancel" to cancel deletion.
ESSENTIALS
Each filter – Package Selection, Exclude Packages, Product Selection, Exclude Products, Demographics, Source Codes, E-Deliverability, Newsletter Activity, Web Activity, Ad Activity – can be applied independently of or in conjunction with the others.
If you change options in a filter, apply the filter then change the options without moving into another filter, it's considered an update to that filter and the user count will change based on that update.
If you apply a filter, move to another filter and apply it, then go back to the previous one to edit and reapply the filter, the system will act on the results of the first filter and and operations performed in the second filter. e.g. if you select product(s) in Product Selection you'll get a user count for that product. Then, if you go to Demographics and select a demographic(s), you'll get a new count based on product(s) and demographic(s) selected. If you go back to Product Selection and add another product, the system will act on the results of the previous two operations (product selection and demographics).
To clear selections prior to clicking Apply Filter, click the filter button again. (e.g. to clear product selections prior to Apply Filter, click on Product Selection button)
Clicking on the "x" beside each filter allows you to clear or edit that individual filter after clicking on Apply Filter.
If you click on the "x" beside a filter to edit it, the count will change, reflecting the count as if that filter were not yet applied.
Use “Clear” on Applied Filters button (or refresh page) to clear entire query / count. This will clear ALL filter selections
Details of each applied filter can be displayed by clicking on the button, i.e. clicking on "Product Selection" will display details of products selected.
Filters may be used independently or in conjunction with other filters. Applying multiple filters will drill the list down based on the filters applied.
LIST ACTIONS

The list actions shown above are found at the top of the List Wizard window, directly below the list count .
**Apply Filter - Applies filters as they're selected/defined. Must be selected each time a filter is defined, e.g a product or demographic is selected. If you don't click on Apply Filter, the count won't change. You must click "Apply Filter" each time you define a new filter.
Save - Saves a list in the ONEcount system for later use. Saved lists are accessed and used to generate reports for audit or other purposes. Simply give the list a name, description, and select the fields you want to save in the list. If you are saving a list for a 3B audit report, you may want to include the number of Adds and Drops to be added to the 3B report when generated.
Adds = the number of additions to the list in the audit period (Obtain the number by running a list of new subscribers for the audit period date range.)
Drops = the number of drops from the list in the audit period (Obtain the number by running a list of unsubscribes for the audit period date range.)
(See Audit Report documentation for more information on saving lists and generating audit reports.)
Download - Allows you to download a list in Excel .csv format. You select the fields you wish to appear in the report (e.g. product status, source code, request date, transaction date, and demographic information – first name, last name, email, title, etc.). OCID (ONEcount User ID #) is automatically appended to downloaded lists. If a list doesn't include a product selection (e.g. a Web Activity or demographic selection only list) Product Status, Source Code, Request Date, Transaction Date aren't options in fields to download. Whhen you click Download, a box pops up allowing you to select the fields that you would like put in your download file. Click the big box to add fields to the filter; remember that the order in which they appear in this box is the order the fields will be output in your file. All files are exported with the OCID of the user in the first column. This will help you if you later need to import the data back into ONEcount.


On the left, selecting the fields you would like in your download file. On the right, choosing a download template from a saved list.
For information on how to download Transactions, click here.
View - Allows you to create breakout reports by row or by row and column demographic and export them in Excel format. To generate the report, simply select the demographic you want for rows, and if you'd like a row and column breakout, select the column demographic as well. The report will generate in an expandable window where you can view and/or export to Excel format.
Bulk Operations - Allows you to perform batch product changes, status changes, unsubscribes, subscribes, deletes, and merges on a list of records. (See User Operations > Bulk Operations documentation for further details)
Save Query - Allows you to save a query for later/repeated use. All selections, except date range, are saved, and the saved query can be used to run a list at any time.
FILTERS
Product Selection
AND/OR Logic: When selecting products or demographics you can use AND logic or OR logic, or a combination of both through the "Joining Logic" drop-down. For example, you can generate a list of users who are subscribed to Product A AND Product B or who are subscribed to Product A OR Product B. Further, you can select users who are subscribed to Product A AND Product B OR Product C or a list of users who are subscribed to Product A OR Product B AND Product C. The AND/OR logic provides great flexibility in product selection for counts/lists.
When generating a product list, the system looks at the user/subscriber's most recent subscription status (new, renew, or unsubscribed) for a product.
When generating a product count/list, if you don't specify the subscription status for the list (new, renew, unsubscribed) the system will pull users with any of the subscription statuses for the selected product(s) and date range. The subscription status is selected via the "Requested action" pulldown
When generating a product count/list, if you don't specify the product status for the list (e.g., current subscriber, qualified, under review, etc., the system will pull users with any of the product statuses for the selected product(s) and date range. (More detail on product status can be found in the Products section.)
To generate a count/list of all current subscribers to a product(s) within a specified date range, select the product(s), set the start and end date of the date range, and select "New" or "Renew" . The generated count/list will include all users who are New or Renewal subscribers to the selected product(s) as of the end date. If they aren't unsubscribed as of the end date of the time range, they'll be included in the count/list . When selecting multiple products and using OR logic, the count/list will include users who are subscribed to ANY of the products (because they are subscribed to Product A OR Product B OR Product C, etc.). If using AND logic, the count/list will include only users who are subscribed to ALL of the selected products as of the end date of the time range (because they are subscribed to Product A AND Product B AND Product C, etc.).(Not all selected products are shown on the list, as it is a list of users, not products.)
To generate a count/list of users who unsubscribed from a product(s) within a specified date range, select the product(s), set the start and end date of the date range, then "Unsubscribed". The generated count/list will include all users who are currently unsubscribed from the selected product(s). If their subscription status "Unsubscribed" as of the end date of the date range , they will be on the list. When selecting multiple products and using OR logic, the list will include users who have unsubscribed from ANY of the products (because they unsubscribed from Product A OR Product B OR Product C, etc,). If using AND logic, the list will include only users who are unsubscribed to ALL of the selected products as of the end date of the time range (because they unsubscribed from Product A AND Product B AND Product C, etc.). (Not all selected products are shown on the list, as it is a list of users, not products.)
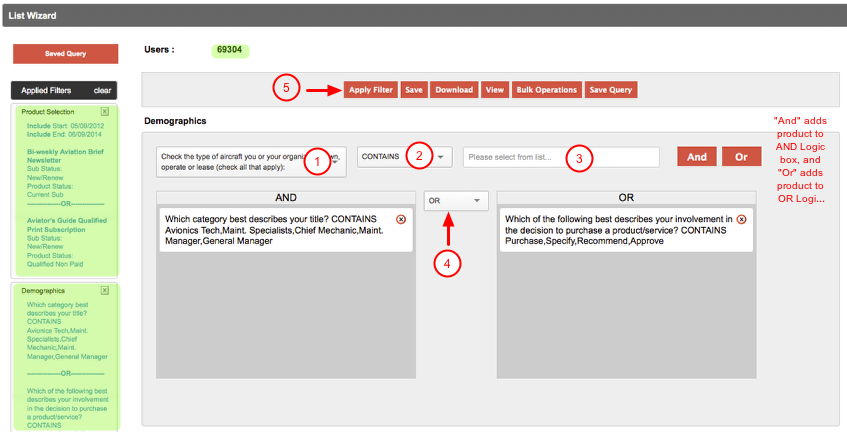
In the screenshot below, the system will generate a count/list that will include those users/records subscribed to either the Bi-weekly Aviation Brief Newsletter OR the Aviator's Guide Qualified Print with a subscription status of "New" or "Renew" and a product status of "Current Sub" or "Qualified Non Paid", respectively, between 05/09/2012 and 06/09/2014.
Products may be moved between the AND logic and OR logic boxes by dragging and dropping.
Include in List
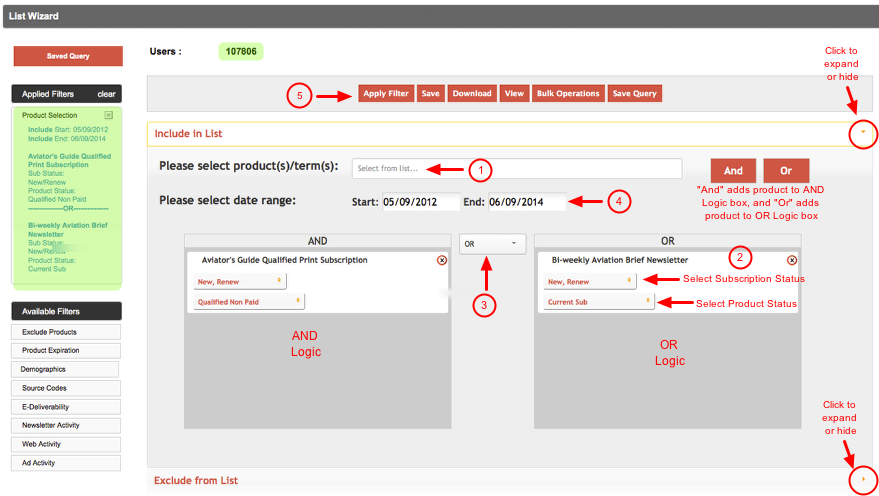
1) Select products by clicking on "Select from list..." to the right of "Please select product(s)/term(s):" This will generate a drop-down list of products/terms to choose from. Once product(s)/term(s) are selected, click on "And" or "Or" button. Selecting multiple products and clicking on AND will place them all in the AND Logic box. Selecting multiple products and clicking on OR will place them all in the OR box. If you select only one product, place it in the AND box. The left-hand selection box is for AND logic: If there are two products in this box, Product A and Product B, and New and Renew is selected for each, the system will search for new and renewal subscribers to Product A AND Product B. If selecting only one product, it should be placed in this box.
2) Select the Subscription Status and Product Status for each product, as indicated in the screenshot above.
3) Set joining logic to AND/OR (if using).
The "AND" box and the "OR" box can be joined by using the drop-down between the two boxes. So, if the "AND" Box (top right) has Product A and Product B and the "OR" Box (bottom right) has Product C, and the drop-down menu is set to OR, the system will search for users subscribed to Product A AND Product B OR to Product C. (Be sure to set the joining logic in the drop-down menu between boxes to AND/OR.)
4) Select the date range.
5) Apply Filter
When the filter is applied, the user count will change and the Product Selection filter will move under Applied Filters. (See count and applied filters highlighted in green. The Product Selection filter has been expanded in the screenshot. Clicking on the X will unapply the filter.)
Note that when "Include in List" is expanded, "Exclude from List" is hidden and vice versa.
Exclude from List
Exclude from List allows you to filter out those users who subscribed, renewed, or unsubscribed from the same set of products as selected in Include in List in a different date range. These users will NOT be included in the count/list.
For example, you want to run a list of all subscribed users in the Include in List example above, which covers the date range between 05/09/2012 and 06/09/2014. However, you DO NOT want to include in the list users who unsubscribed to either of the products any time after 06/09/2014. If you don't include the exclude criteria in Exclude from List, those users who subsequently unsubscribed will be included in the list as they meet all of the criteria in Include in List"
While the interface looks slightly different, Exclude from List AND/OR logic functions in the same way as Include in List. Products can be moved into AND or OR boxes either by checking the checkbox and clicking "AND>>" or 'OR>>" or by dragging and dropping).
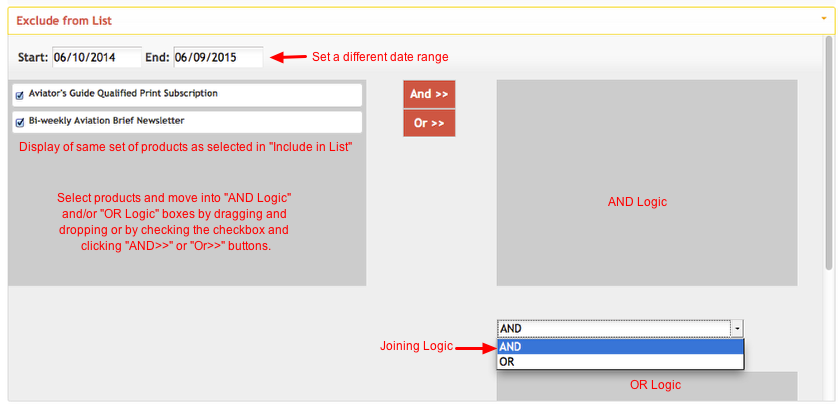
The screenshot below shows the process for setting the criteria to Exclude from List all users who unsubscribed from either product between 06/10/2014 and 06/09/2015.
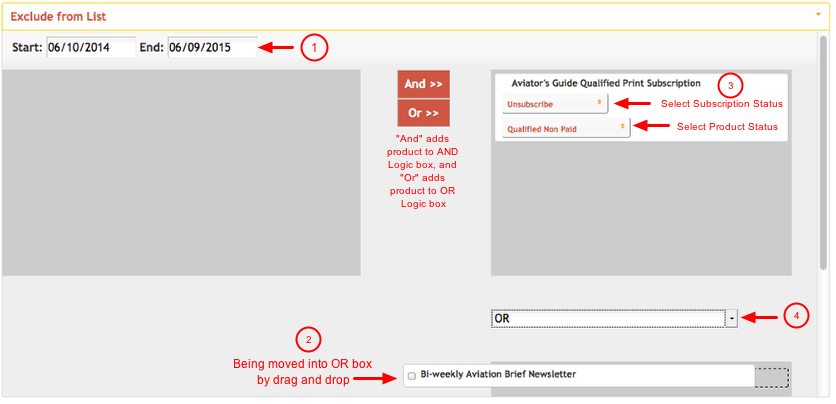
1) Set different date range
2) Select product(s) by moving into AND or OR boxes (either by checking the checkbox or dragging and dropping).
3) Select subscription status and product status for each product. (Note that in the example above, the Print Subscription subscription status is set to "Unsubscribe" rather than "New, Renew".)
4) Set joining logic.
Exclude Products
This filter serves the same function as "Exclude from List" i.e. you can select to exclude users with a specified subscription status for a product(s) during a specified time period from a list. However, Exclude Products allows you to select different product(s) and date range than those selected in Exclude from List. The interface is the same as that in Include in List.
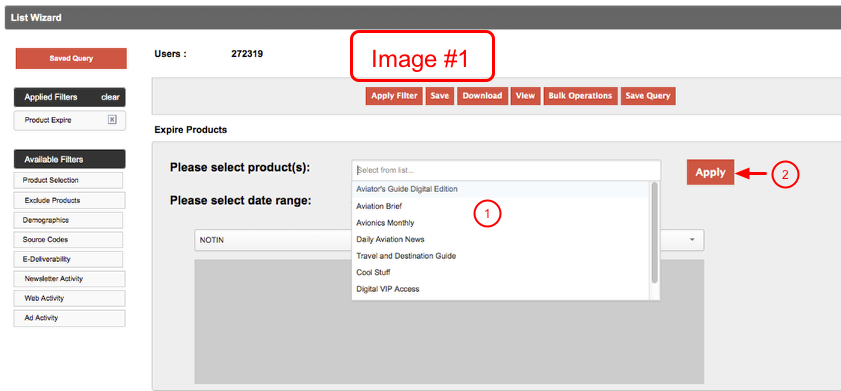
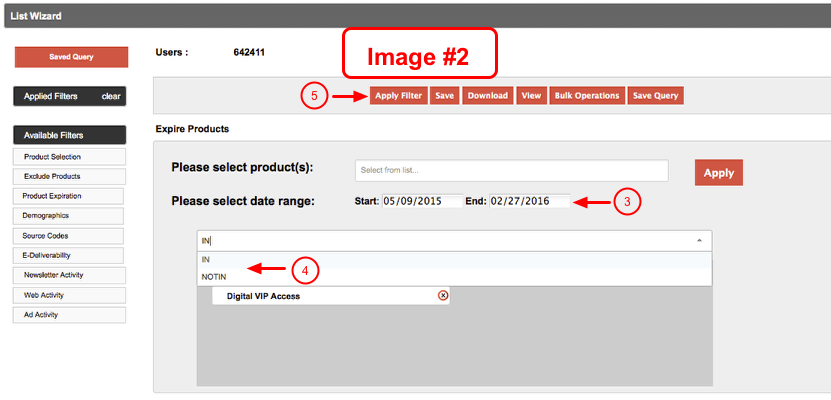
Package Expire
This filter allows you to select a package and date range that subscriptions expired/will expire within, i.e. you can select the package and date range and the system will include in the list all users subscribed to that package whose subscription will expire within that date range. You can also select to run a query of those users who are NOT subscribed to a package that will expire within a specified range.
To use the Package Expire filter:
1) Select the package(s) from the drop-down list. (Image #1)
2) Click the "Apply" button. (Image #1)
This will move the package into the active package(s) box, as shown in Image #2.
3) Select the expiration date range. (Image #2)
4) Select "IN" or "NOT IN". (IN will pull in all users who ARE subscribed to the package and whose subscription will expire within the date range; NOT IN will pull in all users who are subscribed to the package but whose subscription will not expire within the date range.) (Image #2)
5) Apply Filter. (Image #2)
Demographics
AND/OR Logic functions the same way as it does for Product Selection: When selecting demographics, you can use AND logic or OR logic, or a combination of both through the "Joining Logic" drop-down. The AND/OR logic provides great flexibility in demographic selection for counts/lists.
Demographic selection includes all demographic questions/fields you have created in the Form Manager. If you have many questions, you can click in the demographic selection drop-down menu and start typing in the demographic question/field name to find it quickly.
If you generate a count/list using only the Demographics filter (or it in combination with other filters that don't include a product selection) the Request Date and Product Status fields cannot be selected for inclusion in a download of the list . For example, you may wish to generate a count/list of all subscribers/users who are Certified Nurses and who live in the United States, without filtering them by what product they may or may not be subscribed to. In such a list, the Request Date and Product Status fields won't be available to include in the .csv download, as they relate directly to product subscribes/unsubscribes.
In the screenshot below, the demographic filter will pull only those users who have a title of Avionics Tech or Maint. Specialists or Chief Mechanic or Maint. Manager or General Manager OR whose involvement in decisions to purchase products/services contains Purchase or Specify or Recommend or Approve. **
(If multiple responses are selected for one demographic question, e.g. in the example above (CONTAINS Avionics Tech, Maint. Specialists, Chief Mechanic, etc.) the responses themselves use OR logic, even if placed in the AND Logic box.
AND/OR Logic works the same way as it does in Product Selection.
1) Select demographic question using the drop-down menu.
2) Select operator/variable (CONTAINS, DOES NOT CONTAIN, IS, IS NOT, BEGINS WITH, ENDS WITH, IN, CONTAINS IN) using the drop-down menu.
2) If a radio button-type, select-type, or checkbox-type question, select response(s) from the drop-down menu. (Clicking in the response field will bring up the list of possible response values.) Type in the response for text-type questions. Selecting multiple responses and clicking on AND will place them all in the AND Logic box. Selecting multiple responses and clicking on OR will place them all in the OR box. If selecting only one demographic, place it in the AND box. Note that if multiple responses are selected for one demographic question, e.g. in the example above (CONTAINS Avionics Tech, Maint. Specialists, Chief Mechanic, etc.) the responses themselves use OR logic, even if placed in the AND Logic box.
- "CONTAINS" will do wild card search only the single value entered in the text box for "text-type questions". For radio button-type, select-type, or checkbox-type question, select the values from the drop down list.
- "DOES NOT CONTAIN" will return all the records which doesn't contain the entered text or selected responses.
- "IS" will search for the exact value entered in the text box and return those records.
- "IS NOT" will return all the values in the system which are not matching the entered value.
- "BEGINS WITH" will return all the records whose value begins with the entered text.
- "ENDS WITH" will return all the records whose value ends with the entered text.
- "IN" is for text-type questions and accept the values in comma separated format. It is search for the exact values entered and returns the matched records.
- "CONTAINS IN" is for text-type questions and accept the values in comma separated format. It will do wild card search for each value entered in the database and returns the matched results.
3) Set JOINING logic to AND/OR.
4) Apply Filter.
When the filter is applied, the user count will change and the Demographics filter will move under Applied Filters. (See count and applied filters highlighted in green. Note that both filters have been expanded in the screenshot above. To hide, simply click on the title of the filter, e.g. "Product Selection" or "Demographics". (Clicking on the X will unapply the filter.)
Note regarding queries on blank fields:
To get a count of all users who have NO information (a blank) in a designated demographic field:
1) Select the demographic field using the drop-down menu.
2) Select CONTAINS or IS from the operator drop-down menu.
3) Leave the response blank, i.e. don't select a response.
To get a count of all users who have ANY response in a designated demographic field:
1) Select the demographic field using the drop-down menu.
2) Select IS NOT from the operator drop-down menu
3) Leave the response blank, i.e. don't select a response.
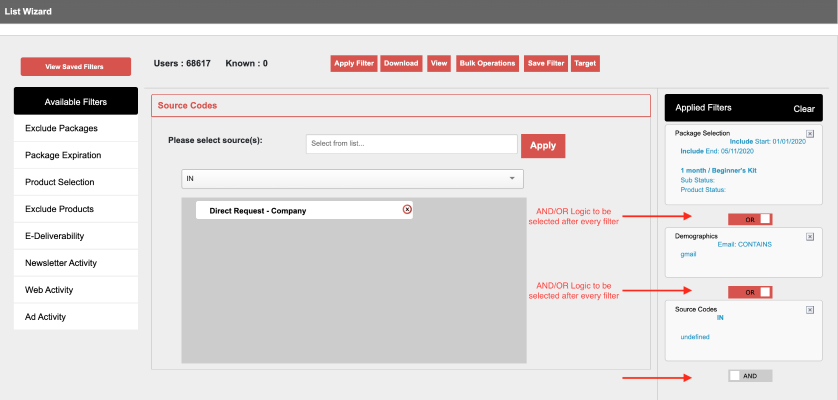
Source Codes
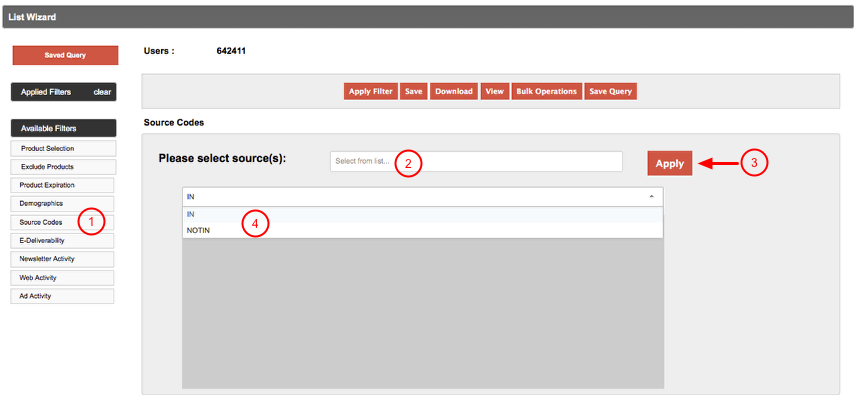
This filter allows you to include or exclude users based on source code(s). A source code is associated with a record when the code is assigned to an online form that the user/subscriber submits, assigned to an imported list, appended to a URL link, or appended to a smartlink in an email blast. (More detail on Source Codes can be found in the Form Manager section.) You can select to run a count/query based on users who have a specified source code(s) associated with their record or based on users who don't have a specified source code(s) associated with their record. Source Codes are selected the same way that products are selected (see above).
To generate a count/query:
1) Select Source Codes filter.
2) Select the source code(s) fro mthe drop-down list. Clicking in the "Select from list..." field will bring up a drop-down menu of source codes.
3) Click "Apply".
4) Select "IN" or "NOT IN" from the drop-down. IN will generate a count/list of users who have a specified source code(s) associated with their record and NOT IN will generate a count/list of users who DO NOT have a specified source code associated with their record.
5) Apply filter.
If you generate a count/list using only the Source Codes filter (or it in combination with other filters that don't include a product selection) the Request Date and Product Status fields cannot be selected for inclusion in a download of the list. For example, you may wish to generate a count/list of all subscribers/users who have a certain source code(s) associated with their record, without filtering them by what product they may or may not be subscribed to. In such a list, the Request Date and Product Status fields won't be available to include in the .csv download, as they relate directly to product subscribes/unsubscribes.
Note: If you run a list using the Source Code filter and download that list, the Source Code you selected may not be displayed in the output. Because the system tracks and keeps all source codes associated with a record, If another, more recent code has been applied to the record, that code will be displayed in the output.
E-Deliverability
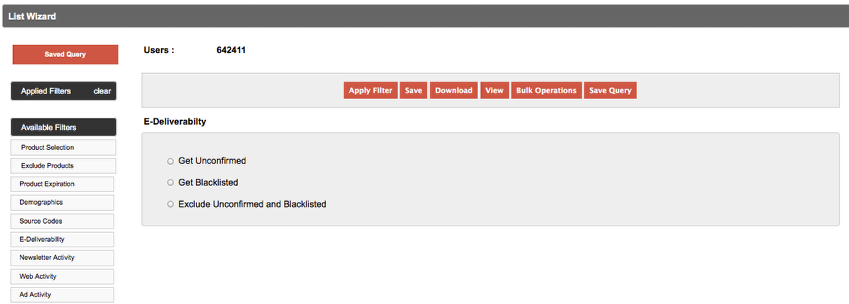
This filter allows you to include or exclude users based on e-deliverability status: Get Unconfirmed, Get Blacklisted, Exclude Unconfirmed and Blacklisted.
If you generate a count/list using onlythe E-Deliverability filter (or it in combination with other filters that don't include a product selection) the Request Date and Product Status fields cannot be selected for inclusion in a download of the list. For example, you may wish to generate a count/list of all blacklisted users, without filtering them by what product(s) they may or may not be subscribed to. In such a ist the Request Date and Product Status fields won't be available to include in the .csv download, as they relate directly to product subscribes/unsubscribes.
Newsletter Activity
The Newsletter Activity filter allows you to filter counts/lists based on user views and/or opens of specified newsletter campaigns. You can select one or multiple newsletter lists and one or multiple campaigns during a specified date range and get a count of users who opened the campaign(s) and/or clicked on a link. (More specific information on exactly what links were clicked on can be obtained using the Newsletter Analytics in the Analytics module. )
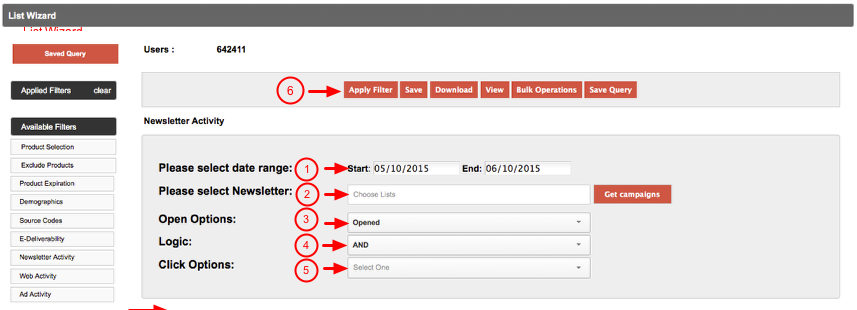
1) Select the date range.
2) Use the drop-down menu of e-newsletters to select a newsletter(s) – click where it says "Choose Lists" to bring up the drop-down menu – then click "Get campaigns" button. This will load a list of all newsletter campaigns sent during the specified date range.
3) Select the OpenOptions (Opened or Not Opened)
4) Select the joining logic AND or OR.
5) Select Click Options (Clicked, Not Clicked, or neither).
6) Select the newsletter campaigns you wish to filter by.
6) Click Apply Filter.
When the filter is applied, the user count will change and the Newsletter Activity filter will move under Applied Filters. (See count and applied filters highlighted in green. Clicking on the X beside the filter name, e.g. Newsletter Activity, will unapply the filter.)
The screenshot below shows the count for users who have Opened AND Clicked on Campaigns #2810, #2707, #2611, or #2279 in Daily Aviation News or Daily Aviation Brief newsletters during the date range of 02/01/2015 - 02/14/2015.
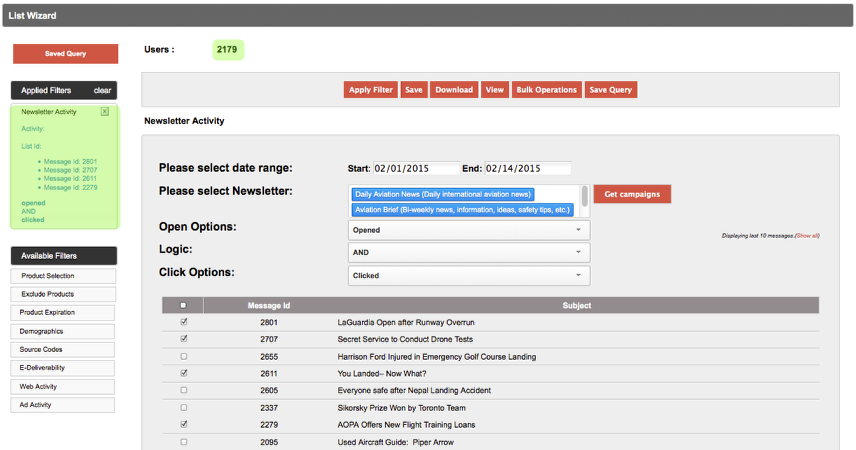
NOTE: The campaign list appear only on the selected date. Which is identified by campaign sent date when Get campaign button is clicked.
Web Activity
The Web Activity filter allows you to run counts/lists of users who have viewed a web page or section of your site(s) during a specified date range. You can select one or multiple pages/sections of a site and use AND/OR logic narrow down the count/list. To get a count of users who have viewed ANY page on your site(s), simply enter the domain, e.g. aviatorsguide.com.
In the screenshot below, the system has filtered all users who visited "... .com/md-iq-quizzes.html OR "... .com/md-iq-quizzes.html. These are the pages with the MD-IQ Quizzes on the respective website. (Note that "... .com/md-iq-quizzes.html" is in the "Section:" box, indicating that it hasn't yet been selected by clicking on either "And" or "Or".)
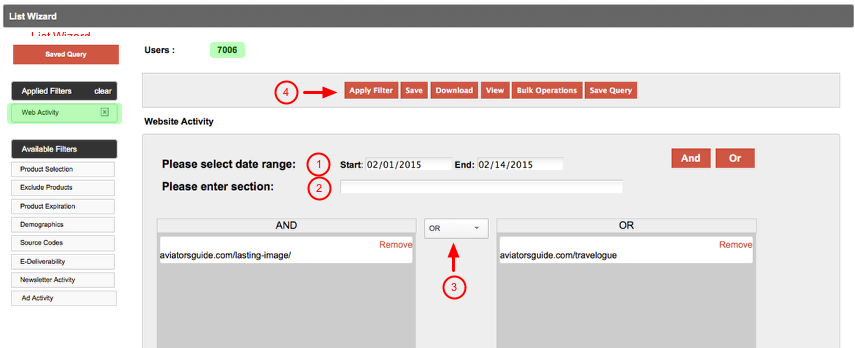
1) Select the date range.
2) Enter the path of the section of the site and click on "And" or "Or". Clicking on "And" will place the path in the AND Logic box. Entering the path to additional section(s) and clicking on "Or" will place them in the OR box. If selecting only one section, click on "And" to place in the AND box.
3) Set JOINING logic to AND/OR.
4) Apply Filter.
For a protected section, you only need to enter the part of the URL that every page in that section has in common. For example, if you enter /views in the "Section:" field, the system will generate statistics for every page that has "/views" as part of its URL.
Note: entering a period (.) in the "Section:" text box will pull data for ALL resources, including ALL protected web pages.
When the filter is applied, the user count will change and the Web Activity filter will move under Applied Filters. (See count and applied filters highlighted in green. Note that the Web Activity filter hasn't been expanded in the screenshot above. To expand, simply click on the filter button. Clicking on the X will unapply the filter.)
Ad Activity
Using Ad Activity allows you to filter users who have viewed specific banners. You can select one or multiple advertisers then select specific banners to generate a count/list of users who have viewed them during a specified time period.
In the screenshot below, the count is showing the number of users own, operate, or lease specified types of aircraft and who have viewed banner ads #1000000000 and #10000000002 from Cirrus Design Corp and Cessna, respectively.
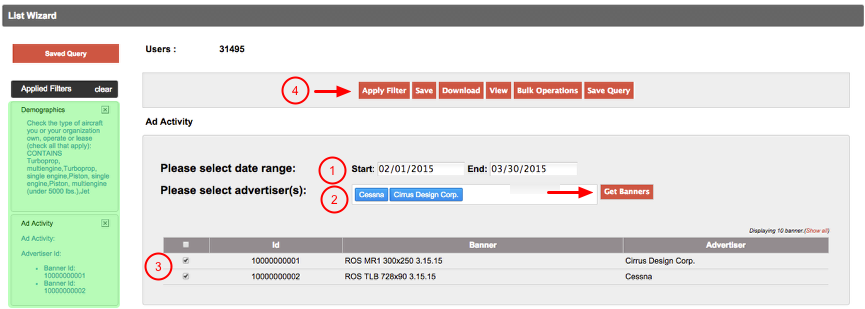
1) Set the date range.
2) Select the Advertiser(s) from the drop-down menu – click where it says "Choose Advertiser(s)" to bring up the drop-down menu – then click "Get Banners". This will generate a list of banner ads run by that advertiser in the specified date range.
3) Select the banner ads you wish to filter by.
4) Apply Filter.
When the filter is applied, the user count will change and the Ad Activity filter will move under Applied Filters. (See count and applied filters highlighted in green. Note that the applied Web Activity filter has been expanded in the screenshot above, showing the advertiser and selected banner ads. Clicking on the X will unapply the filter.)
AND/OR Logic between Filters:
In between the filters, AND/OR logic can be applied. The default is AND which does a AND operation between the applied filters. For OR operation, toggle button has to be clicked.
IMPORTANT NOTE 1:
_In order to identify users and track activity, widgets must be embedded on every page of your web site . _
These widgets, specific to your site(s), and directions for placement are provided in the Widget Builder_. _
See Widget Implementation __documentation for more detail on widgets.
See Smartlinks and Other Form Linkouts_ documentation for more detail on Smartlinks._
IMPORTANT NOTE 2:
_If using the ONEcount Email Engine, deleting a user subscribed to an email/newsletter list(s) deletes the user in the ONEcount database and removes the user from the list in the Email Engine. _
Historical statistics for deleted users (e.g. opens, clicks) are retained in the database, so when running newsletter statistics those historical actions will remain in the counts. If users have been deleted, those users who have been deleted are no longer known to the system, so although their past actions (clicks, opens) will be included in analytics counts, the user won't be included in the List Wizard known user count.
If using MagnetMail , ExactTarget, Silverpop, connected to ONEcount via API, deleting a user subscribed to an email/newsltter list(s) will delete the user in ONEcount and automatically move the user to a suppression list in your ESP.
Failed to execute the [panel] macro. Cause: [Missing macro content: this macro requires content (a body)]. Click on this message for details.
On this page:
More LISTS AND REPORTS