ONEmail
Sending a campaign is the central feature within the ONEmail. A campaign message is a single email message event sent to the members (subscribers) of one or more lists. A single message can only be sent to any subscriber once. In other words, if an administrator sends the same message to multiple lists (which share the same subscribers), each subscriber in these lists would only get that message once.
Sending a campaign can be initiated in a variety of ways. First and foremost, it can be accessed through the Email Engine Dashboard, within the “Main” functionality section.
ALL LIST ADDITIONS, SUBSCRIPTIONS/RENEWALS/UNSUBSCRIBES, USER DELETIONS, AND ANALYTICS SHOULD BE CARRIED OUT USING THE APPROPRIATE MODULE/TOOL IN ONECOUNT AND NOT WITHIN THE EMAIL ENGINE.
THE ONEcount EMAIL ENGINE SHOULD ONLY BE USED TO CREATE AND SEND CAMPAIGN MESSAGES. IF YOUR SYSTEM IS CONFIGURED TO USE AN API FOR MAGNETMAIL/HIGHER LOGIC, POSTUP, EXACT TARGET, SILVERPOP, OR ANY OTHER ESP USE THOSE SYSTEMS TO CREATE AND SEND CAMPAIGNS.
OPENING THE ONEMAIL EMAIL ENGINE
Select ACTIVATION from the main menu.
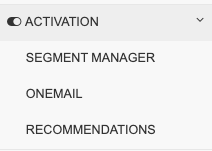
Select ONEmail from the sub-menu.

This will open ONEmail. From the menu on the left, click Campaigns, then Send A Message. You will see a list of Draft campaigns that are waiting to be queued up for sending. You can view all campaigns by clicking on List of Campaigns from the menu on the left. It will show Draft campaigns, Active campaigns, which are those that have been queued and are either being sent or waiting to be sent, and Sent campaigns.
First, let's send a campaign. Click Start a new Campaign in the upper right-hand corner.

CREATE A CAMPAIGN
The campaign creation screen is where you build the contents of your message. Enter the Subject for your campaign, then the "From line:" The From Line has two parts: the first is the e-mail address you campaign will appear to come from, the second is the "Name" that will appear in someone's mailbox as the sender of the message. In the example below, the message will appear to be sent by joanne@one-count.com, and the name that will appear in the recipient's e-mail is "Joanne Persico/ONEcount." The format of the line is email<SPACE>name.
Please note that while you can put pretty much anything you want in the name field, the e-mail address must come from a domain or subdomain that has been configured for use with ONEmail. This is because your e-mail will need to be digitally signed using a Domain Key (DKIM). This key is established in your company's DNS servers and must match the domain in the e-mail address you are sending from. If you are not sure what e-mail to use, contact your ONEcount support team or file a ticket in our help desk.
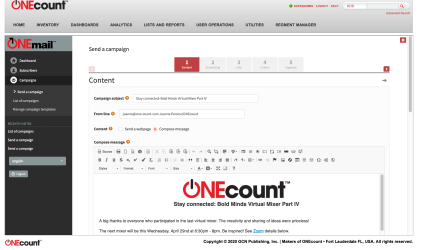
The third line on the content creation screen determines whether you will compose a message in ONEmail's campaign-builder interface, or whether you plan to send a web page.
ONEmail has a powerful feature that allows it to scrape a web page off of your web site and send it as a mail message. Any variable substitution (ie., macros) that you use in ONEmail can be embedded in the page and will be handled properly. Simply click the "Send a webpage button" and then enter the full URL of the page you are planning to send in the box that appears below.
If you would like ONEmail to scrape or pull the subject for your campaign from the HTML page, you can configure a meta tag in the HTML page to hold the campaign subject. Just use the following in the HTML page being pulled in:
<meta name="subject" content="THIS IS MY CAMPAIGN SUBJECT">
If you would like to build the message using ONEmail's full, Rich Text Editor, chose "Compose Message."
**IMPORTANT NOTE: ONEmail will not send a web page, either as part of a scheduled campaign or as a test, if it can not fetch the page. Sometimes customers report problems with sending pages that are gated; other times, the page is down or not yet built. In these circumstances, ONEmail will not send the campaign. If you are sending a test message, it will report "Can't send test message." If you are having problems testing or send a campaign with a fetched URL, double-check the URL from a browser to ensure it is available from the web.
**IMPORTANT NOTE: ONEmail is a multi-threaded campaign sending engine. In order to fetch a web page, ONEmail will fetch a copy of the web page for each thread and cache it for the lifetime of that thread. Most customers are configured to run up to 100 simultaneous threads. Some customers with high volumes will be set up for 200, 300 or 500 simultaneous threads. This means that your web server could see up to 500 requests for the same page coming from one or two of our IP addresses. Some customers have firewall systems that will block more than a handful of requests from a single IP during a certain period of time. If you anticipate problems sending campaigns in this configuration, please contact support so that we can provide you with our IP address block for whitelisting on your web servers.
**IMPORTANT NOTE: Because inline images are not universally available across all e-mail clients, ONEmail will not allow you to send a campaign that uses inline images. If you have created the campaign in a third-party platform and ONEmail is complaining about an image link, please review the link for the following:
<img alt="Footer Logo" border="0" height="36" src="https://s3-us-west-2.amazonaws.com/images/logo_footer.png " style="display: inline-block; margin: 0; padding: 0; border: none;" width="99" />
OR
<img align="center" alt="" class="mcnImage" src="https://usercontent.com/images/bc81a390-f766-4fd2-951a.png" style="max-width:600px; padding-bottom: 0; display: inline !important; vertical-align: bottom;" width="485.04" />
CHANGE THE display: setting to:
display: block;

When you have finished editing your campaign, you'll want to test it to see how it looks, make sure all of the links work, etc. Simply put your e-mail address or the address you would like to receive the test mail into the box, and hit Send test.
If the e-mail you entered is not already in the database, ONEmail will tell you and give you the opportunity to add the address to your ONEmail database. Click Add and then hit Send test again. You will receive a copy of your campaign at the address you submitted.
You should try to validate your message not only with your own eyes, but with one of the excellent, third-party validation platforms out there. One such platform, mail-tester.com, is very easy to use and costs just a few dollars a month. To try it, simply go to https://www.mail-tester.com/. You will see a page with a randomly-generated e-mail address and a button to test the campaign. Copy the randomly-generated e-mail into the "Send test" field above, add it to your list, and send a test.
You can then go back to https://mail-tester.com and run the test. It will show you a lot of valuable information about your message, and provide tips on getting the best-possible inbox placement.
Once you are satisfied with the content of your message, it is time to schedule your e-mail. Click on Tab #2, Scheduling and then you can set up your campaign.
The first option is the Embargo time. This is essentially when your campaign is scheduled to go out. ONEmail will start sending the campaign at the Embargo time (give or take five minutes) and it will stop sending once the campaign is done, or when it reaches the "Stop sending after" time.
This last option is useful in cases where you send a campaign out a short time before an event (say an hour or two) and you want it to stop sending once the event is scheduled to start.

You'll see two other options on this page that you might not be familiar with: Repeat and Requeue. These two options are confusing, yet powerful, so let's discuss both:
Repeat campaign every: This option creates a new campaign on an interval and sends it to your subscriber list automatically. is useful for regular newsletters that are fed dynamically from a Content Management System. If you are using the "Send a web page" option for your content, you can set up your web site CMS to dynamically create your newsletters for you according to rules in your CMS, on whatever schedule you wish. Repeating the campaign means that ONEmail will send the first newsletter the scheduled (ie., embargoed) time, then create a new campaign every hour/day/month/year fetching the same URL and sending it to the same group of people. Using this option, you can create a Monday Morning Newsletter template in your CMS, and have ONEmail automatically create a new campaign every Monday using that URL and send it to the same subscriber list. This completely automates the sending of routine campaigns.
Requeue every: This option allows you to send the same campaign to the list repeatedly, except that no user will get the message twice. This is useful if you want new subscribers to a list to get the campaign even if it is sent after they joined the list. A typical use would be if you have a welcome newsletter for subscribers to your site, and you users to get the message when they sign up.
So remember: repeat sends a new campaign, requeue sends the same campaign.
Next, click on tab #3, lists. If you have a lot of lists, you will see tabs across the list panel, with your lists divided up among the different tabs. CLick on a tab, then click the checkbox next to the list(s) you would like to send the campaign to. If you would like to use a suppression list (like a marketing opt-out list), click on the link where it says, "Please seledt the lists you want to exclude from this campaign" and you will see all of your lists there as well.

Panel #5 is not required, but allows you to segment your campaign based on prior campaign activity. From the pull-down on the left, choose the activity you would like to segment on. Here we've chosen Campaign activity. From the next tab, you can choose the type of engagement (opened/clicked/did not open/did not click, etc), and then from the third pull-down, you'll see a list of prior campaigns.
This allows you to send THIS campaign to people on your list who did not open or did not click on a prior campaign sent to the same list. You can add multiple segmentation rules, and determine whether to send it to users who meet all or any of the criteria below.


Finally, click tab #6, Finish. If you would like to receive notifications when your campaign starts and ends, put your e-mail into the boxes below. You can include multiple e-mail addresses separated by a comma. There is an option to add a Google tracking code to all of the links in your message. If you would like to do this, have your ONEcount support specialist add the GA tag to your ONEmail install.
Reset Click Statistics: Selecting this action clears existing click and open statistics for this campaign.
For example, if you have been sending test messages and have clicked the links, the database might have some statistics that you will want to clear before formally sending the campaign message to your subscribers.
Make sure not to select this once your main campaign has started or else you risk clearing statistics from real subscribers.
Click "Place Campaign in Queue for Sending" and your campaign will be queued for delivery. The queue processor runs every five minutes, so your message should start sending within a few minutes of its schedule or embargo time.

CAMPAIGN PERSONALIZATION
ONEmail can personalize messages using special markers or "placeholders." When you enter a place-holder in your message, ONEmail will replace that placeholder with the value of that field for that user. For example, the placeholder [ EMAIL ] is equivalent to a user's e-mail address. So when you send a campaign and include the placeholder [ EMAIL ] in the campagin, this placeholder will be replaced with the email address of each user the campaign is being sent to.
When you set up your ONEmail install, you defined which demographic fields would be available as placeholders in ONEmail. These typically include [ FNAME ] for a user's first-name, [ LNAME ] for a user's last-name, and [ COMPANY ] for the user's company name.
Other placeholders that the system recognizes include:
[ OCID ]: This is the OCID of the user receiving the e-mail
[ EMAIL ]: This is the e-mail address of the user receiving the e-mail
[ FORWARDURL ]: This will create a unique link in the campaign that a user can use to FORWARD the message to another user
[VIEWBROWSER]: This will create a unique link that allows the user to view the campaign through a web browser.
When sending a campaign, be sure to include a link to your e-mail preferences form, or include a one-click opt-out link so that user's can unsubscribe from the messages you are sending. One simple way to do this is using the one-click opt-out feature of ONEcount, which is described here.
Search all Documentation:
Unknown macro: livesearch. Click on this message for details.
Search System UTILITIES:
Unknown macro: pagetreesearch. Click on this message for details.
More System UTILITIES