Utilities - Backend Users and Permissions
Creating backend users and assigning permissions is as simple as creating login credentials and assigning permissions for each module.
OPENING THE NEW USER WINDOW
Select SETUP from the main menu.

Select BACKEND USERS from the sub-menu.

This will open the Manage Users window, as shown below.
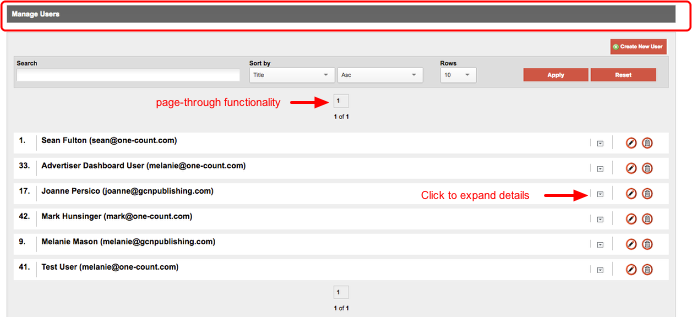
Note the search and page-through functionality at the top of the page.
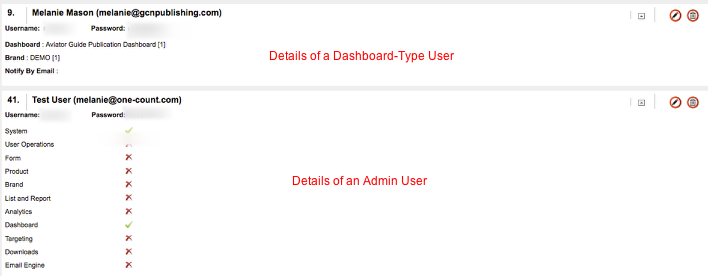
Clicking on the Expand icon will expand details of a user's credentials, as shown below.
CREATE A NEW BACKEND USER
Click "+Create New User" button.

This will open the Edit User window, as shown below.
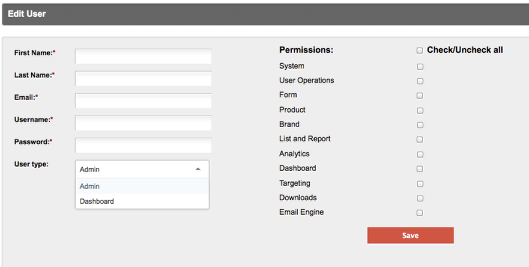
Note that there are two different User Types: Admin and Dashboard
Admin Users
- Admin users have access to the backend of ONEcount and can be granted permissions on a function-by-function basis. Admin is the default user type.
- Note that if granted Dashboard permissions, Admin users have unrestricted access to dashboards without ONEocunt.
Dashboard Users
- Dashboard users are restricted to running the analytics dashboard assigned to them.
- They cannot create, edit, or manage dashboards-- those tasks can only be performed by an Admin user with Dashboard permissions.
- Upon login, dashboard-type users will only see their dashboard in the Brand look and feel assigned with their permissions. They have no access to any other dashboards or ONEcount functionality.
- They can only view and download user data as specified in the Dashboard--this allows you to control what user data a dashboard-type user has access to.
See Dashboard documentation for more details on creating and managing analytics dashboards.
Admin-Type User
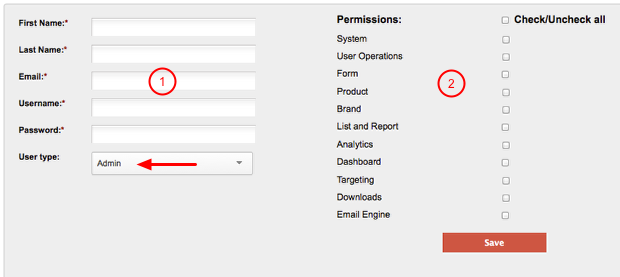
Be sure that the user type is set to Admin (the default user type).
1 – Enter the backend user's first name, last name, email, username, and password.
2 – Set permissions for each module. Note that a user may be granted permission to run lists/reports but not to download them. By not checking "Download", the user will not be allowed to download lists/reports.
Permissions:
System – All system-related functions under UTILITIES
Includes: Job List, Backend Users, Config Manager, BE Activity Log, IVT Mitigator, Widget Builder, Mapper
Excludes: QR Codes, Email Engine, Action Manager, Target Engine
*User Operations * – All USER OPERATONS: Import, Bulk Operation, Add Audience
Form – Form-related tasks under INVENTORY and QR Codes tool in UTILITIES
Includes: Questions, Forms, Source Codes, QR Codes
Excludes: Products, Brand, Resources, Promo Codes, Product Status
Product – Product-related tasks under INVENTORY
Includes: Products, Resources, Promo Codes, Product Status, Source Codes
Excludes: Questions, Forms, Brand
Brand – Brand tool under INVENTORY
List and Report – All functions under LISTS AND REPORTS, including download of lists
Analytics – All tools in the ANALYTICS module, excluding download of lists – download permission must be granted separately
Dashboard – Dashboard tool, excluding download of lists/reports – download permission must be granted separately
Targeting – Permission to use the Target Engine and Action Manager in the UTILITIES module
Download – Permission to download lists/reports in all modules, including Analytics and Dashboard
Email Engine – Can use all tools to create and send emails in the ONEcount Email Engine
Dashboard-Type User

- Dashboard-type users are restricted to running the analytics dashboard assigned to them. You can create dashboard-type accounts for your sales people, for specific advertisers, etc.
- Dashboard-type users cannot create, edit, or manage dashboards-- those tasks can only be performed by an Admin user with Dashboard permissions.
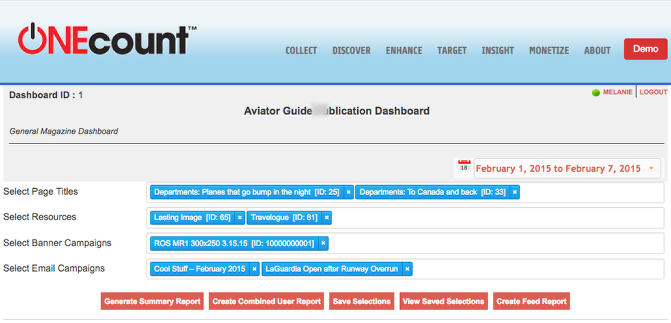
- Upon login, dashboard-type users will only see their dashboard in the Brand look and feel assigned with their permissions. They have no access to any other dashboards or ONEcount functionality. (See screenshot below.)
- They can only view and download user data as specified in the Dashboard--this allows you to control what user data a dashboard-type user has access to
See Dashboard documentation for more details on creating and managing analytics dashboards.
To create a Dahsboard-type user, be sure the User Type is set to Dashboard.
1 – Enter the backend user's first name, last name, email, username, and password.
2 – Set the User type to Dashboard.
3 – Select which dashboard to grant access to from the drop-down menu. (See Dashboard documentation for details on creating and managing analytics dashboards.)
4 – Select the Brand look and feel in which to display the dashboard. (See Brands documentation for details on creating and managing brands.)
5 – Select On/Off for Notify By Email. (See below.)
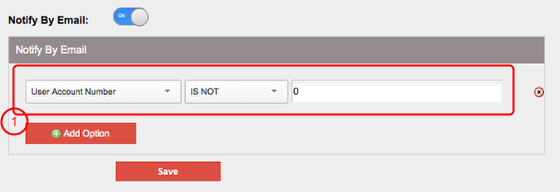
When "Notify By Email" is sent to "ON", email notifications of resource views will be sent to the email address specified.
- To see views by all users, set "User Account Number" - "IS NOT" - "0". (There is no user with a ONEcount ID number of 0, so the system will send notifications for every user.)
- To select specific criteria for notifications, use the drop-down menu to select a demographic. For example, to receive notifications only for users who live in New York, select "State" - "IS" - "New York". Conversely, to receive notifications for users in every state except New York, select "State" - "IS NOT" - "New York.
- You may add multiple criteria by clicking the "Add Option" button.
Sample Advertiser Dashboard
Example of a dashboard account for a specific advertiser:
Remember:
- Upon login, dashboard-type users will only see their dashboard in the Brand look and feel assigned with their permissions. They have no access to any other dashboards or ONEcount functionality.
- They can only view and download user data as specified in the Dashboard--this allows you to control what user data a dashboard-type user has access to.
Search all Documentation:
Unknown macro: livesearch. Click on this message for details.
The [livesearch] macro is not in the list of registered macros. Verify the spelling or contact your administrator.
Search System UTILITIES:
Unknown macro: pagetreesearch. Click on this message for details.
The [pagetreesearch] macro is not in the list of registered macros. Verify the spelling or contact your administrator.
More System UTILITIES
Expand
Action Manager
Backend Activity Log
IVT Mitigator
Import/Export Tool
