Embedded Forms - How to Create an Embedded Form
The Embedded Forms tool allows you to create, edit, delete, and manage forms that are embedded within a brand, or within an iframe on a web page that you host on your site. The Embedded Form Builder is NOT designed to be a full-featured, WYSIWYG form builder. For that functionality, please see the Form Builder.
Creating an embedded form is as simple as defining basic form information, setting the number of rows and columns in the form, dragging and dropping questions into defined layout, and setting optional vaidations for each question. When a user completes and submits a form, all of the demographic and transaction information from the form is saved in the ONEcount database.
Please refer to the Quick Start Guide-- Questions and Forms for information on basic concepts and rules relating to forms.
When a user completes and submits a form, all of the information gathered from the form is entered into the ONEcount database. Plan forms carefully to ensure that you include questions and possible responses that will provide you with all the data you wish to collect from subscribers/purchasers.
Questions are shared among ALL forms, so any changes made to question type, text, responses, alias, report header (See Question Builder - Create and Manage Questions for more detail) will change ALL forms, not just the form you are working on. Deleting a question will remove that question from ALL forms as well.
Changes made to form information, form layout, order of questions, and optional validations. will NOT universally change forms – these changes will be applied only to the form you are working on.
Form-related tasks include:
- creating database fields/questions available for placement in online forms; (See Demographics - Create and Manage Demographic Fields in Your Database for more detail.)
- creating new forms;
- managing existing forms;
- creating source codes that are used to track the source of a name/transaction;
- and creating individually branded forms.
The first task listed above – creating questions is accomplished using the Question Builder tool. The next two tasks – creating new forms and managing existing forms – are carried out using the Form Builder tool under INVENTORY. Creating source codes is handled under Source Codes and creating branded forms is handled under Brands. All of these tools are found under INVENTORY.
Note that there are two methods you can use for a form to display in your brand's look and feel.
Method 1
Use Brand tool in ONEcount. Using the Brand tool, you create a blank page in your CMS with only the header and footer for your brand, then create a code for that brand that will fetch that page when the form is called. The code you create using the Brand tool allows you to use that brand's look and feel for any form simply by appending &brand=CODE to the URL.
You must include the following markers on the brand page you create in your CMS:
<!-onecount_header-> Place in the page where the header will END
<!-onecount_footer-> Place in the page where the footer will START
If you require a separate header/footer page for mobile, you must also create that page.
Because ONEcount uses SSL, there may be issues with non-SSL brand pages using this method, so you may choose to use method 2 described below. (See ONEcount SSL and non-SSL Client Brand Pages for more detail.)
Method 2
Create a custom header and/or footer when creating a form.
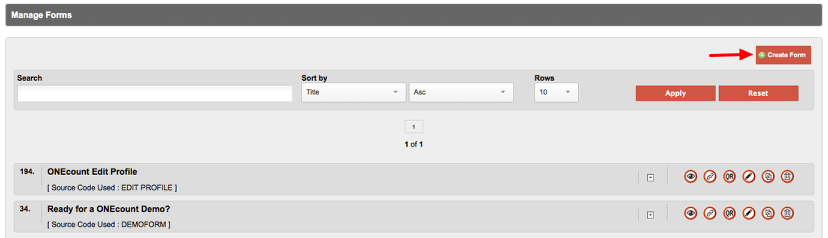
OPEN THE MANAGE FORMS WINDOW
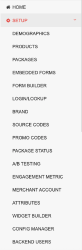
Select SETUP from the main menu.
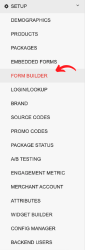
Select "Form Builder" from the sub-menu.
This will open the Manage Forms window where you can select to create a new form. (See below.)
Click "Create Form".
This will ope the "Form Builder - Part 1" window where you begin creation of your new form.
CREATE FORM PART 1 - INFORMATION
Enter Form Information. (See items #1-6 below.)

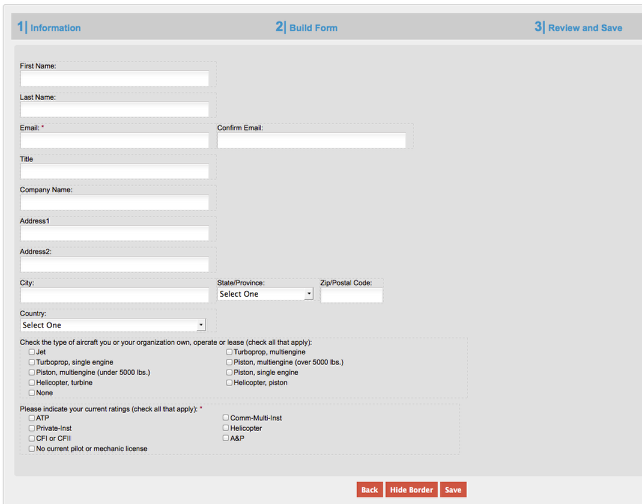
(1) Enter the Form Name. The Form Name field is displayed at the top of the form in the front end view. This is the name of the form the user will see on your website. (See screen shot of front end view below.)
(2) Enter the Form Description (optional). The Form Description field is also displayed at the top of the form, under the Form Name, in the front end view. This is the text the user will see with instructions on what to do, e.g. "Complete the form below to receive a free subscription to our weekly newsletter." Form Description text may be styled using the pop-up styling toolbar that appears when you click in the Form Description field, including images, special characters, and links . (See screen shot of front end view below.)
(3) Enter the Custom Header (optional) - Remember that this will override a Brand, if one is set. You can enter html/css in this field to display the header in the look and feel defined in the html without some of the issues that can be associated with using a brand (see ONEcount SSL and non-SSL Brand Pages) and without having to append a brand code to the form.
(4) Enter the Custom Footer (optional) - Remember that this will override a Brand, if one is set. You can enter html/css in this field to display the footer in the look and feel defined in the html without some of the issues that can be associated with using a brand (see ONEcount SSL and non-SSL Brand Pages) and without having to append a brand code to the form.
(5) Select what Source Code to apply to the form by selecting from the drop-down Source Code List. Source Codes are not displayed on the form--this is a back-end function.
Source Codes are used to track the source of a transaction, ie the source of the user/name in the ONEcount database. The source code assigned to a form is attached to a user record when the form is completed online. This identifies the form that the user completed, thereby identifying the source of the name in the database. See Source Codes- How to Create and Manage Source Codes for more information.
If you want to assign a Source Code and there are none, you should save your form, create a new code, then return to your form and select that code.
(6) Enter the Product Prompt text (optional). The Product Prompt is the instructional text found above the list of products on the form. (See screen shot of front end view below.) If you leave this field blank, the default text of "Please check the box for each of the products you would like to receive/continue receiving. Unchecked products will not be updated." will be used. Any text you enter here will replace the default text, and you can include html to change the font color, size, etc.
(7) Enter a Redirect URL (optional). A Redirect URL is a URL to open upon form submission. Redirect URLs are not displayed on the form--this is a back-end function.
(8) Select a Submission Option. (See screen shots of front end view below.)
- Product Selection Required (The user must select a product to submit the form. If no product is selected, a message will appear below the product prompt text instructing the user to select at least one product to continue.)
- Product Selection Not Required - Display Warning (The form may be submitted without a product selection, but a pop-up message will appear asking if the user is sure he/she wishes to continue without selecting a product.)
- Product Selection Not Required - No Warning (The form may be submitted without a product selection, and no warning message will appear.)
(9) Enter a Form Section Header (optional). A Form Section Header allows you to create a custom header for the section of the form where demographic questions are displayed, e.g. "Name and Address" or any descriptive/instructional text. You can add html here to style the text and/or background of the header.
(10) Enter a Subscription Header. A Subscription Section Header allows you to create a custom header for the section of the form where your products/packages are displayed for selection, e.g. "Subscription Term", "Select Your Package" or any descriptive/instructional text. You can add html here to style the text and/or background of the header.
(11) Email Confirmation (Yes/No) is where you select whether a confirmation email will be sent upon subscription to/registration for any products listed on the form.
Front-End View Screenshots


Enter Acknowledgement Email Information. (See Items #7-10 below.)
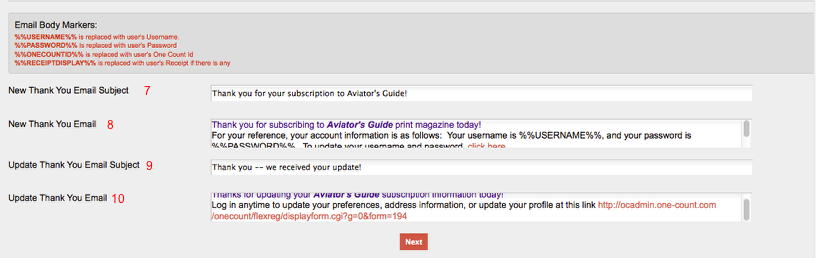
This is where you can create customized acknowledgement emails specific to the form/product attached to the form. Creating these customized emails is optional, as default acknowledgement emails not specific to any form and/or product are configured in the Configuration Manager.
(7) Enter the subject of the email in "New Thank You Email Subject" field.
(8) Enter the content of the email in "New Thank You Email" field.
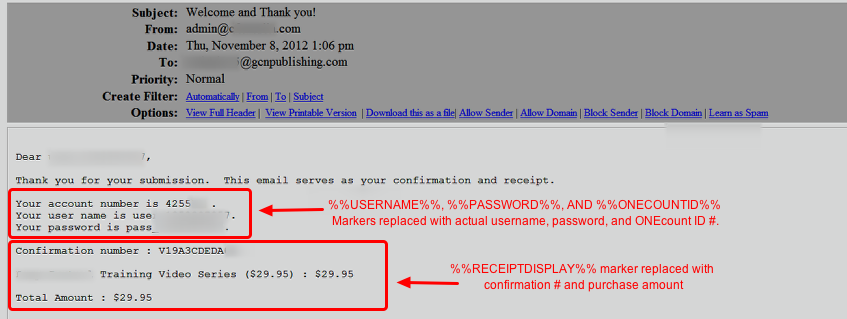
Body markers that may be used in the text are as follows:
%%USERNAME%% – will replace the body marker %%USERNAME%% with the subscriber's username.
%%PASSWORD%% – will replace the body marker %%PASSWORD%% with the subscriber's password.
%%ONECOUNTID%% – will relace the body marker %%ONECOUNTID%% with the subscribers account number/ONEcount ID.
%%RECEIPTDISPLAY%% – will replace the body marker %%RECEIPTDISPLAY%% with a receipt for purchase amount, if any.
(9) Enter the subject of the email in the "Updae Thank You Email Subject" field.
(10) Enter the content of the email in the "Update Thank You Email" field.
As with Form Description text, Email content may be styled using the pop-up styling toolbar that appears when you click in the Form Description field, including images, special characters, and links.
Click the red "Next" button when done with Form Information. This will open the "Build Form" window, as shown below.
CREATE FORM PART 2 - BUILD FORM
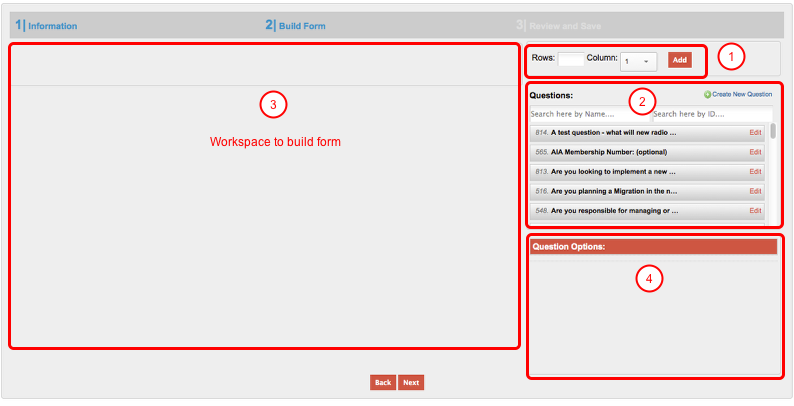
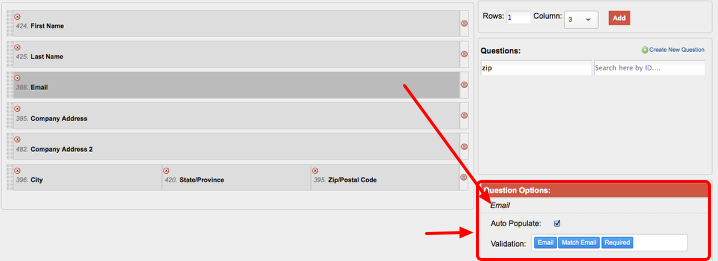
(1) Rows and Columns. Determine the number of rows and how many columns in each of those rows. The number of columns may be set on a row-by-row basis, i.e. the number of columns does not necessarily have to be the same for each row, and rows may be added at any time during form construction.
(2) Drag Questions into the workspace (3). You can quickly find questions by searching by name or question ID #.
(4) Set Question Options and validations for each question.
More detail on each of the above steps is provided below.
Set the number of rows and columns.
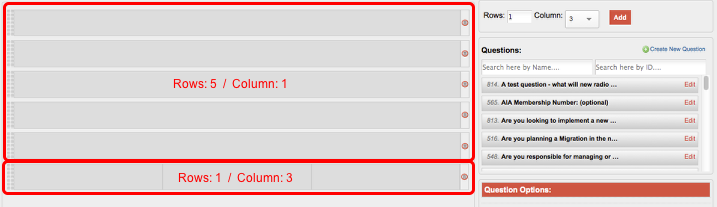
The form layout above was completed in two steps: Step 1 was to select Rows: 5 / Column: 1 then click "Add" and Step 2 was to select Rows: 1 / Column: 3 then click "Add".
As stated in the previous step, the number of rows and columns can be set on a row-by-row basis and can be done at any time during form construction.
Drag and Drop Questions into Workspace.
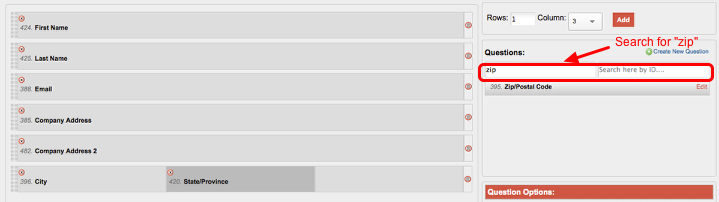
First Name, Last Name, Email, Address1, Address2, City, and State have been dragged and dropped into the form.
Once a question is placed in a form, it is removed from the list of questions.
Notice that the "Zip/Postal Code:" question was found by doing a quick search for "zip". This question can now be dragged and dropped into column 3 of row 6, as shown below.
To return to the full list questions not yet placed on the form, delete "zip" from the search box.
Note that you can create a new question here by clicking on +Create New Question. This will bring up a pop-up where you can create a question on the fly.
You can also edit questions here, but be careful! Any changes made to the Question Text, Response Type, Question Alias, Question Tage, and Lookup Question are universal and will change ALL forms in the system, not just the form you are working on.

Once all questions are placed on the form, set Question Options. Alternatively, question options may be completed as each question is placed on the form.
To set options, simply click on the question and select options.
Set Question Options
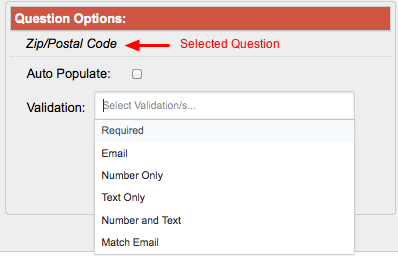
Available Question Options are:
Auto Populate: This check box allows you to tell the form what fields to pre-populate from information already in the database when a user clicks a link to a form. If audited, per audit rules, you cannot pre-populate certain demographics, even if the information is in your database. Auto Populate works in conjunction with the "&renewal=true" string in form linkouts. (Find more about form linkouts in the Quick Start Guide-Questions and Forms or Links section of How to Mange Forms.) When the Auto Populate box is checked and the form linkout has "&renewal=true" appended to the end, the only information that will be pre-populated on the form is the information for the questions that have the Auto Populate box checked. If "&renewal=true" is not appended to the link to the form, then all questions on the form that have responses in the ONEcount database will be pre-populated, even if the Auto Populate box is not checked. If audited, use this feature carefully to be sure you are following audit bureau reporting rules on what fields can be pre-populated in a renewal (or any) form.
Validations:**
Required – Do you want this to be a required (not optional) question on the form. All required questions will be identified by a *** on the form. If a user doesn't complete a required question, he/she will be prompted to do so.
Email – Requires that the information entered on the form be in email format, i.e. c.lechien@dogmail.com. It does not validate whether the email is a real email or not, only that it is in the correct email format. Validation looks to match following REGEX : /^[A-Z0-9._%+-]+@[A-Z0-9.-]+\.[A-Z]{2,4}$/i
Number Only – Only numbers can be entered, i.e. for a numbers-only code.
Text Only – Only text can be entered, i.e. for a text-only code.
Number and Text – Numbers and text can be entered.
Match Email – For an email field, this will add a "Confirm Email" entry on the form.
** Note that for checkbox- and radio button-type questions, an extra option to set the number of columns for responses appears. For example, if you have a checkbox-type question with 9 possible responses, you can set those checkbox responses to appear within two columns rather than one long list. (See second screenshot below for a front-end view.)
You can add multiple validations to a question, e.g. for an Email question you can set validations to required, email, and match email.
To remove a validation, place the cursor to the right of the validation and press your "backspace" or "delete" key.
Options and validations will NOT universally change forms – these changes will be applied only to the form you are working on.
In the example below, the Email question has been set to Auto Populate with multiple validations (Email, Match Email, Required).

Checkbox-type question set for responses to appear in two columns.
Move and/or Remove Questions
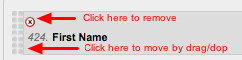
To remove a question from a form, click the "x" icon above the question name. This will remove the question, but not the row.
To move a question to a different location on the form, click the checkered gray area at the left of the row, drag, and drop.
Delete a Row
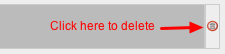
To delete a row, click the trash can icon at the far right of the row.
Note: You must remove the question(s) before deleting a row. If you try to delete a row with a question(s), you'll get a pop-up message asking you to "Please remove questions to remove the row."
Once all questions have been placed on the form and options and validations set, click the red "Next" button to move on to Part 3 - Review and Save.
If you wish to go back to Part 1 - Information, click on the red "Back" button. Your work on Part 2 will not be lost, and you can return to it from Part 1 by clicking on "Next". Just be sure to go to Part 3 and save the form before exiting.
If you leave the form builder from Part 1 or Part 2 BEFORE SAVING IN PART 3:
- A new form – will not be saved;
- An existing form you've opened for editing – changes will not be saved.
CREATE FORM PART 3 - REVIEW AND SAVE
The Review and Save window provides a basic preview of the form and allows you to adjust question response field lengths.
To see a full preview of the form in your site's look and feel, click "Save".
Example of what a form might look like on your web site.

1 -- Form Name
2 -- Form Description
3 -- Questions in custom layout
4 -- Product Prompt Text
5 -- Products attached to the form (notice products subscribed to are identified with "You are currenty receiving:" highlighted in green.
Example of the customized acknowledgement email with receipt confirmation sent to a NEW subscriber/purchaser.
Search all Documentation:
Unknown macro: livesearch. Click on this message for details.
Search INVENTORY Documentation:
Unknown macro: pagetreesearch. Click on this message for details.
On this page:
More INVENTORY Documentation: