Bulk Operation - How to Perform a Bulk Merge of Duplicate Users
This lesson describes how to use the Bulk Operation tool in the USER OPERATIONS module to merge duplicate user records. Performing a batch merge will merge duplicate records into one selected record.
Please refer to the Quick Start Guide - User Operations for important information about basic concepts and rules relating to imports and bulk operations.
IMPORTANT NOTE – FIRST GENERATE A FILE OF DUPLICATES TO BE MERGED
Note that prior to performing a merge, you must generate a csv file of duplicate ocids. **
The first column of the file should have the ocid of the user you wish to keep (i.e. the ocid of the user you wish to merge duplicate users into).
The second column should have a list of duplicate ocids (i.e. ocids of duplicate users that you wish to merge into the one user in the first column).
Be sure that the file doesn't have any duplicates within itself.
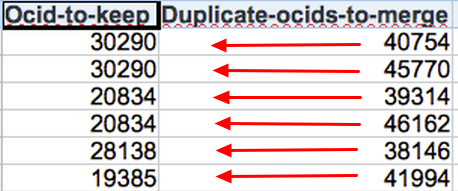
In the screenshot above, ocids in Column B (and all transaction activity) will be merged into the ocid in Column A, e.g. ocids 40754 and 45770 will be merged into ocid 30290, ocids 39314 and 46162 will be merged into ocid 20834, ocid 38146 will be merged into ocid 38138, etc.
Alternatively, you can separate duplicate ocids to merge with a comma as delimiter. (See Screenshot below)
** Use the List Wizard to generate a list of users. Once the list is generated, you can open the file and modify to fit the criteria described above. Or, if you know the ocids of duplicate users, simply enter them into a spreadsheet as shown above. BE SURE TO SAVE THE FILE AS A CSV FILE – fields separated by a comma ( , ) and enclosed by quotes ( " ).
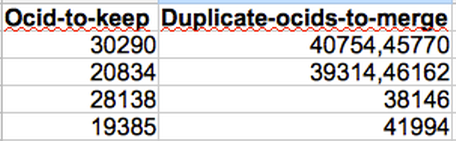
ocids 40754 and 45770 will be merged into ocid 30290, ocids 39314 and 46162 will be merged into ocid 20834, ocid 38146 will be merged into ocid 28138, ocid 41994 will be merged into ocid 19385.
IMPORTANT NOTES – STATISTICS, NEWSLETTER LISTS, AND MERGED RECORDS
- All transaction data and product subscriptions from a removed/merged user will be moved to the kept user's record.
- Each piece of demographic data has a timestamp attached to it. When users are merged, whichever has the latest timestamp on a per question basis becomes the latest info for that user. Each demographic field with the latest timestamp will be included in the "kept" users record. NOTE: Usernames and passwords qualify as demographic information that will be updated to the latest timestamp as well.
When merging records/users, email stats stay the same. For example,
- four records are merged into one, and
- all are subscribed to the same newsletter, and
- there are four unique opens for those users (one unique open per user) for that newsletter, and
- the unique opens count will stay at four.
If you drill into the List Wizard to generate a list of the users, only the record that was kept (the ones other ocids were merged into) will be included on the list.
Users will be processed differently depending on the email engine.
If using the ONEcount email engine, those users who have been removed (merged into another ocid) and who were subscribed to the same newsletter list(s) as the kept user will be deleted in the ONEcount email engine. If a removed user is subscribed to an email list that the kept user is not subscribed to, the kept user will be added to the newsletter list.
MagnetMail doesn't allow for deleting/ merging users, so all users that were merged into another ocid will remain in MagnetMail but will be unsubscribed from respective email list(s) in MagnetMail. If a removed user is subscribed to an email list that the kept user is not subscribed to, the kept user will be added to the newsletter list.
OPEN THE BULK OPERATION WINDOW
Select DATA MANAGEMENT from the Main Menu.
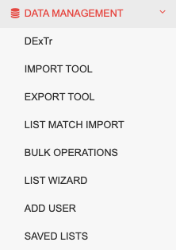
Select "BULK OPERATIONS" from the DATA MANAGEMENT sub-menu.

This will open the Bulk Operation main window, as shown below.
BULK OPERATION Main Window
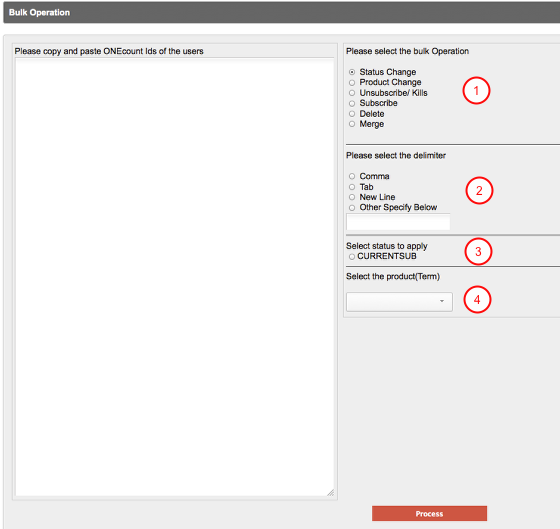
1 - Copy and paste a delimiter separated list of ONEcount IDs.
2 - Select the bulk operation: Status Change will change the status of ocids entered in Box 1, Product Change will change the product all ocids entered in Box 1 are assigned to, Unsubscribe/Kills will unsubscribe all ocids entered in Box 1 from a designated product, Subscribe will subscribe all ocids entered in Box 1 to a designated product, Delete will delete all ocids entered in Box 1, and Merge will merge ocids enterd in Box 1.
3 - Select the delimiter used in the list of ONEcount IDs (Box 1).
4 - Select the status to apply to the Status Change, Product Change, Unsubscribe/Kill, or Subscribe.
5 - Select the Product(Term) that the Status Change, Product Change, Unsubscribe/kill, or Subscribe applies to. If Product Change is selected, "Select the product(Term)" will change to "Select the Product(Term)[FROM} and another box "Select the Product (Term)TO will be added. See details on Product Change below.
MERGE RECORDS
Note that prior to performing a merge, you must generate a csv file of duplicate ocids. ** (See above.)
- The first column of the file should have the ocid of the user you wish to keep (i.e. the ocid of the user you wish to merge duplicate users into).
- The second column should have a list of duplicate ocids (i.e. ocids of duplicate users that you wish to merge into the one user in the first column).
- Be sure that the file doesn't have any duplicates within itself.
Select "Merge" under "Please select the Bulk Operation"
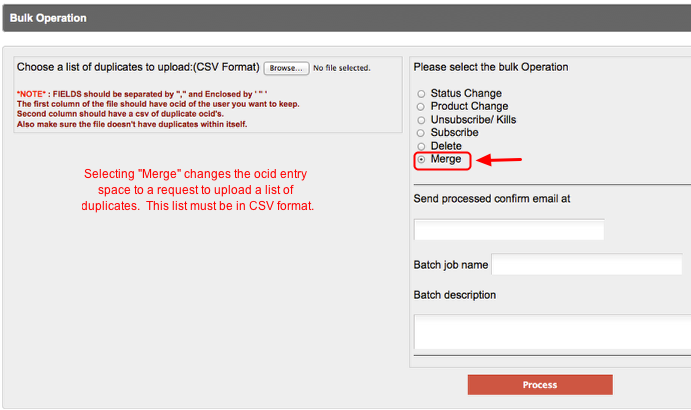
Notice how selecting "Merge" changes the content of Box 1 to a request to upload a selected list of duplicates.
Rather than pasting/entering ocids, you MUST select a list of duplicates to upload.
Click on the "Browse" button to locate the CSV file of duplicates to merge.
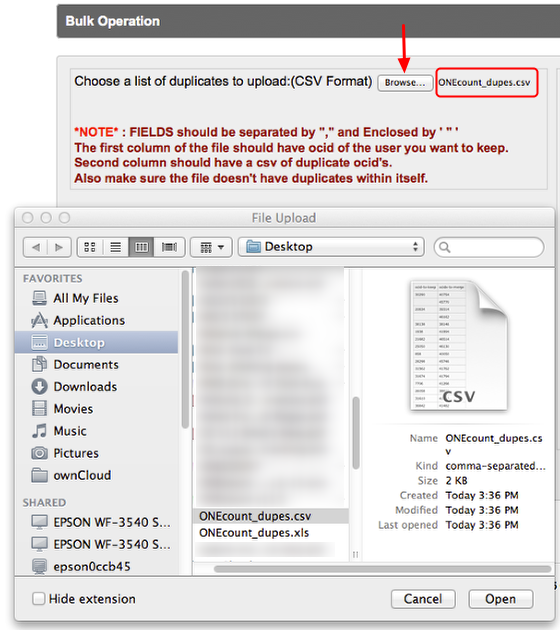
When you click on "Browse" and locate and select your csv file of duplicates, the name of the file will appear beside the "Browse" button. (See above.)
Enter email for confirmation of process completion, batch job name, and batch description.
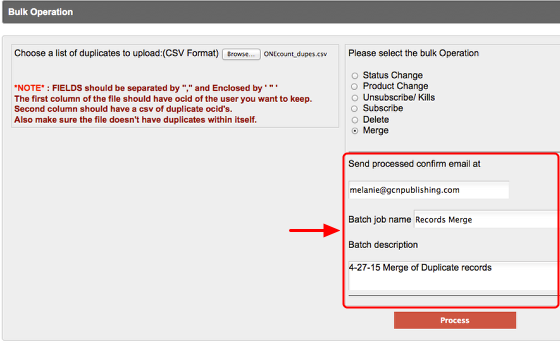
"Batch job name" and "Batch description" are used to identify the Job Status in the Job List (in Utilities module).
Select "Merge Confirm" to begin the merge process or "Cancel" if you wish to cancel.
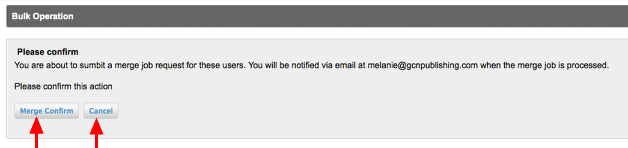
To check the status of the job, go to UTILITIES > JOB LIST.

You will receive email notification at the email address you provided when the merge is completed.
IMPORTANT NOTE:
Performing merge operations on user accounts will not be reflected in the clients external ESP analytics, however those merged accounts will be reflected in ONEcount's analytics. This may lead to a small difference in metrics between each database, however the results in ONEcount would be reflective of the more accurate real-time information.
Search All Documentation:
Unknown macro: livesearch. Click on this message for details.
Search USER OPERATIONS Documentation:
Unknown macro: pagetreesearch. Click on this message for details.
More USER OPERATIONS Documentation