Segment Manager
The Targeting Engine is a powerful tool that allows to quickly and easily define audience Segments and target them with specific Actions, e.g. target specific ads, display a pop-up, send an email, redirect to another page or site.
You can target segments by IP Address and User Agent. This functionality can be used to define a set of IP addresses that may be, for example, non-human traffic that you don't want to display paid banner ads to. By defining the target IP addresses and setting the action to serve only house ads, those IP addresses won't be counted as impressions/views/clicks for paid banner advertising. Or you could redirect to a page or a pop-up with a message that the IP address is suspected of being non-human traffic and a number to call if not the case. That IP could then be removed from the target segment.
The following lesson will provide details on how to use the Segment Manager.
Please Note:
Segments and targeting actions can be applied to both Known and Unknown users.
If the defined criteria for a target segment doesn't require a user be known, e.g. viewing a particular webpage or section 3 times, as soon as a user meets that criteria by viewing the defined webpage or section 3 times, he/she is included in that segment (whether a known user or not) and the targeting action will occur.
Also note that both users who fit the criteria for the defined segment as of the effective start date of an action and users who meet the criteria at any time during the effective date range will be targeted.
CREATING A NEW SEGMENTFrom the left hand side navigation bar, select Activation → Segment Manager :
Under "User Defined Segments" tab, you will see a list of existing segments.
Each segment created, is listed here and has edit and delete functionality available just next to it. The overview of the segment (effective date, action, segment size, stats for known and unknown users) is available on click of arrow button next to each segment.
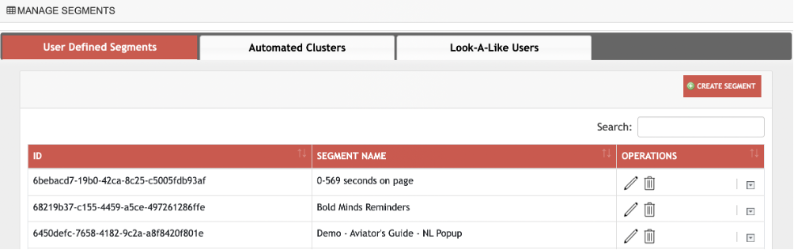

The list of segments created contains three columns. The first column is Segment ID, the second shows Segment Name, and the third is a collection of icons with the following features:
Image | Icon | Feature description |
|---|---|---|
pencil |
| is for editing segment |
trash can |
| is for deleting segment |
add user |
| adds user to the segment |
down-triangle |
| displays data related to the segment such as Effective Date, Action, segment size. It also shows a table with Knowns, Unknowns and Total users as recorded as of the 'Effective Date.' At the bottom right is a bar graph with data for the last 7 days for Knowns and Unknowns. |
If user has been added successfully to the segment, a popup confirming the same - including segment name and id - appears, as shown:

Below is an example of data displayed by clicking the 'down-triangle' button. This button changes to 'up-triangle' after expansion. On clicking this 'up-triangle' button, the display collapses.

Click "Create Segment" in the upper right-hand corner. You'll be taken to a screen allowing you to define a new segment.
The new segment creation screen consists of total 5 tabs – Definition, Demographics (previously named as First Party), IP Address (previously named as Account based), Behavior, Action. The panels are cumulative, meaning that in order for a user to be included in a segment, the rules on the Demographics, IP Address, and Behavior tabs must all match that user.
Demographics, IP Address, Behavior tabs allow us to define the segment rules.
1. Definition Tab:
Define your segment by giving it a name and a brief description.
Title is a mandatory field. It should not be blank. Without providing title, you cannot navigate to other tabs.
Description is an optional field and can have any types of values.

A segment is a group of people. You can define that group based on any number of demographic criteria, ie., "who" the user is, or based on behavioral criteria, ie., "what" the user has done. You can also create an "IP addresses-based Segment.", which can also be called as account based segment.
Give your segment a descriptive name. You can also add a brief description to the segment with more details.
On this panel you will see an option to include only unknown users in this segment. Many of the segment selection criteria can apply to both unknown (ie., unidentified) and known (identified) users. By changing this option to "Yes," you are telling ONEcount to only select users who are unknown for this segment. (See Segment Impact Matrix below).
2. Demographics Tab:
If you click the "Demographics" tab, you will have the opportunity to define demographic characteristics for the segment. Multiple rules can be added with And/OR conditions as per requirements.

CREATE A DEMOGRAPHIC SEGMENTDefine demographic rules of your segment based on the demographic questions you have built in your database. You can use any demographic question to define a segment.

If you choose a demographic question that has a multiple choice response, simply click in the search text box and start typing one of the responses. ONEcount should pre-populate the box with the response. Multiple responses can be defined for a single question.
To add multiple demographic questions to a segment, simply click the Add button on the right-hand side and ONEcount will allow you to add another demographic question.
In this way, you can create a demographic segment of users who are Pediatricians who live in Arizona, for example.
If you are creating purely a demographic segment, hit "Save" and ONEcount will save your segment.
**NOTE: E-mail is a special demographic field. Since demographic fields are part of a user's profile, a user who is unknown would not have any demographic information in the database. Therefore, when you select a demographic field as part of a segment definition, you are normally telling ONEcount you want known users included in this segment. ONEcount handles e-mail slightly differently. If you specify all users who have no e-mail address (ie., select e-mail but leave the Search Text box blank), ONEcount will automatically include unknown users in this segment. This is because a user who is unknown has no e-mail address. For further details, please see the Segment Impact Matrix below.
3. IP Address Tab:
The IP address-based segment can be created and targeted by providing the intended IP addresses here. There is no limit on number of IP addresses that can be added here.
CREATE AN IP Address-BASED SEGMENT
Target segments by Account – which is IP Address and User Agent. A user agent is any software that retrieves and presents Web content for end users. User agents include Web browsers, media players, and plug-ins that help in retrieving, rendering and interacting with Web content.

This functionality can be used, among other things, to define a set of IP addresses of invalid/non-human traffic that you don't want to display paid banner ads to. By defining the target IP addresses and setting the action to serve only house ads, those IP addresses won't be counted as impressions/views/clicks for sponsored banner advertising because they won't be served sponsored ads. Or you could redirect to a page or a pop-up with a message that the IP address is suspected of being non-human traffic and a number to call if not the case. That IP could then be removed from the target segment.
So, in the example above, the segment will include all users coming from IP address xx.xxx.20.80 using Safari OR from IP address xx.xxx.145.194 or 24.xxx.xxx.10 using Mozilla 5.0 OR, etc...
Note that in IP Address based segmenting you can enter multiple IP addresses and user agents in each field.
To create a segment of ALL users, both known and unknown, enter the IP address 1.0.0.0/1. This will include all possible IP addresses and, by extension, all users who visit your site.
If you are creating purely a IP Address based segment, hit "Save" and ONEcount will save your segment.
4. Behavior Tab:
If you would like to add behavioral characteristics to your segment (ie., Pediatricians who live in Arizona and have read at least two articles on pain), click on the Behavior tab.
CREATE A BEHAVIOR-BASED SEGMENT

To define behavioral characteristics of your segment, choose a behavior type from the Category pull-down. The sub-category pull-down will change depending on the Category that was chosen. For the target, you can enter keywords in the Target box if the value(s) are free text.
If the Target values are multiple choice, you can put your cursor in the box, hit back-space, and then start typing possible values. ONEcount will show matching values, just hit enter and ONEcount will add the value to the target.
You can add multiple values to a single behavioral target; they will be "OR" values, meaning the segment will be true if any of the values is present.
Define the frequency of the action in the Frequency box. This means how many times within the given date range this event has happened, and enter a date range for the given event.
Date Range: If 'Past,' the maximum allowed range is 3 months. If 'Custom,' you can specify a start and end date. If 'Future' option, allows to set a date range into the future (Currently, only the 'Package Transaction' Category has 'Future' option). By not entering a value (or simply 0), the segment cannot be processed for that event.
If you add multiple behavioral criteria to your segment (hit Add) to add more behavioral criteria, be sure to define whether this criteria is AND/OR, meaning, whether this segment will match when both criteria are met (AND), or when either of the criteria is met (OR).
There is a wide range of behavioral criteria that can be used for behavioral segments:
Banner: Users are selected based on the banner ads they have viewed on your site. The sub-category for Banners is Viewed or Clicked. Target is the name of the banner(s).
Content: Users are selected based on the meta keywords contained on the pages a user visits. The sub-category for Content is Viewed or Clicked. Target is the content keyword.
Email: Users are selected based on the emails (from your ONEcount-integrated ESP or ONEmail) that the user has engaged with. The sub-category for Email is Opened or Clicked. Target is the name or subject of the e-mail campaign.
Engagement Metric: Users are selected based on the Engagement Metrics they have registered, such as webinar attendance, whitepaper downloads, etc. Please note that only SELECT and NUMERIC metrics appear here.
Form: Users are selected based on the ONEcount form they have engaged with. The sub-category for Form is Completed. Target is the name of the form.
Package Transaction: Users are selected based on the ONEcount package transaction they have executed. The sub-categories for Package Transaction are Subscribed/Purchased, Currently Subscribed, Not Subscribed, Expired, Will Expire, Unsubscribed. The Target is the name of the package. The selected date range will query on Request Date (Not Transaction Date).
Package Status: Users are selected based on the status of a package they have purchased or subscribed to. Best when used with a Package Transaction criteria. The sub-categories for Package Status are any of the package Statuses that you've defined in the Package Status section under the Inventory menu in ONEcount. There are no targets for this option.
Source Code: Users are selected based on the source code for any transaction they have executed within ONEcount. The sub-category is Selected. The target is the specific source codes that are used. Possible options are the source codes defined in the Source Code manager under the Inventory section of ONEcount.
Web: Users are selected based on the web URLs that they have visited. The sub-category is Viewed At Least. The target is a URL or URL fragment. When entering the URL, do not include the protocol (http:// or https://).

***IMPORTANT NOTE: When you type a URL into the URL box, you will see an option beneath asking if you want to Add the text you are typing to the box. After you are done typing the URL, you must hit 'Enter' to confirm that you want to add the text you just typed into the box. You will see the URL you typed appear in the box in blue (as seen above). If you do not hit 'Enter' and just click the Save button, the URL field will be blank and your segment may not work correctly.

Product Transaction: Users are selected based on products that they have purchased. The sub-categories are Subscribed/Purchased, Currently Subscribed, Not Subscribed and Unsubscribed. The target is the product name. The selected date range will query on Request Date (Not Transaction Date).
Product Attribute: Users are selected based on specific attributes of the products they have purchased. The sub-categories are the attributes (ie., category, type, state, etc.) The target is the value of that attribute (ie., blue, edible, New York, etc.) If the sub-category is a multiple-choice list, then your target must be the name of one of those elements of the list. If the sub-category is a free text field, you can enter any value in the target box.
Geo: Users are selected based on specific geographic location from anywhere in the world. The sub-category is 'coordinate'. When this geo category is selected, the world map is popped up and you can select any region on that map, where you want to target your users. Once, the selection of region is made, you will see the corresponding geographic coordinates are added to the target field. This geo-based targeting is one of the important functionalities introduced recently. Like other behavior categories, geo can also be added any number of times along with any other rules, by using ‘Add’ button on the screen as per your requirements.
Referrer: You can specify URL(s) that serve as a starting point, for an action to be triggered on the target domain (specified in the 'Action' tab). Multiple URLs can be entered in the URL field. The URL is a web address - either its domain (www.Domain.com) or subdomain (.com). The 'Action' field has two choices and is used to indicate if the URL values are to be considered as given (you choose 'IS'), or contains a part of it (you choose 'CONTAINS'). The Referrer URL can essentially be used to execute actions defined in the 'Action' tab. This helps in targeting users specified by the Referrer. For instance, if you put in '.com' in the URL field, and the target header (Action tab) had 'www.testMe.com' with 'Popup' as the Action Type, what happens is that if the user is currently visiting a webpage that contains '.com' in its URL, then clicks a link that takes them to 'www.Domain.com/testMe.html' the specified popup will show on the Target Domain.
***IMPORTANT NOTE: When you type a URL into the URL box box for Referrer, you will see an option beneath asking if you want to Add the text you are typing to the box. After you are done typing the URL, you must hit 'Enter' to confirm that you want to add the text you just typed into the box. You will see the URL you typed appear in the box in blue (as seen above). If you do not hit 'Enter' and just click the Save button, the URL field will be blank and your segment may not work correctly.
Once you have defined your Behavioral criteria for your segment and you do not wish to add any other rules/action, be sure to HIT SAVE.
Note: There can be only one rule for each criteria like web, banner. If you have multiple target values all of them can be added into 1 rule by adding multiple values into target box.
ONEcount uses specific logic for demographic and behavioral-based criteria. If you select any demographic field as part of your segment (other than e-mail, which is a special case), ONEcount will only select known users has part of the segment. This is because an unknown user has not been matched to a profile, and therefore ONEcount has no way of knowing the user's response to that demographic question. Put another way, if you include State is Alabama in your segment criteria, ONEcount will exclude all unknown users because there is no way for ONEcount to know the state of an unknown user.
The following Segment Impact Matrix illustrates the types of users who can be selected with each demographic and behavioral criteria:
DEMOS | VALUE | Selects (KNOWN/UNKNOWN/BOTH) |
Any demo | ANY VALUE | KNOWN |
E-mail DEMO | IS BLANK | BOTH |
| IS NOT BLANK | KNOWN |
|
|
|
BEHAVIOR | VALUE | Selects (KNOWN/UNKNOWN/BOTH) |
Banner | Clicked/Viewed | BOTH |
Content | Viewed | BOTH |
Opened | KNOWN | |
| Clicked/Viewed | KNOWN |
| Not clicked | KNOWN |
Form | Completed | KNOWN |
| Abandoned | BOTH |
Package Status |
| KNOWN |
Package Transaction |
| KNOWN |
Source Code | Selected | KNOWN |
Web | Viewed | BOTH |
Product Transaction | Subscribed | KNOWN |
| Currently Subscribed | KNOWN |
| Not Subscribed | BOTH |
| Unsubscribed | KNOWN |
GEO | IS IN | BOTH |
Engagement Metric |
| KNOWN |
Referrer | IS/CONTAINS | BOTH |
**NOTE: Selecting "Only Unknown" on the first panel of the segment will cause any of the above options to be limited to unknowns. For example, e-mail is blank would return only unknowns, viewing a web page would be only unknowns, etc.
5. Action tab:
Any action to be associated for segment targeting is defined in this tab.
Date range is a mandatory field (both start and end dates) to add any form of action. You can select any form of action from the dropdown. Once you provide action details, you can save the changes made.

ADD AN ACTIONGo to the Action tab of create/edit segment. This is where you define the action to be taken for a segment, e.g. a website pop-up or ad targeting. Types of available Actions include: Pop-Up, Redirect, Ad Target, Email, Social Target, Subscribe to a Product, Unsubscribe to a Product, Subscribe to a Package, Unsubscribe to a Package, Add to Segment, Remove from Segment. Any action can be selected from action type dropdown.
Please Note: the 'Referrer' Category from the Behavior tab can be used to execute the 'Action Type' defined here. Please read about this Category in the 'Create a Behavior-based Segment' section.
ADD AN AD ACTION
Here, we are defining an Ad Target. This will allow ONEcount to tell Google Ad Manager (DFP) what ad to target when a specific user is on your web site. The specific users will be defined in the Segment that you link to this target.
In the screen below, you'll see the options for an Ad Target. The first three options are Target Domain and Target Content, Section. These are used to limit the scope of this action, not to define it. It's important to understand the difference.
In content-based targeting, you define a specific page or web site section (or a whole site) to be targeted with a banner or banner campaign. In effect you are saying, whenever someone comes to this section or this web site, show them this banner.
ONEcount targets ads based on identity. ONEcount is saying in effect, for this specific person (as defined by the Segment linked to this Action), show this ad. Period.
The Target Domain and Section options are used to limit this behavior. So what we are saying then is that for this specific person (as defined by the Segment linked to this Action) show this ad, but ONLY on these domains and in these specific sections of the site.
Why would we do that? Generally, this is limitation is used because we want to target a user with one ad campaign on one site, and a different campaign on another site.
For example, say we have a pediatrician who we want to target with an ad for a skin medicine on our dermatology site, but an ad for a different drug when he visits a site on diabetes.

The Target Domain and Section parameters are only required if you want to limit the banner. If you leave them blank, the user will be targeted across all your web sites.
***IMPORTANT NOTE: When you type a Target Domain or Section into the appropriate box, you will see an option beneath asking if you want to Add the text you are typing to the box. After you are done typing, you must hit 'Enter' to confirm that you want to add the text you just typed into the box. You will see the Domain or Section you typed appear in the box in blue (as seen above). If you do not hit 'Enter' and just click the Save button, the Domain and Section fields will be blank and your segment may not work correctly.
The last property is the Key/Value pair that you will use to tell Google Ad Manager which banners or Line Items to target at this user. Consult for Google Ad Manager documentation on Key/value pair targeting. You may specify more than one Key/Value pair for this target. This allows Google Ad Manager or DFP to decide which banners to show.
- In Revive/OpenX, these variables are created under Inventory > Banner > Delivery Options > Add Delivery Limitation > Site-Variable > Add > enter Key and Value variables. These variables are of your choosing and can be text or num
For example, say you wanted to target users who read stories about high school basketball. You could create a segment of users who viewed content tagged "high school boys basketball." You could then create three Key/Value pairs for the action you link to that segment: one for high school boys basketball, one for high school sports, and one for high school boys sports. You could then use Google Ad Manager or DFP to determine how the user is targeted and the prioritization of each banner.
NOTE: Prioritization of banners is done in Google Ad Manager (or DFP) based on rules you configure in GAM.
ADD A POP-UP ACTION
You can also create a pop-up target for your segments. Any pop-up created under form-builder section od ONEcount cxan be used for pop-up action for segment.
Choose Pop-Up from the Action Type pull-down.
The next three options are Target Domain, Target Content and Section. These are used to limit the scope of this action, not to define it. It's important to understand the difference.
In content-based targeting, you define a specific page or web site section (or a whole site) to be targeted with a pop-up. In effect you are saying, whenever someone comes to this section or this web site, show them this pop-up.
ONEcount targets pop-ups based on identity. ONEcount is saying in effect, for this specific person (as defined by the Segment linked to this Action), show this pop-up. Period.
The Target Domain and Section options are used to limit this behavior. So what we are saying then is that for this specific person (as defined by the Segment linked to this Action) show this pop-up, but ONLY on these domains and in these specific sections of the site.
Why would we do that? Generally, this is limitation is used because we want to target a user with pop-up campaign on one site, and a different campaign on another site.
For example, say we have a pediatrician who we want to target with a pop-up for a skin medicine on our dermatology site, but a pop-up for a conference when he visits our site on diabetes.
The Target Domain and Section parameters are only required if you want to limit the pop-up If you leave them blank, the user will be targeted across all your web sites.

***IMPORTANT NOTE: When you type a Target Domain or Section into the appropriate box, you will see an option beneath asking if you want to Add the text you are typing to the box. After you are done typing, you must hit 'Enter' to confirm that you want to add the text you just typed into the box. You will see the Domain or Section you typed appear in the box in blue (as seen above). If you do not hit 'Enter' and just click the Save button, the Domain and Section fields will be blank and your segment may not work correctly.
Next we determine the priority of this pop-up relative to other pop-ups that may be targeted at this segment. It's possible that a user is in multiple segments and may be subject to multiple pop-ups. This setting will help ONEcount determine how important this pop-up is relative to other marketing efforts.
Frequency allows you determine how frequently this pop-up will appear to this user. Options include once, always (on every page load), daily (once per day), weekly, bi-weekly, monthly, or annually.
Last, select the pop-up (it can be any pop-up form builder pop-up or A/B test pop-up).
Review your Action details and finally click Save to save it.
ADD A SOCIAL TARGET ACTION
In order to target your users on social networks, ONEcount will need to log into the social network and create a segment containing the users you want to target. Once that segment is created, ONEcount will automatically populate the segment in the social platform as users qualify for that segment in ONEcount.
To do this, ONEcount needs API access to your social account. This account should be the one you run your social ad campaigns through. You will need to provide the credentials for these accounts to the ONEcount team to configure your installation. Just open a ticket with our Help Desk and include the credentials and platform you would like to be connected to, and we''ll take care of it.
To advertise on Google: Your account will need to meet the criteria mentioned in below link. We need API access that meets this criteria. If your account does not meet these criteria, we can send a file containing the hashed e-mails of users who fit into the segmnt, so that you can load the data into Google's Customer Match tool manually.
https://support.google.com/adspolicy/answer/6299717
To advertise on LinkedIn: Your account will need API access that has “Marketing Developer Platform” access. If your account does not have this capability, we can send a file containing the hashed e-mails of users who fit into the segment, so that you can load the data into LinkedIn's Matched Audience too manually. You can follow steps in below link to get “Marketing Developer Platform” access.
https://www.linkedin.com/help/linkedin/topics/6400/6401/112188
Choose Social Target from the list of Type of Action. You can select multiple social platforms in a single action as shown in below screenshot. Enter URL of target in Target URL field; this is the URL you want users to go to when they click on the ad in the social platform. ONEcount will generate a unique URL for each social platform.
The URLs ONEcount generates will be the ones you place in the banner system on the social platform. When the user clicks on the URL, they will be sent to the URL you entered in this box, with two important advantages: 1) ONEcount will record the click and capture it for your analysis, and 2) if the user is known to ONEcount, the analytics will show the identity of the user who clicked–even if the link you enter here is not on your web site.
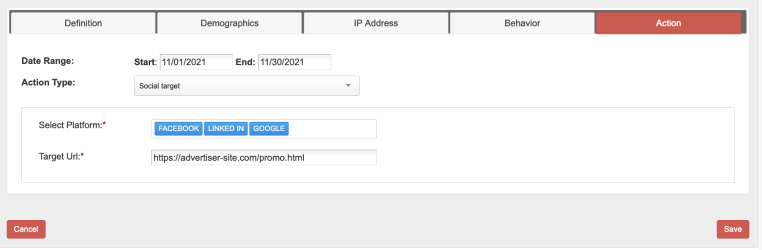
To get the URLs for pasting into the social system, go to your Segment List and expand the segment. The URLs will be shown. Simply click on the clip-board to the right and the URL will be copied to your browser's clipboard.

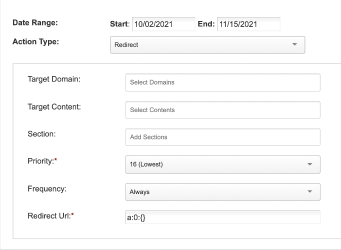
ADD A REDIRECT ACTION
Choose redirect from the list of Type of Action. The redirect action is very similar to the Pop-Up action, except that instead of displaying a pop-up message, ONEcount will redirect the user to a URL of your choosing.
One use case for this might be users who have a subscription that is running out; you could create a segment of users whose subscription expires in the next 10 days, and target that segment with an Action that redirects them to your subscription form when they first come to your site.
As with pop-up and ad targeting, the Target Domain and Section parameters are optional.
ADD EMAIL ACTION
To send a transactional e-mail to a user, choose Email from the Action Type pull-down.

When an email action is in effect, the email will be sent to the specified target segment on the designated domains and sections at the set frequency and priority level.
If you wish to cancel the changes, click the "Cancel" button to go to the segment listing page.
On this page:
More USER OPERATIONS Documentation