Import - How to Import a File
Failed to execute the [include] macro. Cause: [Current user [null] doesn't have view rights on document [xwiki:Licenses.Code.VelocityMacros]]. Click on this message for details.
org.xwiki.rendering.macro.MacroExecutionException: Current user [null] doesn't have view rights on document [xwiki:Licenses.Code.VelocityMacros]
at org.xwiki.rendering.internal.macro.include.IncludeMacro.execute(IncludeMacro.java:124)
at org.xwiki.rendering.internal.macro.include.IncludeMacro.execute(IncludeMacro.java:59)
at org.xwiki.rendering.internal.transformation.macro.MacroTransformation.transform(MacroTransformation.java:311)
at org.xwiki.rendering.internal.transformation.DefaultRenderingContext.transformInContext(DefaultRenderingContext.java:183)
at org.xwiki.rendering.async.internal.block.AbstractBlockAsyncRenderer.transform(AbstractBlockAsyncRenderer.java:76)
at org.xwiki.rendering.wikimacro.internal.DefaultWikiMacroRenderer.transform(DefaultWikiMacroRenderer.java:882)
at org.xwiki.rendering.wikimacro.internal.DefaultWikiMacroRenderer.transform(DefaultWikiMacroRenderer.java:868)
at org.xwiki.rendering.wikimacro.internal.DefaultWikiMacroRenderer.transform(DefaultWikiMacroRenderer.java:594)
at org.xwiki.rendering.wikimacro.internal.DefaultWikiMacroRenderer.execute(DefaultWikiMacroRenderer.java:409)
at org.xwiki.rendering.async.internal.block.AbstractBlockAsyncRenderer.render(AbstractBlockAsyncRenderer.java:157)
at org.xwiki.rendering.async.internal.block.AbstractBlockAsyncRenderer.render(AbstractBlockAsyncRenderer.java:54)
at org.xwiki.rendering.async.internal.DefaultAsyncRendererExecutor.lambda$syncRender$0(DefaultAsyncRendererExecutor.java:284)
at com.xpn.xwiki.internal.security.authorization.DefaultAuthorExecutor.call(DefaultAuthorExecutor.java:98)
at org.xwiki.rendering.async.internal.DefaultAsyncRendererExecutor.syncRender(DefaultAsyncRendererExecutor.java:284)
at org.xwiki.rendering.async.internal.DefaultAsyncRendererExecutor.render(DefaultAsyncRendererExecutor.java:267)
at org.xwiki.rendering.async.internal.block.DefaultBlockAsyncRendererExecutor.execute(DefaultBlockAsyncRendererExecutor.java:125)
at org.xwiki.rendering.wikimacro.internal.DefaultWikiMacro.execute(DefaultWikiMacro.java:129)
at org.xwiki.rendering.wikimacro.internal.DefaultWikiMacro.execute(DefaultWikiMacro.java:61)
at org.xwiki.rendering.internal.transformation.macro.MacroTransformation.transform(MacroTransformation.java:311)
at org.xwiki.rendering.internal.transformation.DefaultRenderingContext.transformInContext(DefaultRenderingContext.java:183)
at org.xwiki.rendering.internal.transformation.DefaultTransformationManager.performTransformations(DefaultTransformationManager.java:88)
at org.xwiki.display.internal.DocumentContentAsyncExecutor.executeInCurrentExecutionContext(DocumentContentAsyncExecutor.java:396)
at org.xwiki.display.internal.DocumentContentAsyncExecutor.execute(DocumentContentAsyncExecutor.java:269)
at org.xwiki.display.internal.DocumentContentAsyncRenderer.execute(DocumentContentAsyncRenderer.java:112)
at org.xwiki.rendering.async.internal.block.AbstractBlockAsyncRenderer.render(AbstractBlockAsyncRenderer.java:157)
at org.xwiki.rendering.async.internal.block.AbstractBlockAsyncRenderer.render(AbstractBlockAsyncRenderer.java:54)
at org.xwiki.rendering.async.internal.DefaultAsyncRendererExecutor.syncRender(DefaultAsyncRendererExecutor.java:290)
at org.xwiki.rendering.async.internal.DefaultAsyncRendererExecutor.render(DefaultAsyncRendererExecutor.java:267)
at org.xwiki.rendering.async.internal.block.DefaultBlockAsyncRendererExecutor.execute(DefaultBlockAsyncRendererExecutor.java:125)
at org.xwiki.display.internal.DocumentContentDisplayer.display(DocumentContentDisplayer.java:67)
at org.xwiki.display.internal.DocumentContentDisplayer.display(DocumentContentDisplayer.java:43)
at org.xwiki.display.internal.DefaultDocumentDisplayer.display(DefaultDocumentDisplayer.java:96)
at org.xwiki.display.internal.DefaultDocumentDisplayer.display(DefaultDocumentDisplayer.java:39)
at org.xwiki.sheet.internal.SheetDocumentDisplayer.display(SheetDocumentDisplayer.java:123)
at org.xwiki.sheet.internal.SheetDocumentDisplayer.display(SheetDocumentDisplayer.java:52)
at org.xwiki.display.internal.ConfiguredDocumentDisplayer.display(ConfiguredDocumentDisplayer.java:68)
at org.xwiki.display.internal.ConfiguredDocumentDisplayer.display(ConfiguredDocumentDisplayer.java:42)
at com.xpn.xwiki.doc.XWikiDocument.display(XWikiDocument.java:1428)
at com.xpn.xwiki.doc.XWikiDocument.getRenderedContent(XWikiDocument.java:1564)
at com.xpn.xwiki.doc.XWikiDocument.displayDocument(XWikiDocument.java:1514)
at com.xpn.xwiki.doc.XWikiDocument.displayDocument(XWikiDocument.java:1483)
at com.xpn.xwiki.api.Document.displayDocument(Document.java:821)
at jdk.internal.reflect.GeneratedMethodAccessor653.invoke(Unknown Source)
at java.base/jdk.internal.reflect.DelegatingMethodAccessorImpl.invoke(DelegatingMethodAccessorImpl.java:43)
at java.base/java.lang.reflect.Method.invoke(Method.java:569)
at org.apache.velocity.util.introspection.UberspectImpl$VelMethodImpl.doInvoke(UberspectImpl.java:571)
at org.apache.velocity.util.introspection.UberspectImpl$VelMethodImpl.invoke(UberspectImpl.java:554)
at org.apache.velocity.runtime.parser.node.ASTMethod.execute(ASTMethod.java:221)
at org.apache.velocity.runtime.parser.node.ASTReference.execute(ASTReference.java:368)
at org.apache.velocity.runtime.parser.node.ASTReference.value(ASTReference.java:704)
at org.apache.velocity.runtime.parser.node.ASTExpression.value(ASTExpression.java:75)
at org.apache.velocity.runtime.parser.node.ASTSetDirective.render(ASTSetDirective.java:242)
at org.apache.velocity.runtime.parser.node.ASTBlock.render(ASTBlock.java:147)
at org.apache.velocity.runtime.parser.node.SimpleNode.render(SimpleNode.java:439)
at org.apache.velocity.runtime.parser.node.ASTIfStatement.render(ASTIfStatement.java:190)
at org.apache.velocity.runtime.parser.node.ASTBlock.render(ASTBlock.java:147)
at org.xwiki.velocity.internal.directive.TryCatchDirective.render(TryCatchDirective.java:86)
at org.apache.velocity.runtime.parser.node.ASTDirective.render(ASTDirective.java:304)
at org.apache.velocity.runtime.parser.node.SimpleNode.render(SimpleNode.java:439)
at org.apache.velocity.Template.merge(Template.java:358)
at org.apache.velocity.Template.merge(Template.java:262)
at org.xwiki.velocity.internal.InternalVelocityEngine.evaluate(InternalVelocityEngine.java:233)
at com.xpn.xwiki.internal.template.VelocityTemplateEvaluator.evaluateContent(VelocityTemplateEvaluator.java:107)
at com.xpn.xwiki.internal.template.TemplateAsyncRenderer.evaluateContent(TemplateAsyncRenderer.java:219)
at com.xpn.xwiki.internal.template.TemplateAsyncRenderer.renderVelocity(TemplateAsyncRenderer.java:174)
at com.xpn.xwiki.internal.template.TemplateAsyncRenderer.render(TemplateAsyncRenderer.java:135)
at com.xpn.xwiki.internal.template.TemplateAsyncRenderer.render(TemplateAsyncRenderer.java:54)
at org.xwiki.rendering.async.internal.DefaultAsyncRendererExecutor.lambda$syncRender$0(DefaultAsyncRendererExecutor.java:284)
at com.xpn.xwiki.internal.security.authorization.DefaultAuthorExecutor.call(DefaultAuthorExecutor.java:98)
at org.xwiki.rendering.async.internal.DefaultAsyncRendererExecutor.syncRender(DefaultAsyncRendererExecutor.java:284)
at org.xwiki.rendering.async.internal.DefaultAsyncRendererExecutor.render(DefaultAsyncRendererExecutor.java:267)
at org.xwiki.rendering.async.internal.block.DefaultBlockAsyncRendererExecutor.render(DefaultBlockAsyncRendererExecutor.java:154)
at com.xpn.xwiki.internal.template.InternalTemplateManager.render(InternalTemplateManager.java:904)
at com.xpn.xwiki.internal.template.InternalTemplateManager.renderFromSkin(InternalTemplateManager.java:866)
at com.xpn.xwiki.internal.template.InternalTemplateManager.render(InternalTemplateManager.java:853)
at com.xpn.xwiki.internal.template.InternalTemplateManager.renderNoException(InternalTemplateManager.java:808)
at com.xpn.xwiki.internal.template.InternalTemplateManager.renderNoException(InternalTemplateManager.java:800)
at com.xpn.xwiki.internal.template.DefaultTemplateManager.renderNoException(DefaultTemplateManager.java:79)
at com.xpn.xwiki.internal.template.DefaultTemplateManager.renderNoException(DefaultTemplateManager.java:73)
at org.xwiki.template.script.TemplateScriptService.render(TemplateScriptService.java:54)
at jdk.internal.reflect.GeneratedMethodAccessor207.invoke(Unknown Source)
at java.base/jdk.internal.reflect.DelegatingMethodAccessorImpl.invoke(DelegatingMethodAccessorImpl.java:43)
at java.base/java.lang.reflect.Method.invoke(Method.java:569)
at org.apache.velocity.util.introspection.UberspectImpl$VelMethodImpl.doInvoke(UberspectImpl.java:571)
at org.apache.velocity.util.introspection.UberspectImpl$VelMethodImpl.invoke(UberspectImpl.java:554)
at org.apache.velocity.runtime.parser.node.ASTMethod.execute(ASTMethod.java:221)
at org.apache.velocity.runtime.parser.node.ASTReference.execute(ASTReference.java:368)
at org.apache.velocity.runtime.parser.node.ASTReference.render(ASTReference.java:492)
at org.apache.velocity.runtime.parser.node.ASTBlock.render(ASTBlock.java:147)
at org.apache.velocity.runtime.directive.VelocimacroProxy.render(VelocimacroProxy.java:217)
at org.apache.velocity.runtime.directive.RuntimeMacro.render(RuntimeMacro.java:331)
at org.apache.velocity.runtime.directive.RuntimeMacro.render(RuntimeMacro.java:261)
at org.apache.velocity.runtime.parser.node.ASTDirective.render(ASTDirective.java:304)
at org.apache.velocity.runtime.parser.node.ASTBlock.render(ASTBlock.java:147)
at org.apache.velocity.runtime.parser.node.ASTIfStatement.render(ASTIfStatement.java:171)
at org.apache.velocity.runtime.parser.node.ASTBlock.render(ASTBlock.java:147)
at org.apache.velocity.runtime.parser.node.SimpleNode.render(SimpleNode.java:439)
at org.apache.velocity.runtime.parser.node.ASTIfStatement.render(ASTIfStatement.java:190)
at org.apache.velocity.runtime.parser.node.SimpleNode.render(SimpleNode.java:439)
at org.apache.velocity.Template.merge(Template.java:358)
at org.apache.velocity.Template.merge(Template.java:262)
at org.xwiki.velocity.internal.InternalVelocityEngine.evaluate(InternalVelocityEngine.java:233)
at com.xpn.xwiki.internal.template.VelocityTemplateEvaluator.evaluateContent(VelocityTemplateEvaluator.java:107)
at com.xpn.xwiki.internal.template.TemplateAsyncRenderer.evaluateContent(TemplateAsyncRenderer.java:219)
at com.xpn.xwiki.internal.template.TemplateAsyncRenderer.renderVelocity(TemplateAsyncRenderer.java:174)
at com.xpn.xwiki.internal.template.TemplateAsyncRenderer.render(TemplateAsyncRenderer.java:135)
at com.xpn.xwiki.internal.template.TemplateAsyncRenderer.render(TemplateAsyncRenderer.java:54)
at org.xwiki.rendering.async.internal.DefaultAsyncRendererExecutor.lambda$syncRender$0(DefaultAsyncRendererExecutor.java:284)
at com.xpn.xwiki.internal.security.authorization.DefaultAuthorExecutor.call(DefaultAuthorExecutor.java:98)
at org.xwiki.rendering.async.internal.DefaultAsyncRendererExecutor.syncRender(DefaultAsyncRendererExecutor.java:284)
at org.xwiki.rendering.async.internal.DefaultAsyncRendererExecutor.render(DefaultAsyncRendererExecutor.java:267)
at org.xwiki.rendering.async.internal.block.DefaultBlockAsyncRendererExecutor.render(DefaultBlockAsyncRendererExecutor.java:154)
at com.xpn.xwiki.internal.template.InternalTemplateManager.render(InternalTemplateManager.java:904)
at com.xpn.xwiki.internal.template.InternalTemplateManager.renderFromSkin(InternalTemplateManager.java:866)
at com.xpn.xwiki.internal.template.InternalTemplateManager.renderFromSkin(InternalTemplateManager.java:846)
at com.xpn.xwiki.internal.template.InternalTemplateManager.render(InternalTemplateManager.java:832)
at com.xpn.xwiki.internal.template.DefaultTemplateManager.render(DefaultTemplateManager.java:91)
at com.xpn.xwiki.internal.template.DefaultTemplateManager.render(DefaultTemplateManager.java:85)
at com.xpn.xwiki.XWiki.evaluateTemplate(XWiki.java:2569)
at com.xpn.xwiki.web.Utils.parseTemplate(Utils.java:180)
at com.xpn.xwiki.web.XWikiAction.execute(XWikiAction.java:650)
at com.xpn.xwiki.web.XWikiAction.execute(XWikiAction.java:338)
at com.xpn.xwiki.web.LegacyActionServlet.service(LegacyActionServlet.java:108)
at javax.servlet.http.HttpServlet.service(HttpServlet.java:764)
at org.apache.catalina.core.ApplicationFilterChain.internalDoFilter(ApplicationFilterChain.java:227)
at org.apache.catalina.core.ApplicationFilterChain.doFilter(ApplicationFilterChain.java:162)
at com.xpn.xwiki.web.ActionFilter.doFilter(ActionFilter.java:122)
at org.apache.catalina.core.ApplicationFilterChain.internalDoFilter(ApplicationFilterChain.java:189)
at org.apache.catalina.core.ApplicationFilterChain.doFilter(ApplicationFilterChain.java:162)
at org.xwiki.wysiwyg.filter.ConversionFilter.doFilter(ConversionFilter.java:61)
at org.apache.catalina.core.ApplicationFilterChain.internalDoFilter(ApplicationFilterChain.java:189)
at org.apache.catalina.core.ApplicationFilterChain.doFilter(ApplicationFilterChain.java:162)
at org.apache.tomcat.websocket.server.WsFilter.doFilter(WsFilter.java:53)
at org.apache.catalina.core.ApplicationFilterChain.internalDoFilter(ApplicationFilterChain.java:189)
at org.apache.catalina.core.ApplicationFilterChain.doFilter(ApplicationFilterChain.java:162)
at org.xwiki.container.servlet.filters.internal.SetHTTPHeaderFilter.doFilter(SetHTTPHeaderFilter.java:63)
at org.apache.catalina.core.ApplicationFilterChain.internalDoFilter(ApplicationFilterChain.java:189)
at org.apache.catalina.core.ApplicationFilterChain.doFilter(ApplicationFilterChain.java:162)
at org.xwiki.resource.servlet.RoutingFilter.doFilter(RoutingFilter.java:132)
at org.apache.catalina.core.ApplicationFilterChain.internalDoFilter(ApplicationFilterChain.java:189)
at org.apache.catalina.core.ApplicationFilterChain.doFilter(ApplicationFilterChain.java:162)
at org.xwiki.container.servlet.filters.internal.SavedRequestRestorerFilter.doFilter(SavedRequestRestorerFilter.java:208)
at org.apache.catalina.core.ApplicationFilterChain.internalDoFilter(ApplicationFilterChain.java:189)
at org.apache.catalina.core.ApplicationFilterChain.doFilter(ApplicationFilterChain.java:162)
at org.xwiki.container.servlet.filters.internal.SetCharacterEncodingFilter.doFilter(SetCharacterEncodingFilter.java:117)
at org.apache.catalina.core.ApplicationFilterChain.internalDoFilter(ApplicationFilterChain.java:189)
at org.apache.catalina.core.ApplicationFilterChain.doFilter(ApplicationFilterChain.java:162)
at org.apache.catalina.core.StandardWrapperValve.invoke(StandardWrapperValve.java:197)
at org.apache.catalina.core.StandardContextValve.invoke(StandardContextValve.java:97)
at org.apache.catalina.authenticator.AuthenticatorBase.invoke(AuthenticatorBase.java:541)
at org.apache.catalina.core.StandardHostValve.invoke(StandardHostValve.java:135)
at org.apache.catalina.valves.ErrorReportValve.invoke(ErrorReportValve.java:92)
at org.apache.catalina.valves.AbstractAccessLogValve.invoke(AbstractAccessLogValve.java:687)
at org.apache.catalina.core.StandardEngineValve.invoke(StandardEngineValve.java:78)
at org.apache.catalina.connector.CoyoteAdapter.service(CoyoteAdapter.java:360)
at org.apache.coyote.http11.Http11Processor.service(Http11Processor.java:399)
at org.apache.coyote.AbstractProcessorLight.process(AbstractProcessorLight.java:65)
at org.apache.coyote.AbstractProtocol$ConnectionHandler.process(AbstractProtocol.java:890)
at org.apache.tomcat.util.net.NioEndpoint$SocketProcessor.doRun(NioEndpoint.java:1743)
at org.apache.tomcat.util.net.SocketProcessorBase.run(SocketProcessorBase.java:49)
at org.apache.tomcat.util.threads.ThreadPoolExecutor.runWorker(ThreadPoolExecutor.java:1191)
at org.apache.tomcat.util.threads.ThreadPoolExecutor$Worker.run(ThreadPoolExecutor.java:659)
at org.apache.tomcat.util.threads.TaskThread$WrappingRunnable.run(TaskThread.java:61)
at java.base/java.lang.Thread.run(Thread.java:840)
This lesson will describe how to use the Import Engine to upload a CSV formatted list of users into the ONEcount database.
Please refer to Quick Start Guide - User Operations for important information about basic concepts and rules relating to imports and bulk operations.
OPEN THE "IMPORT" WINDOW
Select USER OPERATIONS from the Main Menu.
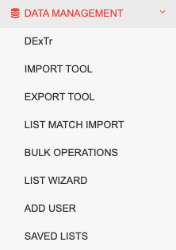
Click on "IMPORT" in the sub-menu.
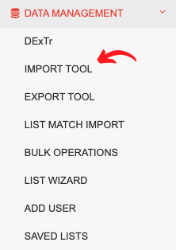
The "Import" window will open, where you begin begin the import process.
IMPORT STEPS
Select Import File
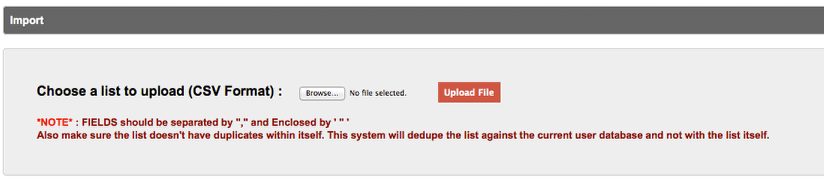
1. In the Import window choose your import file using the "Browse" button (1), and select "Upload File" (2).

The list will be uploaded, and the Import window opened. You will see a confirmation that the list was uploaded successfully, along with the number of records uploaded. (See screen shot below.) The list has not been imported at this point but uploaded to the system in preparation for import.

Complete Import Information
2. Give your import an Import Title (1), Import Description (2), select a Source Code (3), select the product term(s) from the Product List (4), and select a Product Status.
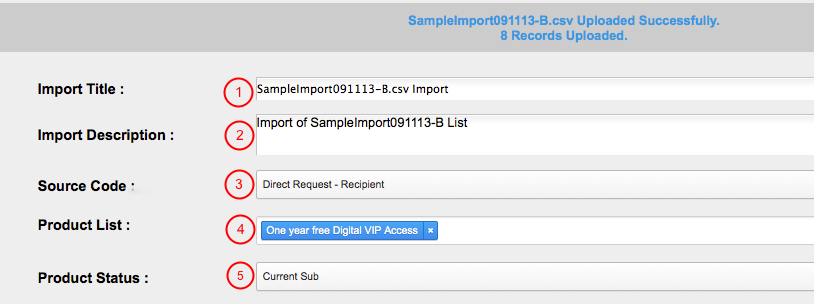
Note that the product terms are what appear in the list of products (#4 above) in the Import Engine. Because all products have a term(s) and if a product has multiple terms (i.e. a free print subscription and a paid print subscription), each term needs to appear in the "product" list so that a user can be subscribed to that specific term.
Source Codes are used to track the source of a transaction, ie the source of the user/name in the ONEcount database.* When assigned to a form, a source code can be used as a selection when generating lists and reports, to track what form a user/subscriber completed, to track what list a user came from when importing users, or to show which e-mail campaign a user came from . (A source code tag can be appended to links in a newsletter campaign to override a source code assigned when a form is created, which allows you to identify that a user was directed to a form and came into the system from a link in that campaign.) Source Codes are created using the Source Codes tool in the INVENTORY module.
*For audited publications, source codes that identify the source of user names in accordance with cagetories in Paragraph 3b reports should be created. Forms and imported lists should be assigned the appropriate source code for the source of the name. For example:
1) You want to identify all Internet Direct Requests from a subscription form, so you would create a source code called, for example, IDRPrintForm and attach it to the subscription form. This source code will be attached to any user record created when a user subscribes using that form. The source codes indicates it was an Internet Direct Request from the form, and when a 3b report is generated those users will be included in the count for internet direct requests.
2) You want to identify all Telecommunications Direct Requests from a telemarketing renewal campaign, so you create source code called, for example, TDR05152104 to identify that renewal list imported on May 15, 2014. When doing the import to update/renew, select that source code and all records imported will have that source attached to their record in ONEcount. So, when generating a 3b report those renewed users will be included in the count for telecommunications direct requests.
If you have a master file including multiple codes for circulationc sources, separate the file by source (e.g. a sub-file for each 3b category/source of circulation) and import each sub-file using the appropriate source code created in ONEcount.
You can select multiple products. Note that the same source code and product status will be assigned to each product. If you wish to have a different product status assigned to each product, e.g. Qualified Print for a print product and Current Subscriber for a newsletter, perform a separate import for each.
Below the Product List, you will see a list of any existing Import Mappings (templates), if any.
Map Data
3a. If using an Import Mapping Template: Below the Product List, you will see a list of any existing Import Mappings (templates). Find the template you wish to use and select "Use" then proceed to Step 5.

For information on how to use and/or create mapping templates, see the lessons "How to Use an Import Mapping Template" and "How to Create an Import Mapping Template".
You may select to use a template and then modify it by adding/removing fields to be mapped (as described in Step 4.)
3b. If not using an Import Mapping Template: The mapping function is found below the list of mapping templates. Proceed to Step 4.
4. Proceed to the mapping section and map your fields (either from scratch or by modifying an Import Mapping Template).
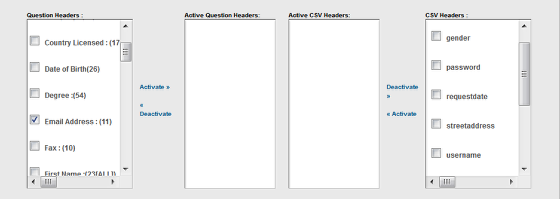
Definitions:
Question Header - This is a list of all questions/data fields in your ONEcount database. Question Headers are selected for mapping to CSV Headers when importing. You can map one, several, or all headers depending upon what information you want to import into the database.
Active Question Header - These are the Question Headers (fields) that have been selected to map to/match the Active CSV Headers (fields) when importing. Active Question Headers must be matched with the corresponding Active CSV Headers in order to import. (The name of the Question Header may differ from the name of the CSV Header, but use care when matching because he contents of that field will be imported into the selected Question field in the ONEcount database.)
CSV Header - This is a list of all the column headers (fields) in your CSV import file. CSV headers are selected for mapping to Question Headers when importing. You can map one, several, or all headers depending upon what information you want to import into the database.
Active CSV Header - These are the CSV column headers selected to map to the Question Headers when importing. Active CSV Headers must be matched with the corresponding Active Question Headers in order to import. (The name of the Question Header may differ from the name of the CSV Header, but use care when matching because the contents of that field will be imported into the selected Question field in the ONEcount database.)
To map fields:
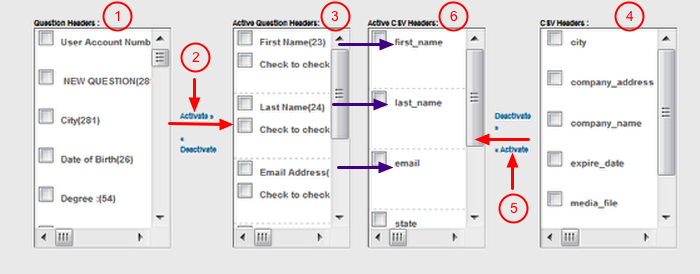
- Select data Question Headers (felds) from the ONEcount database (1) then select "Activate" (2). Selected Question Headers will appear in the "Active Question Headers" column (3). (Move from left to right.)
- Select the CSV Headers to map from the CSV import file (4) then select "Activate" (5). Selected CSV Headers will appear in the "Active CSV Headers" column (6). (Move from right to left.) Be sure that the Active CSV Headers match up with/are in the same order as the Active Question Headers.
To move more than one field at a time into the "Active Header" box, select multiple fields then click on "Activate".
To remove a field from the Active column, select the field and click on "Deactivate". Be sure to remove the same field from the other Active column.
When mapping fields, Active Question Headers and Active CSV Headers must match, ie the fields must be in the same order. (See purple arrows in screenshot above.)
Question Header and CSV Header field names don't need to be identical, e.g. a Question Header may be "Email Address" and CSV Header "Email".
5. DO NOT SKIP THIS STEP – ALWAYS CHECK FOR DUPLICATES! Check the box for the Active Question Header(s) you want to check for duplicates against.
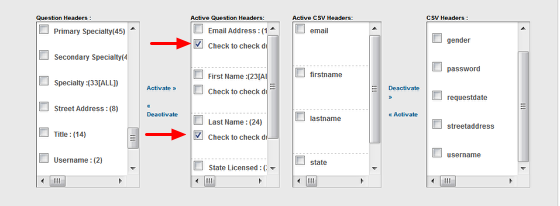
In the screen shot above, the system will check for duplicates against the Email and Last Name fields. A duplicate would be identified when a record being imported has the same email address AND last name as a record already in the ONEcount database.
You can select multiple headers to check for duplicates, but be aware that ONEcount uses “AND” logic when doing so. For example, if you select to check email, first name, and last name fields for duplicates, ONEcount will look for records in the ONEcount database that have the same email AND first name AND last name as a record being imported. A record would be a duplicate only if all three fields match.
It is important to be sure that records in ONEcount and the import file contain data for the fields you are checking for duplicates against. If they don't, a record may not be matched as a duplicate. For example, you check for duplicates against email AND last name: a record in ONEcount has the same email as a record in the import file and the ONEcount record DOES include last name. The record in the import file DOESN'T include last name. The record won't be counted as a duplicate because the email AND last name do not match.
Failed to execute the [include] macro. Cause: [Current user [null] doesn't have view rights on document [xwiki:Licenses.Code.VelocityMacros]]. Click on this message for details.
org.xwiki.rendering.macro.MacroExecutionException: Current user [null] doesn't have view rights on document [xwiki:Licenses.Code.VelocityMacros]
at org.xwiki.rendering.internal.macro.include.IncludeMacro.execute(IncludeMacro.java:124)
at org.xwiki.rendering.internal.macro.include.IncludeMacro.execute(IncludeMacro.java:59)
at org.xwiki.rendering.internal.transformation.macro.MacroTransformation.transform(MacroTransformation.java:311)
at org.xwiki.rendering.internal.transformation.DefaultRenderingContext.transformInContext(DefaultRenderingContext.java:183)
at org.xwiki.rendering.async.internal.block.AbstractBlockAsyncRenderer.transform(AbstractBlockAsyncRenderer.java:76)
at org.xwiki.rendering.wikimacro.internal.DefaultWikiMacroRenderer.transform(DefaultWikiMacroRenderer.java:882)
at org.xwiki.rendering.wikimacro.internal.DefaultWikiMacroRenderer.transform(DefaultWikiMacroRenderer.java:868)
at org.xwiki.rendering.wikimacro.internal.DefaultWikiMacroRenderer.transform(DefaultWikiMacroRenderer.java:594)
at org.xwiki.rendering.wikimacro.internal.DefaultWikiMacroRenderer.execute(DefaultWikiMacroRenderer.java:409)
at org.xwiki.rendering.async.internal.block.AbstractBlockAsyncRenderer.render(AbstractBlockAsyncRenderer.java:157)
at org.xwiki.rendering.async.internal.block.AbstractBlockAsyncRenderer.render(AbstractBlockAsyncRenderer.java:54)
at org.xwiki.rendering.async.internal.DefaultAsyncRendererExecutor.lambda$syncRender$0(DefaultAsyncRendererExecutor.java:284)
at com.xpn.xwiki.internal.security.authorization.DefaultAuthorExecutor.call(DefaultAuthorExecutor.java:98)
at org.xwiki.rendering.async.internal.DefaultAsyncRendererExecutor.syncRender(DefaultAsyncRendererExecutor.java:284)
at org.xwiki.rendering.async.internal.DefaultAsyncRendererExecutor.render(DefaultAsyncRendererExecutor.java:267)
at org.xwiki.rendering.async.internal.block.DefaultBlockAsyncRendererExecutor.execute(DefaultBlockAsyncRendererExecutor.java:125)
at org.xwiki.rendering.wikimacro.internal.DefaultWikiMacro.execute(DefaultWikiMacro.java:129)
at org.xwiki.rendering.wikimacro.internal.DefaultWikiMacro.execute(DefaultWikiMacro.java:61)
at org.xwiki.rendering.internal.transformation.macro.MacroTransformation.transform(MacroTransformation.java:311)
at org.xwiki.rendering.internal.transformation.DefaultRenderingContext.transformInContext(DefaultRenderingContext.java:183)
at org.xwiki.rendering.internal.transformation.DefaultTransformationManager.performTransformations(DefaultTransformationManager.java:88)
at org.xwiki.display.internal.DocumentContentAsyncExecutor.executeInCurrentExecutionContext(DocumentContentAsyncExecutor.java:396)
at org.xwiki.display.internal.DocumentContentAsyncExecutor.execute(DocumentContentAsyncExecutor.java:269)
at org.xwiki.display.internal.DocumentContentAsyncRenderer.execute(DocumentContentAsyncRenderer.java:112)
at org.xwiki.rendering.async.internal.block.AbstractBlockAsyncRenderer.render(AbstractBlockAsyncRenderer.java:157)
at org.xwiki.rendering.async.internal.block.AbstractBlockAsyncRenderer.render(AbstractBlockAsyncRenderer.java:54)
at org.xwiki.rendering.async.internal.DefaultAsyncRendererExecutor.syncRender(DefaultAsyncRendererExecutor.java:290)
at org.xwiki.rendering.async.internal.DefaultAsyncRendererExecutor.render(DefaultAsyncRendererExecutor.java:267)
at org.xwiki.rendering.async.internal.block.DefaultBlockAsyncRendererExecutor.execute(DefaultBlockAsyncRendererExecutor.java:125)
at org.xwiki.display.internal.DocumentContentDisplayer.display(DocumentContentDisplayer.java:67)
at org.xwiki.display.internal.DocumentContentDisplayer.display(DocumentContentDisplayer.java:43)
at org.xwiki.display.internal.DefaultDocumentDisplayer.display(DefaultDocumentDisplayer.java:96)
at org.xwiki.display.internal.DefaultDocumentDisplayer.display(DefaultDocumentDisplayer.java:39)
at org.xwiki.sheet.internal.SheetDocumentDisplayer.display(SheetDocumentDisplayer.java:123)
at org.xwiki.sheet.internal.SheetDocumentDisplayer.display(SheetDocumentDisplayer.java:52)
at org.xwiki.display.internal.ConfiguredDocumentDisplayer.display(ConfiguredDocumentDisplayer.java:68)
at org.xwiki.display.internal.ConfiguredDocumentDisplayer.display(ConfiguredDocumentDisplayer.java:42)
at com.xpn.xwiki.doc.XWikiDocument.display(XWikiDocument.java:1428)
at com.xpn.xwiki.doc.XWikiDocument.getRenderedContent(XWikiDocument.java:1564)
at com.xpn.xwiki.doc.XWikiDocument.displayDocument(XWikiDocument.java:1514)
at com.xpn.xwiki.doc.XWikiDocument.displayDocument(XWikiDocument.java:1483)
at com.xpn.xwiki.api.Document.displayDocument(Document.java:821)
at jdk.internal.reflect.GeneratedMethodAccessor653.invoke(Unknown Source)
at java.base/jdk.internal.reflect.DelegatingMethodAccessorImpl.invoke(DelegatingMethodAccessorImpl.java:43)
at java.base/java.lang.reflect.Method.invoke(Method.java:569)
at org.apache.velocity.util.introspection.UberspectImpl$VelMethodImpl.doInvoke(UberspectImpl.java:571)
at org.apache.velocity.util.introspection.UberspectImpl$VelMethodImpl.invoke(UberspectImpl.java:554)
at org.apache.velocity.runtime.parser.node.ASTMethod.execute(ASTMethod.java:221)
at org.apache.velocity.runtime.parser.node.ASTReference.execute(ASTReference.java:368)
at org.apache.velocity.runtime.parser.node.ASTReference.value(ASTReference.java:704)
at org.apache.velocity.runtime.parser.node.ASTExpression.value(ASTExpression.java:75)
at org.apache.velocity.runtime.parser.node.ASTSetDirective.render(ASTSetDirective.java:242)
at org.apache.velocity.runtime.parser.node.ASTBlock.render(ASTBlock.java:147)
at org.apache.velocity.runtime.parser.node.SimpleNode.render(SimpleNode.java:439)
at org.apache.velocity.runtime.parser.node.ASTIfStatement.render(ASTIfStatement.java:190)
at org.apache.velocity.runtime.parser.node.ASTBlock.render(ASTBlock.java:147)
at org.xwiki.velocity.internal.directive.TryCatchDirective.render(TryCatchDirective.java:86)
at org.apache.velocity.runtime.parser.node.ASTDirective.render(ASTDirective.java:304)
at org.apache.velocity.runtime.parser.node.SimpleNode.render(SimpleNode.java:439)
at org.apache.velocity.Template.merge(Template.java:358)
at org.apache.velocity.Template.merge(Template.java:262)
at org.xwiki.velocity.internal.InternalVelocityEngine.evaluate(InternalVelocityEngine.java:233)
at com.xpn.xwiki.internal.template.VelocityTemplateEvaluator.evaluateContent(VelocityTemplateEvaluator.java:107)
at com.xpn.xwiki.internal.template.TemplateAsyncRenderer.evaluateContent(TemplateAsyncRenderer.java:219)
at com.xpn.xwiki.internal.template.TemplateAsyncRenderer.renderVelocity(TemplateAsyncRenderer.java:174)
at com.xpn.xwiki.internal.template.TemplateAsyncRenderer.render(TemplateAsyncRenderer.java:135)
at com.xpn.xwiki.internal.template.TemplateAsyncRenderer.render(TemplateAsyncRenderer.java:54)
at org.xwiki.rendering.async.internal.DefaultAsyncRendererExecutor.lambda$syncRender$0(DefaultAsyncRendererExecutor.java:284)
at com.xpn.xwiki.internal.security.authorization.DefaultAuthorExecutor.call(DefaultAuthorExecutor.java:98)
at org.xwiki.rendering.async.internal.DefaultAsyncRendererExecutor.syncRender(DefaultAsyncRendererExecutor.java:284)
at org.xwiki.rendering.async.internal.DefaultAsyncRendererExecutor.render(DefaultAsyncRendererExecutor.java:267)
at org.xwiki.rendering.async.internal.block.DefaultBlockAsyncRendererExecutor.render(DefaultBlockAsyncRendererExecutor.java:154)
at com.xpn.xwiki.internal.template.InternalTemplateManager.render(InternalTemplateManager.java:904)
at com.xpn.xwiki.internal.template.InternalTemplateManager.renderFromSkin(InternalTemplateManager.java:866)
at com.xpn.xwiki.internal.template.InternalTemplateManager.render(InternalTemplateManager.java:853)
at com.xpn.xwiki.internal.template.InternalTemplateManager.renderNoException(InternalTemplateManager.java:808)
at com.xpn.xwiki.internal.template.InternalTemplateManager.renderNoException(InternalTemplateManager.java:800)
at com.xpn.xwiki.internal.template.DefaultTemplateManager.renderNoException(DefaultTemplateManager.java:79)
at com.xpn.xwiki.internal.template.DefaultTemplateManager.renderNoException(DefaultTemplateManager.java:73)
at org.xwiki.template.script.TemplateScriptService.render(TemplateScriptService.java:54)
at jdk.internal.reflect.GeneratedMethodAccessor207.invoke(Unknown Source)
at java.base/jdk.internal.reflect.DelegatingMethodAccessorImpl.invoke(DelegatingMethodAccessorImpl.java:43)
at java.base/java.lang.reflect.Method.invoke(Method.java:569)
at org.apache.velocity.util.introspection.UberspectImpl$VelMethodImpl.doInvoke(UberspectImpl.java:571)
at org.apache.velocity.util.introspection.UberspectImpl$VelMethodImpl.invoke(UberspectImpl.java:554)
at org.apache.velocity.runtime.parser.node.ASTMethod.execute(ASTMethod.java:221)
at org.apache.velocity.runtime.parser.node.ASTReference.execute(ASTReference.java:368)
at org.apache.velocity.runtime.parser.node.ASTReference.render(ASTReference.java:492)
at org.apache.velocity.runtime.parser.node.ASTBlock.render(ASTBlock.java:147)
at org.apache.velocity.runtime.directive.VelocimacroProxy.render(VelocimacroProxy.java:217)
at org.apache.velocity.runtime.directive.RuntimeMacro.render(RuntimeMacro.java:331)
at org.apache.velocity.runtime.directive.RuntimeMacro.render(RuntimeMacro.java:261)
at org.apache.velocity.runtime.parser.node.ASTDirective.render(ASTDirective.java:304)
at org.apache.velocity.runtime.parser.node.SimpleNode.render(SimpleNode.java:439)
at org.apache.velocity.Template.merge(Template.java:358)
at org.apache.velocity.Template.merge(Template.java:262)
at org.xwiki.velocity.internal.InternalVelocityEngine.evaluate(InternalVelocityEngine.java:233)
at com.xpn.xwiki.internal.template.VelocityTemplateEvaluator.evaluateContent(VelocityTemplateEvaluator.java:107)
at com.xpn.xwiki.internal.template.TemplateAsyncRenderer.evaluateContent(TemplateAsyncRenderer.java:219)
at com.xpn.xwiki.internal.template.TemplateAsyncRenderer.renderVelocity(TemplateAsyncRenderer.java:174)
at com.xpn.xwiki.internal.template.TemplateAsyncRenderer.render(TemplateAsyncRenderer.java:135)
at com.xpn.xwiki.internal.template.TemplateAsyncRenderer.render(TemplateAsyncRenderer.java:54)
at org.xwiki.rendering.async.internal.DefaultAsyncRendererExecutor.lambda$syncRender$0(DefaultAsyncRendererExecutor.java:284)
at com.xpn.xwiki.internal.security.authorization.DefaultAuthorExecutor.call(DefaultAuthorExecutor.java:98)
at org.xwiki.rendering.async.internal.DefaultAsyncRendererExecutor.syncRender(DefaultAsyncRendererExecutor.java:284)
at org.xwiki.rendering.async.internal.DefaultAsyncRendererExecutor.render(DefaultAsyncRendererExecutor.java:267)
at org.xwiki.rendering.async.internal.block.DefaultBlockAsyncRendererExecutor.render(DefaultBlockAsyncRendererExecutor.java:154)
at com.xpn.xwiki.internal.template.InternalTemplateManager.render(InternalTemplateManager.java:904)
at com.xpn.xwiki.internal.template.InternalTemplateManager.renderFromSkin(InternalTemplateManager.java:866)
at com.xpn.xwiki.internal.template.InternalTemplateManager.render(InternalTemplateManager.java:853)
at com.xpn.xwiki.internal.template.InternalTemplateManager.renderNoException(InternalTemplateManager.java:808)
at com.xpn.xwiki.internal.template.InternalTemplateManager.renderNoException(InternalTemplateManager.java:800)
at com.xpn.xwiki.internal.template.DefaultTemplateManager.renderNoException(DefaultTemplateManager.java:79)
at com.xpn.xwiki.internal.template.DefaultTemplateManager.renderNoException(DefaultTemplateManager.java:73)
at org.xwiki.template.script.TemplateScriptService.render(TemplateScriptService.java:54)
at jdk.internal.reflect.GeneratedMethodAccessor207.invoke(Unknown Source)
at java.base/jdk.internal.reflect.DelegatingMethodAccessorImpl.invoke(DelegatingMethodAccessorImpl.java:43)
at java.base/java.lang.reflect.Method.invoke(Method.java:569)
at org.apache.velocity.util.introspection.UberspectImpl$VelMethodImpl.doInvoke(UberspectImpl.java:571)
at org.apache.velocity.util.introspection.UberspectImpl$VelMethodImpl.invoke(UberspectImpl.java:554)
at org.apache.velocity.runtime.parser.node.ASTMethod.execute(ASTMethod.java:221)
at org.apache.velocity.runtime.parser.node.ASTReference.execute(ASTReference.java:368)
at org.apache.velocity.runtime.parser.node.ASTReference.render(ASTReference.java:492)
at org.apache.velocity.runtime.parser.node.ASTBlock.render(ASTBlock.java:147)
at org.apache.velocity.runtime.directive.VelocimacroProxy.render(VelocimacroProxy.java:217)
at org.apache.velocity.runtime.directive.RuntimeMacro.render(RuntimeMacro.java:331)
at org.apache.velocity.runtime.directive.RuntimeMacro.render(RuntimeMacro.java:261)
at org.apache.velocity.runtime.parser.node.ASTDirective.render(ASTDirective.java:304)
at org.apache.velocity.runtime.parser.node.ASTBlock.render(ASTBlock.java:147)
at org.apache.velocity.runtime.parser.node.ASTIfStatement.render(ASTIfStatement.java:171)
at org.apache.velocity.runtime.parser.node.ASTBlock.render(ASTBlock.java:147)
at org.apache.velocity.runtime.parser.node.SimpleNode.render(SimpleNode.java:439)
at org.apache.velocity.runtime.parser.node.ASTIfStatement.render(ASTIfStatement.java:190)
at org.apache.velocity.runtime.parser.node.SimpleNode.render(SimpleNode.java:439)
at org.apache.velocity.Template.merge(Template.java:358)
at org.apache.velocity.Template.merge(Template.java:262)
at org.xwiki.velocity.internal.InternalVelocityEngine.evaluate(InternalVelocityEngine.java:233)
at com.xpn.xwiki.internal.template.VelocityTemplateEvaluator.evaluateContent(VelocityTemplateEvaluator.java:107)
at com.xpn.xwiki.internal.template.TemplateAsyncRenderer.evaluateContent(TemplateAsyncRenderer.java:219)
at com.xpn.xwiki.internal.template.TemplateAsyncRenderer.renderVelocity(TemplateAsyncRenderer.java:174)
at com.xpn.xwiki.internal.template.TemplateAsyncRenderer.render(TemplateAsyncRenderer.java:135)
at com.xpn.xwiki.internal.template.TemplateAsyncRenderer.render(TemplateAsyncRenderer.java:54)
at org.xwiki.rendering.async.internal.DefaultAsyncRendererExecutor.lambda$syncRender$0(DefaultAsyncRendererExecutor.java:284)
at com.xpn.xwiki.internal.security.authorization.DefaultAuthorExecutor.call(DefaultAuthorExecutor.java:98)
at org.xwiki.rendering.async.internal.DefaultAsyncRendererExecutor.syncRender(DefaultAsyncRendererExecutor.java:284)
at org.xwiki.rendering.async.internal.DefaultAsyncRendererExecutor.render(DefaultAsyncRendererExecutor.java:267)
at org.xwiki.rendering.async.internal.block.DefaultBlockAsyncRendererExecutor.render(DefaultBlockAsyncRendererExecutor.java:154)
at com.xpn.xwiki.internal.template.InternalTemplateManager.render(InternalTemplateManager.java:904)
at com.xpn.xwiki.internal.template.InternalTemplateManager.renderFromSkin(InternalTemplateManager.java:866)
at com.xpn.xwiki.internal.template.InternalTemplateManager.renderFromSkin(InternalTemplateManager.java:846)
at com.xpn.xwiki.internal.template.InternalTemplateManager.render(InternalTemplateManager.java:832)
at com.xpn.xwiki.internal.template.DefaultTemplateManager.render(DefaultTemplateManager.java:91)
at com.xpn.xwiki.internal.template.DefaultTemplateManager.render(DefaultTemplateManager.java:85)
at com.xpn.xwiki.XWiki.evaluateTemplate(XWiki.java:2569)
at com.xpn.xwiki.web.Utils.parseTemplate(Utils.java:180)
at com.xpn.xwiki.web.XWikiAction.execute(XWikiAction.java:650)
at com.xpn.xwiki.web.XWikiAction.execute(XWikiAction.java:338)
at com.xpn.xwiki.web.LegacyActionServlet.service(LegacyActionServlet.java:108)
at javax.servlet.http.HttpServlet.service(HttpServlet.java:764)
at org.apache.catalina.core.ApplicationFilterChain.internalDoFilter(ApplicationFilterChain.java:227)
at org.apache.catalina.core.ApplicationFilterChain.doFilter(ApplicationFilterChain.java:162)
at com.xpn.xwiki.web.ActionFilter.doFilter(ActionFilter.java:122)
at org.apache.catalina.core.ApplicationFilterChain.internalDoFilter(ApplicationFilterChain.java:189)
at org.apache.catalina.core.ApplicationFilterChain.doFilter(ApplicationFilterChain.java:162)
at org.xwiki.wysiwyg.filter.ConversionFilter.doFilter(ConversionFilter.java:61)
at org.apache.catalina.core.ApplicationFilterChain.internalDoFilter(ApplicationFilterChain.java:189)
at org.apache.catalina.core.ApplicationFilterChain.doFilter(ApplicationFilterChain.java:162)
at org.apache.tomcat.websocket.server.WsFilter.doFilter(WsFilter.java:53)
at org.apache.catalina.core.ApplicationFilterChain.internalDoFilter(ApplicationFilterChain.java:189)
at org.apache.catalina.core.ApplicationFilterChain.doFilter(ApplicationFilterChain.java:162)
at org.xwiki.container.servlet.filters.internal.SetHTTPHeaderFilter.doFilter(SetHTTPHeaderFilter.java:63)
at org.apache.catalina.core.ApplicationFilterChain.internalDoFilter(ApplicationFilterChain.java:189)
at org.apache.catalina.core.ApplicationFilterChain.doFilter(ApplicationFilterChain.java:162)
at org.xwiki.resource.servlet.RoutingFilter.doFilter(RoutingFilter.java:132)
at org.apache.catalina.core.ApplicationFilterChain.internalDoFilter(ApplicationFilterChain.java:189)
at org.apache.catalina.core.ApplicationFilterChain.doFilter(ApplicationFilterChain.java:162)
at org.xwiki.container.servlet.filters.internal.SavedRequestRestorerFilter.doFilter(SavedRequestRestorerFilter.java:208)
at org.apache.catalina.core.ApplicationFilterChain.internalDoFilter(ApplicationFilterChain.java:189)
at org.apache.catalina.core.ApplicationFilterChain.doFilter(ApplicationFilterChain.java:162)
at org.xwiki.container.servlet.filters.internal.SetCharacterEncodingFilter.doFilter(SetCharacterEncodingFilter.java:117)
at org.apache.catalina.core.ApplicationFilterChain.internalDoFilter(ApplicationFilterChain.java:189)
at org.apache.catalina.core.ApplicationFilterChain.doFilter(ApplicationFilterChain.java:162)
at org.apache.catalina.core.StandardWrapperValve.invoke(StandardWrapperValve.java:197)
at org.apache.catalina.core.StandardContextValve.invoke(StandardContextValve.java:97)
at org.apache.catalina.authenticator.AuthenticatorBase.invoke(AuthenticatorBase.java:541)
at org.apache.catalina.core.StandardHostValve.invoke(StandardHostValve.java:135)
at org.apache.catalina.valves.ErrorReportValve.invoke(ErrorReportValve.java:92)
at org.apache.catalina.valves.AbstractAccessLogValve.invoke(AbstractAccessLogValve.java:687)
at org.apache.catalina.core.StandardEngineValve.invoke(StandardEngineValve.java:78)
at org.apache.catalina.connector.CoyoteAdapter.service(CoyoteAdapter.java:360)
at org.apache.coyote.http11.Http11Processor.service(Http11Processor.java:399)
at org.apache.coyote.AbstractProcessorLight.process(AbstractProcessorLight.java:65)
at org.apache.coyote.AbstractProtocol$ConnectionHandler.process(AbstractProtocol.java:890)
at org.apache.tomcat.util.net.NioEndpoint$SocketProcessor.doRun(NioEndpoint.java:1743)
at org.apache.tomcat.util.net.SocketProcessorBase.run(SocketProcessorBase.java:49)
at org.apache.tomcat.util.threads.ThreadPoolExecutor.runWorker(ThreadPoolExecutor.java:1191)
at org.apache.tomcat.util.threads.ThreadPoolExecutor$Worker.run(ThreadPoolExecutor.java:659)
at org.apache.tomcat.util.threads.TaskThread$WrappingRunnable.run(TaskThread.java:61)
at java.base/java.lang.Thread.run(Thread.java:840)
When checking for duplicates, ONEcount is not checking for duplicates within the import file but only between the ONEcount database and the file being imported. If your import file contains duplicates within it and no matching records are found in ONEcount, the duplicate records in the import file will be imported.
Failed to execute the [include] macro. Cause: [Current user [null] doesn't have view rights on document [xwiki:Licenses.Code.VelocityMacros]]. Click on this message for details.
org.xwiki.rendering.macro.MacroExecutionException: Current user [null] doesn't have view rights on document [xwiki:Licenses.Code.VelocityMacros]
at org.xwiki.rendering.internal.macro.include.IncludeMacro.execute(IncludeMacro.java:124)
at org.xwiki.rendering.internal.macro.include.IncludeMacro.execute(IncludeMacro.java:59)
at org.xwiki.rendering.internal.transformation.macro.MacroTransformation.transform(MacroTransformation.java:311)
at org.xwiki.rendering.internal.transformation.DefaultRenderingContext.transformInContext(DefaultRenderingContext.java:183)
at org.xwiki.rendering.async.internal.block.AbstractBlockAsyncRenderer.transform(AbstractBlockAsyncRenderer.java:76)
at org.xwiki.rendering.wikimacro.internal.DefaultWikiMacroRenderer.transform(DefaultWikiMacroRenderer.java:882)
at org.xwiki.rendering.wikimacro.internal.DefaultWikiMacroRenderer.transform(DefaultWikiMacroRenderer.java:868)
at org.xwiki.rendering.wikimacro.internal.DefaultWikiMacroRenderer.transform(DefaultWikiMacroRenderer.java:594)
at org.xwiki.rendering.wikimacro.internal.DefaultWikiMacroRenderer.execute(DefaultWikiMacroRenderer.java:409)
at org.xwiki.rendering.async.internal.block.AbstractBlockAsyncRenderer.render(AbstractBlockAsyncRenderer.java:157)
at org.xwiki.rendering.async.internal.block.AbstractBlockAsyncRenderer.render(AbstractBlockAsyncRenderer.java:54)
at org.xwiki.rendering.async.internal.DefaultAsyncRendererExecutor.lambda$syncRender$0(DefaultAsyncRendererExecutor.java:284)
at com.xpn.xwiki.internal.security.authorization.DefaultAuthorExecutor.call(DefaultAuthorExecutor.java:98)
at org.xwiki.rendering.async.internal.DefaultAsyncRendererExecutor.syncRender(DefaultAsyncRendererExecutor.java:284)
at org.xwiki.rendering.async.internal.DefaultAsyncRendererExecutor.render(DefaultAsyncRendererExecutor.java:267)
at org.xwiki.rendering.async.internal.block.DefaultBlockAsyncRendererExecutor.execute(DefaultBlockAsyncRendererExecutor.java:125)
at org.xwiki.rendering.wikimacro.internal.DefaultWikiMacro.execute(DefaultWikiMacro.java:129)
at org.xwiki.rendering.wikimacro.internal.DefaultWikiMacro.execute(DefaultWikiMacro.java:61)
at org.xwiki.rendering.internal.transformation.macro.MacroTransformation.transform(MacroTransformation.java:311)
at org.xwiki.rendering.internal.transformation.DefaultRenderingContext.transformInContext(DefaultRenderingContext.java:183)
at org.xwiki.rendering.internal.transformation.DefaultTransformationManager.performTransformations(DefaultTransformationManager.java:88)
at org.xwiki.display.internal.DocumentContentAsyncExecutor.executeInCurrentExecutionContext(DocumentContentAsyncExecutor.java:396)
at org.xwiki.display.internal.DocumentContentAsyncExecutor.execute(DocumentContentAsyncExecutor.java:269)
at org.xwiki.display.internal.DocumentContentAsyncRenderer.execute(DocumentContentAsyncRenderer.java:112)
at org.xwiki.rendering.async.internal.block.AbstractBlockAsyncRenderer.render(AbstractBlockAsyncRenderer.java:157)
at org.xwiki.rendering.async.internal.block.AbstractBlockAsyncRenderer.render(AbstractBlockAsyncRenderer.java:54)
at org.xwiki.rendering.async.internal.DefaultAsyncRendererExecutor.syncRender(DefaultAsyncRendererExecutor.java:290)
at org.xwiki.rendering.async.internal.DefaultAsyncRendererExecutor.render(DefaultAsyncRendererExecutor.java:267)
at org.xwiki.rendering.async.internal.block.DefaultBlockAsyncRendererExecutor.execute(DefaultBlockAsyncRendererExecutor.java:125)
at org.xwiki.display.internal.DocumentContentDisplayer.display(DocumentContentDisplayer.java:67)
at org.xwiki.display.internal.DocumentContentDisplayer.display(DocumentContentDisplayer.java:43)
at org.xwiki.display.internal.DefaultDocumentDisplayer.display(DefaultDocumentDisplayer.java:96)
at org.xwiki.display.internal.DefaultDocumentDisplayer.display(DefaultDocumentDisplayer.java:39)
at org.xwiki.sheet.internal.SheetDocumentDisplayer.display(SheetDocumentDisplayer.java:123)
at org.xwiki.sheet.internal.SheetDocumentDisplayer.display(SheetDocumentDisplayer.java:52)
at org.xwiki.display.internal.ConfiguredDocumentDisplayer.display(ConfiguredDocumentDisplayer.java:68)
at org.xwiki.display.internal.ConfiguredDocumentDisplayer.display(ConfiguredDocumentDisplayer.java:42)
at com.xpn.xwiki.doc.XWikiDocument.display(XWikiDocument.java:1428)
at com.xpn.xwiki.doc.XWikiDocument.getRenderedContent(XWikiDocument.java:1564)
at com.xpn.xwiki.doc.XWikiDocument.displayDocument(XWikiDocument.java:1514)
at com.xpn.xwiki.doc.XWikiDocument.displayDocument(XWikiDocument.java:1483)
at com.xpn.xwiki.api.Document.displayDocument(Document.java:821)
at jdk.internal.reflect.GeneratedMethodAccessor653.invoke(Unknown Source)
at java.base/jdk.internal.reflect.DelegatingMethodAccessorImpl.invoke(DelegatingMethodAccessorImpl.java:43)
at java.base/java.lang.reflect.Method.invoke(Method.java:569)
at org.apache.velocity.util.introspection.UberspectImpl$VelMethodImpl.doInvoke(UberspectImpl.java:571)
at org.apache.velocity.util.introspection.UberspectImpl$VelMethodImpl.invoke(UberspectImpl.java:554)
at org.apache.velocity.runtime.parser.node.ASTMethod.execute(ASTMethod.java:221)
at org.apache.velocity.runtime.parser.node.ASTReference.execute(ASTReference.java:368)
at org.apache.velocity.runtime.parser.node.ASTReference.value(ASTReference.java:704)
at org.apache.velocity.runtime.parser.node.ASTExpression.value(ASTExpression.java:75)
at org.apache.velocity.runtime.parser.node.ASTSetDirective.render(ASTSetDirective.java:242)
at org.apache.velocity.runtime.parser.node.ASTBlock.render(ASTBlock.java:147)
at org.apache.velocity.runtime.parser.node.SimpleNode.render(SimpleNode.java:439)
at org.apache.velocity.runtime.parser.node.ASTIfStatement.render(ASTIfStatement.java:190)
at org.apache.velocity.runtime.parser.node.ASTBlock.render(ASTBlock.java:147)
at org.xwiki.velocity.internal.directive.TryCatchDirective.render(TryCatchDirective.java:86)
at org.apache.velocity.runtime.parser.node.ASTDirective.render(ASTDirective.java:304)
at org.apache.velocity.runtime.parser.node.SimpleNode.render(SimpleNode.java:439)
at org.apache.velocity.Template.merge(Template.java:358)
at org.apache.velocity.Template.merge(Template.java:262)
at org.xwiki.velocity.internal.InternalVelocityEngine.evaluate(InternalVelocityEngine.java:233)
at com.xpn.xwiki.internal.template.VelocityTemplateEvaluator.evaluateContent(VelocityTemplateEvaluator.java:107)
at com.xpn.xwiki.internal.template.TemplateAsyncRenderer.evaluateContent(TemplateAsyncRenderer.java:219)
at com.xpn.xwiki.internal.template.TemplateAsyncRenderer.renderVelocity(TemplateAsyncRenderer.java:174)
at com.xpn.xwiki.internal.template.TemplateAsyncRenderer.render(TemplateAsyncRenderer.java:135)
at com.xpn.xwiki.internal.template.TemplateAsyncRenderer.render(TemplateAsyncRenderer.java:54)
at org.xwiki.rendering.async.internal.DefaultAsyncRendererExecutor.lambda$syncRender$0(DefaultAsyncRendererExecutor.java:284)
at com.xpn.xwiki.internal.security.authorization.DefaultAuthorExecutor.call(DefaultAuthorExecutor.java:98)
at org.xwiki.rendering.async.internal.DefaultAsyncRendererExecutor.syncRender(DefaultAsyncRendererExecutor.java:284)
at org.xwiki.rendering.async.internal.DefaultAsyncRendererExecutor.render(DefaultAsyncRendererExecutor.java:267)
at org.xwiki.rendering.async.internal.block.DefaultBlockAsyncRendererExecutor.render(DefaultBlockAsyncRendererExecutor.java:154)
at com.xpn.xwiki.internal.template.InternalTemplateManager.render(InternalTemplateManager.java:904)
at com.xpn.xwiki.internal.template.InternalTemplateManager.renderFromSkin(InternalTemplateManager.java:866)
at com.xpn.xwiki.internal.template.InternalTemplateManager.render(InternalTemplateManager.java:853)
at com.xpn.xwiki.internal.template.InternalTemplateManager.renderNoException(InternalTemplateManager.java:808)
at com.xpn.xwiki.internal.template.InternalTemplateManager.renderNoException(InternalTemplateManager.java:800)
at com.xpn.xwiki.internal.template.DefaultTemplateManager.renderNoException(DefaultTemplateManager.java:79)
at com.xpn.xwiki.internal.template.DefaultTemplateManager.renderNoException(DefaultTemplateManager.java:73)
at org.xwiki.template.script.TemplateScriptService.render(TemplateScriptService.java:54)
at jdk.internal.reflect.GeneratedMethodAccessor207.invoke(Unknown Source)
at java.base/jdk.internal.reflect.DelegatingMethodAccessorImpl.invoke(DelegatingMethodAccessorImpl.java:43)
at java.base/java.lang.reflect.Method.invoke(Method.java:569)
at org.apache.velocity.util.introspection.UberspectImpl$VelMethodImpl.doInvoke(UberspectImpl.java:571)
at org.apache.velocity.util.introspection.UberspectImpl$VelMethodImpl.invoke(UberspectImpl.java:554)
at org.apache.velocity.runtime.parser.node.ASTMethod.execute(ASTMethod.java:221)
at org.apache.velocity.runtime.parser.node.ASTReference.execute(ASTReference.java:368)
at org.apache.velocity.runtime.parser.node.ASTReference.render(ASTReference.java:492)
at org.apache.velocity.runtime.parser.node.ASTBlock.render(ASTBlock.java:147)
at org.apache.velocity.runtime.directive.VelocimacroProxy.render(VelocimacroProxy.java:217)
at org.apache.velocity.runtime.directive.RuntimeMacro.render(RuntimeMacro.java:331)
at org.apache.velocity.runtime.directive.RuntimeMacro.render(RuntimeMacro.java:261)
at org.apache.velocity.runtime.parser.node.ASTDirective.render(ASTDirective.java:304)
at org.apache.velocity.runtime.parser.node.SimpleNode.render(SimpleNode.java:439)
at org.apache.velocity.Template.merge(Template.java:358)
at org.apache.velocity.Template.merge(Template.java:262)
at org.xwiki.velocity.internal.InternalVelocityEngine.evaluate(InternalVelocityEngine.java:233)
at com.xpn.xwiki.internal.template.VelocityTemplateEvaluator.evaluateContent(VelocityTemplateEvaluator.java:107)
at com.xpn.xwiki.internal.template.TemplateAsyncRenderer.evaluateContent(TemplateAsyncRenderer.java:219)
at com.xpn.xwiki.internal.template.TemplateAsyncRenderer.renderVelocity(TemplateAsyncRenderer.java:174)
at com.xpn.xwiki.internal.template.TemplateAsyncRenderer.render(TemplateAsyncRenderer.java:135)
at com.xpn.xwiki.internal.template.TemplateAsyncRenderer.render(TemplateAsyncRenderer.java:54)
at org.xwiki.rendering.async.internal.DefaultAsyncRendererExecutor.lambda$syncRender$0(DefaultAsyncRendererExecutor.java:284)
at com.xpn.xwiki.internal.security.authorization.DefaultAuthorExecutor.call(DefaultAuthorExecutor.java:98)
at org.xwiki.rendering.async.internal.DefaultAsyncRendererExecutor.syncRender(DefaultAsyncRendererExecutor.java:284)
at org.xwiki.rendering.async.internal.DefaultAsyncRendererExecutor.render(DefaultAsyncRendererExecutor.java:267)
at org.xwiki.rendering.async.internal.block.DefaultBlockAsyncRendererExecutor.render(DefaultBlockAsyncRendererExecutor.java:154)
at com.xpn.xwiki.internal.template.InternalTemplateManager.render(InternalTemplateManager.java:904)
at com.xpn.xwiki.internal.template.InternalTemplateManager.renderFromSkin(InternalTemplateManager.java:866)
at com.xpn.xwiki.internal.template.InternalTemplateManager.render(InternalTemplateManager.java:853)
at com.xpn.xwiki.internal.template.InternalTemplateManager.renderNoException(InternalTemplateManager.java:808)
at com.xpn.xwiki.internal.template.InternalTemplateManager.renderNoException(InternalTemplateManager.java:800)
at com.xpn.xwiki.internal.template.DefaultTemplateManager.renderNoException(DefaultTemplateManager.java:79)
at com.xpn.xwiki.internal.template.DefaultTemplateManager.renderNoException(DefaultTemplateManager.java:73)
at org.xwiki.template.script.TemplateScriptService.render(TemplateScriptService.java:54)
at jdk.internal.reflect.GeneratedMethodAccessor207.invoke(Unknown Source)
at java.base/jdk.internal.reflect.DelegatingMethodAccessorImpl.invoke(DelegatingMethodAccessorImpl.java:43)
at java.base/java.lang.reflect.Method.invoke(Method.java:569)
at org.apache.velocity.util.introspection.UberspectImpl$VelMethodImpl.doInvoke(UberspectImpl.java:571)
at org.apache.velocity.util.introspection.UberspectImpl$VelMethodImpl.invoke(UberspectImpl.java:554)
at org.apache.velocity.runtime.parser.node.ASTMethod.execute(ASTMethod.java:221)
at org.apache.velocity.runtime.parser.node.ASTReference.execute(ASTReference.java:368)
at org.apache.velocity.runtime.parser.node.ASTReference.render(ASTReference.java:492)
at org.apache.velocity.runtime.parser.node.ASTBlock.render(ASTBlock.java:147)
at org.apache.velocity.runtime.directive.VelocimacroProxy.render(VelocimacroProxy.java:217)
at org.apache.velocity.runtime.directive.RuntimeMacro.render(RuntimeMacro.java:331)
at org.apache.velocity.runtime.directive.RuntimeMacro.render(RuntimeMacro.java:261)
at org.apache.velocity.runtime.parser.node.ASTDirective.render(ASTDirective.java:304)
at org.apache.velocity.runtime.parser.node.ASTBlock.render(ASTBlock.java:147)
at org.apache.velocity.runtime.parser.node.ASTIfStatement.render(ASTIfStatement.java:171)
at org.apache.velocity.runtime.parser.node.ASTBlock.render(ASTBlock.java:147)
at org.apache.velocity.runtime.parser.node.SimpleNode.render(SimpleNode.java:439)
at org.apache.velocity.runtime.parser.node.ASTIfStatement.render(ASTIfStatement.java:190)
at org.apache.velocity.runtime.parser.node.SimpleNode.render(SimpleNode.java:439)
at org.apache.velocity.Template.merge(Template.java:358)
at org.apache.velocity.Template.merge(Template.java:262)
at org.xwiki.velocity.internal.InternalVelocityEngine.evaluate(InternalVelocityEngine.java:233)
at com.xpn.xwiki.internal.template.VelocityTemplateEvaluator.evaluateContent(VelocityTemplateEvaluator.java:107)
at com.xpn.xwiki.internal.template.TemplateAsyncRenderer.evaluateContent(TemplateAsyncRenderer.java:219)
at com.xpn.xwiki.internal.template.TemplateAsyncRenderer.renderVelocity(TemplateAsyncRenderer.java:174)
at com.xpn.xwiki.internal.template.TemplateAsyncRenderer.render(TemplateAsyncRenderer.java:135)
at com.xpn.xwiki.internal.template.TemplateAsyncRenderer.render(TemplateAsyncRenderer.java:54)
at org.xwiki.rendering.async.internal.DefaultAsyncRendererExecutor.lambda$syncRender$0(DefaultAsyncRendererExecutor.java:284)
at com.xpn.xwiki.internal.security.authorization.DefaultAuthorExecutor.call(DefaultAuthorExecutor.java:98)
at org.xwiki.rendering.async.internal.DefaultAsyncRendererExecutor.syncRender(DefaultAsyncRendererExecutor.java:284)
at org.xwiki.rendering.async.internal.DefaultAsyncRendererExecutor.render(DefaultAsyncRendererExecutor.java:267)
at org.xwiki.rendering.async.internal.block.DefaultBlockAsyncRendererExecutor.render(DefaultBlockAsyncRendererExecutor.java:154)
at com.xpn.xwiki.internal.template.InternalTemplateManager.render(InternalTemplateManager.java:904)
at com.xpn.xwiki.internal.template.InternalTemplateManager.renderFromSkin(InternalTemplateManager.java:866)
at com.xpn.xwiki.internal.template.InternalTemplateManager.renderFromSkin(InternalTemplateManager.java:846)
at com.xpn.xwiki.internal.template.InternalTemplateManager.render(InternalTemplateManager.java:832)
at com.xpn.xwiki.internal.template.DefaultTemplateManager.render(DefaultTemplateManager.java:91)
at com.xpn.xwiki.internal.template.DefaultTemplateManager.render(DefaultTemplateManager.java:85)
at com.xpn.xwiki.XWiki.evaluateTemplate(XWiki.java:2569)
at com.xpn.xwiki.web.Utils.parseTemplate(Utils.java:180)
at com.xpn.xwiki.web.XWikiAction.execute(XWikiAction.java:650)
at com.xpn.xwiki.web.XWikiAction.execute(XWikiAction.java:338)
at com.xpn.xwiki.web.LegacyActionServlet.service(LegacyActionServlet.java:108)
at javax.servlet.http.HttpServlet.service(HttpServlet.java:764)
at org.apache.catalina.core.ApplicationFilterChain.internalDoFilter(ApplicationFilterChain.java:227)
at org.apache.catalina.core.ApplicationFilterChain.doFilter(ApplicationFilterChain.java:162)
at com.xpn.xwiki.web.ActionFilter.doFilter(ActionFilter.java:122)
at org.apache.catalina.core.ApplicationFilterChain.internalDoFilter(ApplicationFilterChain.java:189)
at org.apache.catalina.core.ApplicationFilterChain.doFilter(ApplicationFilterChain.java:162)
at org.xwiki.wysiwyg.filter.ConversionFilter.doFilter(ConversionFilter.java:61)
at org.apache.catalina.core.ApplicationFilterChain.internalDoFilter(ApplicationFilterChain.java:189)
at org.apache.catalina.core.ApplicationFilterChain.doFilter(ApplicationFilterChain.java:162)
at org.apache.tomcat.websocket.server.WsFilter.doFilter(WsFilter.java:53)
at org.apache.catalina.core.ApplicationFilterChain.internalDoFilter(ApplicationFilterChain.java:189)
at org.apache.catalina.core.ApplicationFilterChain.doFilter(ApplicationFilterChain.java:162)
at org.xwiki.container.servlet.filters.internal.SetHTTPHeaderFilter.doFilter(SetHTTPHeaderFilter.java:63)
at org.apache.catalina.core.ApplicationFilterChain.internalDoFilter(ApplicationFilterChain.java:189)
at org.apache.catalina.core.ApplicationFilterChain.doFilter(ApplicationFilterChain.java:162)
at org.xwiki.resource.servlet.RoutingFilter.doFilter(RoutingFilter.java:132)
at org.apache.catalina.core.ApplicationFilterChain.internalDoFilter(ApplicationFilterChain.java:189)
at org.apache.catalina.core.ApplicationFilterChain.doFilter(ApplicationFilterChain.java:162)
at org.xwiki.container.servlet.filters.internal.SavedRequestRestorerFilter.doFilter(SavedRequestRestorerFilter.java:208)
at org.apache.catalina.core.ApplicationFilterChain.internalDoFilter(ApplicationFilterChain.java:189)
at org.apache.catalina.core.ApplicationFilterChain.doFilter(ApplicationFilterChain.java:162)
at org.xwiki.container.servlet.filters.internal.SetCharacterEncodingFilter.doFilter(SetCharacterEncodingFilter.java:117)
at org.apache.catalina.core.ApplicationFilterChain.internalDoFilter(ApplicationFilterChain.java:189)
at org.apache.catalina.core.ApplicationFilterChain.doFilter(ApplicationFilterChain.java:162)
at org.apache.catalina.core.StandardWrapperValve.invoke(StandardWrapperValve.java:197)
at org.apache.catalina.core.StandardContextValve.invoke(StandardContextValve.java:97)
at org.apache.catalina.authenticator.AuthenticatorBase.invoke(AuthenticatorBase.java:541)
at org.apache.catalina.core.StandardHostValve.invoke(StandardHostValve.java:135)
at org.apache.catalina.valves.ErrorReportValve.invoke(ErrorReportValve.java:92)
at org.apache.catalina.valves.AbstractAccessLogValve.invoke(AbstractAccessLogValve.java:687)
at org.apache.catalina.core.StandardEngineValve.invoke(StandardEngineValve.java:78)
at org.apache.catalina.connector.CoyoteAdapter.service(CoyoteAdapter.java:360)
at org.apache.coyote.http11.Http11Processor.service(Http11Processor.java:399)
at org.apache.coyote.AbstractProcessorLight.process(AbstractProcessorLight.java:65)
at org.apache.coyote.AbstractProtocol$ConnectionHandler.process(AbstractProtocol.java:890)
at org.apache.tomcat.util.net.NioEndpoint$SocketProcessor.doRun(NioEndpoint.java:1743)
at org.apache.tomcat.util.net.SocketProcessorBase.run(SocketProcessorBase.java:49)
at org.apache.tomcat.util.threads.ThreadPoolExecutor.runWorker(ThreadPoolExecutor.java:1191)
at org.apache.tomcat.util.threads.ThreadPoolExecutor$Worker.run(ThreadPoolExecutor.java:659)
at org.apache.tomcat.util.threads.TaskThread$WrappingRunnable.run(TaskThread.java:61)
at java.base/java.lang.Thread.run(Thread.java:840)
If importing a new list and email is a required field for all records (e.g. for an e-newsletter-type product), it is recommended to check for duplicates across *email.* _ Note that if a user has a different email in the import list than in ONEcount and you check only by email, the record won't be identified as a duplicate_. If the emails match (and the records identified as duplicates) and you wish to append data to that record and/or subscribe to a new product via the import file, you will need to select to process duplicates after new records are imported. This will process ALL duplicates.
Failed to execute the [include] macro. Cause: [Current user [null] doesn't have view rights on document [xwiki:Licenses.Code.VelocityMacros]]. Click on this message for details.
org.xwiki.rendering.macro.MacroExecutionException: Current user [null] doesn't have view rights on document [xwiki:Licenses.Code.VelocityMacros]
at org.xwiki.rendering.internal.macro.include.IncludeMacro.execute(IncludeMacro.java:124)
at org.xwiki.rendering.internal.macro.include.IncludeMacro.execute(IncludeMacro.java:59)
at org.xwiki.rendering.internal.transformation.macro.MacroTransformation.transform(MacroTransformation.java:311)
at org.xwiki.rendering.internal.transformation.DefaultRenderingContext.transformInContext(DefaultRenderingContext.java:183)
at org.xwiki.rendering.async.internal.block.AbstractBlockAsyncRenderer.transform(AbstractBlockAsyncRenderer.java:76)
at org.xwiki.rendering.wikimacro.internal.DefaultWikiMacroRenderer.transform(DefaultWikiMacroRenderer.java:882)
at org.xwiki.rendering.wikimacro.internal.DefaultWikiMacroRenderer.transform(DefaultWikiMacroRenderer.java:868)
at org.xwiki.rendering.wikimacro.internal.DefaultWikiMacroRenderer.transform(DefaultWikiMacroRenderer.java:594)
at org.xwiki.rendering.wikimacro.internal.DefaultWikiMacroRenderer.execute(DefaultWikiMacroRenderer.java:409)
at org.xwiki.rendering.async.internal.block.AbstractBlockAsyncRenderer.render(AbstractBlockAsyncRenderer.java:157)
at org.xwiki.rendering.async.internal.block.AbstractBlockAsyncRenderer.render(AbstractBlockAsyncRenderer.java:54)
at org.xwiki.rendering.async.internal.DefaultAsyncRendererExecutor.lambda$syncRender$0(DefaultAsyncRendererExecutor.java:284)
at com.xpn.xwiki.internal.security.authorization.DefaultAuthorExecutor.call(DefaultAuthorExecutor.java:98)
at org.xwiki.rendering.async.internal.DefaultAsyncRendererExecutor.syncRender(DefaultAsyncRendererExecutor.java:284)
at org.xwiki.rendering.async.internal.DefaultAsyncRendererExecutor.render(DefaultAsyncRendererExecutor.java:267)
at org.xwiki.rendering.async.internal.block.DefaultBlockAsyncRendererExecutor.execute(DefaultBlockAsyncRendererExecutor.java:125)
at org.xwiki.rendering.wikimacro.internal.DefaultWikiMacro.execute(DefaultWikiMacro.java:129)
at org.xwiki.rendering.wikimacro.internal.DefaultWikiMacro.execute(DefaultWikiMacro.java:61)
at org.xwiki.rendering.internal.transformation.macro.MacroTransformation.transform(MacroTransformation.java:311)
at org.xwiki.rendering.internal.transformation.DefaultRenderingContext.transformInContext(DefaultRenderingContext.java:183)
at org.xwiki.rendering.internal.transformation.DefaultTransformationManager.performTransformations(DefaultTransformationManager.java:88)
at org.xwiki.display.internal.DocumentContentAsyncExecutor.executeInCurrentExecutionContext(DocumentContentAsyncExecutor.java:396)
at org.xwiki.display.internal.DocumentContentAsyncExecutor.execute(DocumentContentAsyncExecutor.java:269)
at org.xwiki.display.internal.DocumentContentAsyncRenderer.execute(DocumentContentAsyncRenderer.java:112)
at org.xwiki.rendering.async.internal.block.AbstractBlockAsyncRenderer.render(AbstractBlockAsyncRenderer.java:157)
at org.xwiki.rendering.async.internal.block.AbstractBlockAsyncRenderer.render(AbstractBlockAsyncRenderer.java:54)
at org.xwiki.rendering.async.internal.DefaultAsyncRendererExecutor.syncRender(DefaultAsyncRendererExecutor.java:290)
at org.xwiki.rendering.async.internal.DefaultAsyncRendererExecutor.render(DefaultAsyncRendererExecutor.java:267)
at org.xwiki.rendering.async.internal.block.DefaultBlockAsyncRendererExecutor.execute(DefaultBlockAsyncRendererExecutor.java:125)
at org.xwiki.display.internal.DocumentContentDisplayer.display(DocumentContentDisplayer.java:67)
at org.xwiki.display.internal.DocumentContentDisplayer.display(DocumentContentDisplayer.java:43)
at org.xwiki.display.internal.DefaultDocumentDisplayer.display(DefaultDocumentDisplayer.java:96)
at org.xwiki.display.internal.DefaultDocumentDisplayer.display(DefaultDocumentDisplayer.java:39)
at org.xwiki.sheet.internal.SheetDocumentDisplayer.display(SheetDocumentDisplayer.java:123)
at org.xwiki.sheet.internal.SheetDocumentDisplayer.display(SheetDocumentDisplayer.java:52)
at org.xwiki.display.internal.ConfiguredDocumentDisplayer.display(ConfiguredDocumentDisplayer.java:68)
at org.xwiki.display.internal.ConfiguredDocumentDisplayer.display(ConfiguredDocumentDisplayer.java:42)
at com.xpn.xwiki.doc.XWikiDocument.display(XWikiDocument.java:1428)
at com.xpn.xwiki.doc.XWikiDocument.getRenderedContent(XWikiDocument.java:1564)
at com.xpn.xwiki.doc.XWikiDocument.displayDocument(XWikiDocument.java:1514)
at com.xpn.xwiki.doc.XWikiDocument.displayDocument(XWikiDocument.java:1483)
at com.xpn.xwiki.api.Document.displayDocument(Document.java:821)
at jdk.internal.reflect.GeneratedMethodAccessor653.invoke(Unknown Source)
at java.base/jdk.internal.reflect.DelegatingMethodAccessorImpl.invoke(DelegatingMethodAccessorImpl.java:43)
at java.base/java.lang.reflect.Method.invoke(Method.java:569)
at org.apache.velocity.util.introspection.UberspectImpl$VelMethodImpl.doInvoke(UberspectImpl.java:571)
at org.apache.velocity.util.introspection.UberspectImpl$VelMethodImpl.invoke(UberspectImpl.java:554)
at org.apache.velocity.runtime.parser.node.ASTMethod.execute(ASTMethod.java:221)
at org.apache.velocity.runtime.parser.node.ASTReference.execute(ASTReference.java:368)
at org.apache.velocity.runtime.parser.node.ASTReference.value(ASTReference.java:704)
at org.apache.velocity.runtime.parser.node.ASTExpression.value(ASTExpression.java:75)
at org.apache.velocity.runtime.parser.node.ASTSetDirective.render(ASTSetDirective.java:242)
at org.apache.velocity.runtime.parser.node.ASTBlock.render(ASTBlock.java:147)
at org.apache.velocity.runtime.parser.node.SimpleNode.render(SimpleNode.java:439)
at org.apache.velocity.runtime.parser.node.ASTIfStatement.render(ASTIfStatement.java:190)
at org.apache.velocity.runtime.parser.node.ASTBlock.render(ASTBlock.java:147)
at org.xwiki.velocity.internal.directive.TryCatchDirective.render(TryCatchDirective.java:86)
at org.apache.velocity.runtime.parser.node.ASTDirective.render(ASTDirective.java:304)
at org.apache.velocity.runtime.parser.node.SimpleNode.render(SimpleNode.java:439)
at org.apache.velocity.Template.merge(Template.java:358)
at org.apache.velocity.Template.merge(Template.java:262)
at org.xwiki.velocity.internal.InternalVelocityEngine.evaluate(InternalVelocityEngine.java:233)
at com.xpn.xwiki.internal.template.VelocityTemplateEvaluator.evaluateContent(VelocityTemplateEvaluator.java:107)
at com.xpn.xwiki.internal.template.TemplateAsyncRenderer.evaluateContent(TemplateAsyncRenderer.java:219)
at com.xpn.xwiki.internal.template.TemplateAsyncRenderer.renderVelocity(TemplateAsyncRenderer.java:174)
at com.xpn.xwiki.internal.template.TemplateAsyncRenderer.render(TemplateAsyncRenderer.java:135)
at com.xpn.xwiki.internal.template.TemplateAsyncRenderer.render(TemplateAsyncRenderer.java:54)
at org.xwiki.rendering.async.internal.DefaultAsyncRendererExecutor.lambda$syncRender$0(DefaultAsyncRendererExecutor.java:284)
at com.xpn.xwiki.internal.security.authorization.DefaultAuthorExecutor.call(DefaultAuthorExecutor.java:98)
at org.xwiki.rendering.async.internal.DefaultAsyncRendererExecutor.syncRender(DefaultAsyncRendererExecutor.java:284)
at org.xwiki.rendering.async.internal.DefaultAsyncRendererExecutor.render(DefaultAsyncRendererExecutor.java:267)
at org.xwiki.rendering.async.internal.block.DefaultBlockAsyncRendererExecutor.render(DefaultBlockAsyncRendererExecutor.java:154)
at com.xpn.xwiki.internal.template.InternalTemplateManager.render(InternalTemplateManager.java:904)
at com.xpn.xwiki.internal.template.InternalTemplateManager.renderFromSkin(InternalTemplateManager.java:866)
at com.xpn.xwiki.internal.template.InternalTemplateManager.render(InternalTemplateManager.java:853)
at com.xpn.xwiki.internal.template.InternalTemplateManager.renderNoException(InternalTemplateManager.java:808)
at com.xpn.xwiki.internal.template.InternalTemplateManager.renderNoException(InternalTemplateManager.java:800)
at com.xpn.xwiki.internal.template.DefaultTemplateManager.renderNoException(DefaultTemplateManager.java:79)
at com.xpn.xwiki.internal.template.DefaultTemplateManager.renderNoException(DefaultTemplateManager.java:73)
at org.xwiki.template.script.TemplateScriptService.render(TemplateScriptService.java:54)
at jdk.internal.reflect.GeneratedMethodAccessor207.invoke(Unknown Source)
at java.base/jdk.internal.reflect.DelegatingMethodAccessorImpl.invoke(DelegatingMethodAccessorImpl.java:43)
at java.base/java.lang.reflect.Method.invoke(Method.java:569)
at org.apache.velocity.util.introspection.UberspectImpl$VelMethodImpl.doInvoke(UberspectImpl.java:571)
at org.apache.velocity.util.introspection.UberspectImpl$VelMethodImpl.invoke(UberspectImpl.java:554)
at org.apache.velocity.runtime.parser.node.ASTMethod.execute(ASTMethod.java:221)
at org.apache.velocity.runtime.parser.node.ASTReference.execute(ASTReference.java:368)
at org.apache.velocity.runtime.parser.node.ASTReference.render(ASTReference.java:492)
at org.apache.velocity.runtime.parser.node.ASTBlock.render(ASTBlock.java:147)
at org.apache.velocity.runtime.directive.VelocimacroProxy.render(VelocimacroProxy.java:217)
at org.apache.velocity.runtime.directive.RuntimeMacro.render(RuntimeMacro.java:331)
at org.apache.velocity.runtime.directive.RuntimeMacro.render(RuntimeMacro.java:261)
at org.apache.velocity.runtime.parser.node.ASTDirective.render(ASTDirective.java:304)
at org.apache.velocity.runtime.parser.node.SimpleNode.render(SimpleNode.java:439)
at org.apache.velocity.Template.merge(Template.java:358)
at org.apache.velocity.Template.merge(Template.java:262)
at org.xwiki.velocity.internal.InternalVelocityEngine.evaluate(InternalVelocityEngine.java:233)
at com.xpn.xwiki.internal.template.VelocityTemplateEvaluator.evaluateContent(VelocityTemplateEvaluator.java:107)
at com.xpn.xwiki.internal.template.TemplateAsyncRenderer.evaluateContent(TemplateAsyncRenderer.java:219)
at com.xpn.xwiki.internal.template.TemplateAsyncRenderer.renderVelocity(TemplateAsyncRenderer.java:174)
at com.xpn.xwiki.internal.template.TemplateAsyncRenderer.render(TemplateAsyncRenderer.java:135)
at com.xpn.xwiki.internal.template.TemplateAsyncRenderer.render(TemplateAsyncRenderer.java:54)
at org.xwiki.rendering.async.internal.DefaultAsyncRendererExecutor.lambda$syncRender$0(DefaultAsyncRendererExecutor.java:284)
at com.xpn.xwiki.internal.security.authorization.DefaultAuthorExecutor.call(DefaultAuthorExecutor.java:98)
at org.xwiki.rendering.async.internal.DefaultAsyncRendererExecutor.syncRender(DefaultAsyncRendererExecutor.java:284)
at org.xwiki.rendering.async.internal.DefaultAsyncRendererExecutor.render(DefaultAsyncRendererExecutor.java:267)
at org.xwiki.rendering.async.internal.block.DefaultBlockAsyncRendererExecutor.render(DefaultBlockAsyncRendererExecutor.java:154)
at com.xpn.xwiki.internal.template.InternalTemplateManager.render(InternalTemplateManager.java:904)
at com.xpn.xwiki.internal.template.InternalTemplateManager.renderFromSkin(InternalTemplateManager.java:866)
at com.xpn.xwiki.internal.template.InternalTemplateManager.render(InternalTemplateManager.java:853)
at com.xpn.xwiki.internal.template.InternalTemplateManager.renderNoException(InternalTemplateManager.java:808)
at com.xpn.xwiki.internal.template.InternalTemplateManager.renderNoException(InternalTemplateManager.java:800)
at com.xpn.xwiki.internal.template.DefaultTemplateManager.renderNoException(DefaultTemplateManager.java:79)
at com.xpn.xwiki.internal.template.DefaultTemplateManager.renderNoException(DefaultTemplateManager.java:73)
at org.xwiki.template.script.TemplateScriptService.render(TemplateScriptService.java:54)
at jdk.internal.reflect.GeneratedMethodAccessor207.invoke(Unknown Source)
at java.base/jdk.internal.reflect.DelegatingMethodAccessorImpl.invoke(DelegatingMethodAccessorImpl.java:43)
at java.base/java.lang.reflect.Method.invoke(Method.java:569)
at org.apache.velocity.util.introspection.UberspectImpl$VelMethodImpl.doInvoke(UberspectImpl.java:571)
at org.apache.velocity.util.introspection.UberspectImpl$VelMethodImpl.invoke(UberspectImpl.java:554)
at org.apache.velocity.runtime.parser.node.ASTMethod.execute(ASTMethod.java:221)
at org.apache.velocity.runtime.parser.node.ASTReference.execute(ASTReference.java:368)
at org.apache.velocity.runtime.parser.node.ASTReference.render(ASTReference.java:492)
at org.apache.velocity.runtime.parser.node.ASTBlock.render(ASTBlock.java:147)
at org.apache.velocity.runtime.directive.VelocimacroProxy.render(VelocimacroProxy.java:217)
at org.apache.velocity.runtime.directive.RuntimeMacro.render(RuntimeMacro.java:331)
at org.apache.velocity.runtime.directive.RuntimeMacro.render(RuntimeMacro.java:261)
at org.apache.velocity.runtime.parser.node.ASTDirective.render(ASTDirective.java:304)
at org.apache.velocity.runtime.parser.node.ASTBlock.render(ASTBlock.java:147)
at org.apache.velocity.runtime.parser.node.ASTIfStatement.render(ASTIfStatement.java:171)
at org.apache.velocity.runtime.parser.node.ASTBlock.render(ASTBlock.java:147)
at org.apache.velocity.runtime.parser.node.SimpleNode.render(SimpleNode.java:439)
at org.apache.velocity.runtime.parser.node.ASTIfStatement.render(ASTIfStatement.java:190)
at org.apache.velocity.runtime.parser.node.SimpleNode.render(SimpleNode.java:439)
at org.apache.velocity.Template.merge(Template.java:358)
at org.apache.velocity.Template.merge(Template.java:262)
at org.xwiki.velocity.internal.InternalVelocityEngine.evaluate(InternalVelocityEngine.java:233)
at com.xpn.xwiki.internal.template.VelocityTemplateEvaluator.evaluateContent(VelocityTemplateEvaluator.java:107)
at com.xpn.xwiki.internal.template.TemplateAsyncRenderer.evaluateContent(TemplateAsyncRenderer.java:219)
at com.xpn.xwiki.internal.template.TemplateAsyncRenderer.renderVelocity(TemplateAsyncRenderer.java:174)
at com.xpn.xwiki.internal.template.TemplateAsyncRenderer.render(TemplateAsyncRenderer.java:135)
at com.xpn.xwiki.internal.template.TemplateAsyncRenderer.render(TemplateAsyncRenderer.java:54)
at org.xwiki.rendering.async.internal.DefaultAsyncRendererExecutor.lambda$syncRender$0(DefaultAsyncRendererExecutor.java:284)
at com.xpn.xwiki.internal.security.authorization.DefaultAuthorExecutor.call(DefaultAuthorExecutor.java:98)
at org.xwiki.rendering.async.internal.DefaultAsyncRendererExecutor.syncRender(DefaultAsyncRendererExecutor.java:284)
at org.xwiki.rendering.async.internal.DefaultAsyncRendererExecutor.render(DefaultAsyncRendererExecutor.java:267)
at org.xwiki.rendering.async.internal.block.DefaultBlockAsyncRendererExecutor.render(DefaultBlockAsyncRendererExecutor.java:154)
at com.xpn.xwiki.internal.template.InternalTemplateManager.render(InternalTemplateManager.java:904)
at com.xpn.xwiki.internal.template.InternalTemplateManager.renderFromSkin(InternalTemplateManager.java:866)
at com.xpn.xwiki.internal.template.InternalTemplateManager.renderFromSkin(InternalTemplateManager.java:846)
at com.xpn.xwiki.internal.template.InternalTemplateManager.render(InternalTemplateManager.java:832)
at com.xpn.xwiki.internal.template.DefaultTemplateManager.render(DefaultTemplateManager.java:91)
at com.xpn.xwiki.internal.template.DefaultTemplateManager.render(DefaultTemplateManager.java:85)
at com.xpn.xwiki.XWiki.evaluateTemplate(XWiki.java:2569)
at com.xpn.xwiki.web.Utils.parseTemplate(Utils.java:180)
at com.xpn.xwiki.web.XWikiAction.execute(XWikiAction.java:650)
at com.xpn.xwiki.web.XWikiAction.execute(XWikiAction.java:338)
at com.xpn.xwiki.web.LegacyActionServlet.service(LegacyActionServlet.java:108)
at javax.servlet.http.HttpServlet.service(HttpServlet.java:764)
at org.apache.catalina.core.ApplicationFilterChain.internalDoFilter(ApplicationFilterChain.java:227)
at org.apache.catalina.core.ApplicationFilterChain.doFilter(ApplicationFilterChain.java:162)
at com.xpn.xwiki.web.ActionFilter.doFilter(ActionFilter.java:122)
at org.apache.catalina.core.ApplicationFilterChain.internalDoFilter(ApplicationFilterChain.java:189)
at org.apache.catalina.core.ApplicationFilterChain.doFilter(ApplicationFilterChain.java:162)
at org.xwiki.wysiwyg.filter.ConversionFilter.doFilter(ConversionFilter.java:61)
at org.apache.catalina.core.ApplicationFilterChain.internalDoFilter(ApplicationFilterChain.java:189)
at org.apache.catalina.core.ApplicationFilterChain.doFilter(ApplicationFilterChain.java:162)
at org.apache.tomcat.websocket.server.WsFilter.doFilter(WsFilter.java:53)
at org.apache.catalina.core.ApplicationFilterChain.internalDoFilter(ApplicationFilterChain.java:189)
at org.apache.catalina.core.ApplicationFilterChain.doFilter(ApplicationFilterChain.java:162)
at org.xwiki.container.servlet.filters.internal.SetHTTPHeaderFilter.doFilter(SetHTTPHeaderFilter.java:63)
at org.apache.catalina.core.ApplicationFilterChain.internalDoFilter(ApplicationFilterChain.java:189)
at org.apache.catalina.core.ApplicationFilterChain.doFilter(ApplicationFilterChain.java:162)
at org.xwiki.resource.servlet.RoutingFilter.doFilter(RoutingFilter.java:132)
at org.apache.catalina.core.ApplicationFilterChain.internalDoFilter(ApplicationFilterChain.java:189)
at org.apache.catalina.core.ApplicationFilterChain.doFilter(ApplicationFilterChain.java:162)
at org.xwiki.container.servlet.filters.internal.SavedRequestRestorerFilter.doFilter(SavedRequestRestorerFilter.java:208)
at org.apache.catalina.core.ApplicationFilterChain.internalDoFilter(ApplicationFilterChain.java:189)
at org.apache.catalina.core.ApplicationFilterChain.doFilter(ApplicationFilterChain.java:162)
at org.xwiki.container.servlet.filters.internal.SetCharacterEncodingFilter.doFilter(SetCharacterEncodingFilter.java:117)
at org.apache.catalina.core.ApplicationFilterChain.internalDoFilter(ApplicationFilterChain.java:189)
at org.apache.catalina.core.ApplicationFilterChain.doFilter(ApplicationFilterChain.java:162)
at org.apache.catalina.core.StandardWrapperValve.invoke(StandardWrapperValve.java:197)
at org.apache.catalina.core.StandardContextValve.invoke(StandardContextValve.java:97)
at org.apache.catalina.authenticator.AuthenticatorBase.invoke(AuthenticatorBase.java:541)
at org.apache.catalina.core.StandardHostValve.invoke(StandardHostValve.java:135)
at org.apache.catalina.valves.ErrorReportValve.invoke(ErrorReportValve.java:92)
at org.apache.catalina.valves.AbstractAccessLogValve.invoke(AbstractAccessLogValve.java:687)
at org.apache.catalina.core.StandardEngineValve.invoke(StandardEngineValve.java:78)
at org.apache.catalina.connector.CoyoteAdapter.service(CoyoteAdapter.java:360)
at org.apache.coyote.http11.Http11Processor.service(Http11Processor.java:399)
at org.apache.coyote.AbstractProcessorLight.process(AbstractProcessorLight.java:65)
at org.apache.coyote.AbstractProtocol$ConnectionHandler.process(AbstractProtocol.java:890)
at org.apache.tomcat.util.net.NioEndpoint$SocketProcessor.doRun(NioEndpoint.java:1743)
at org.apache.tomcat.util.net.SocketProcessorBase.run(SocketProcessorBase.java:49)
at org.apache.tomcat.util.threads.ThreadPoolExecutor.runWorker(ThreadPoolExecutor.java:1191)
at org.apache.tomcat.util.threads.ThreadPoolExecutor$Worker.run(ThreadPoolExecutor.java:659)
at org.apache.tomcat.util.threads.TaskThread$WrappingRunnable.run(TaskThread.java:61)
at java.base/java.lang.Thread.run(Thread.java:840)
If you are re-importing a list that was exported from ONEcount, e.g. to change data in a demographic field for multiple records, the best field to check against is "User Account Number" (ONEcount ID or ocid) because each user can have only one OCID. Note that at the current time, you can't name a column in your import file "ocid". If you do, the system will give you an error message telling you to use a variation such as "oc_id". So, if you have a column with ocid's in your import file, title it "oc_id" and map it to "User Account Number" to dedupe against ocid.
For example: You wish to change an assigned code (e.g. a class or subscription type code) for a group of users subscribed to a particular product. First, you would export the list (for more on how to generate lists see the LISTS AND REPORTS Manual), then do a "find and replace" for the code in the exported csv file, and then reimport the file with the new code. The Bulk Operations feature allows you to make bulk status changes, product changes, unsubscribes/ kills, subscriptions to additional products, and to delete multiple records without having to reimport a list. It does not allow for bulk demographic changes at this time. More information can be found in the BULK OPERATIONS section of the USER OPERATIONS Manual.
Request Date | Expiration Date | Link to Media Files
6. Select from the Request Date drop-down menu the field/column from your import file to map as the Request Date. (If you don't map this field, the Request Date will be the same as the Transaction Date, which is the date of the import.)
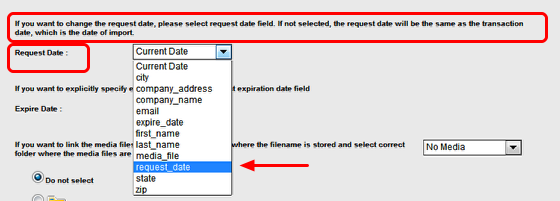
Failed to execute the [include] macro. Cause: [Current user [null] doesn't have view rights on document [xwiki:Licenses.Code.VelocityMacros]]. Click on this message for details.
org.xwiki.rendering.macro.MacroExecutionException: Current user [null] doesn't have view rights on document [xwiki:Licenses.Code.VelocityMacros]
at org.xwiki.rendering.internal.macro.include.IncludeMacro.execute(IncludeMacro.java:124)
at org.xwiki.rendering.internal.macro.include.IncludeMacro.execute(IncludeMacro.java:59)
at org.xwiki.rendering.internal.transformation.macro.MacroTransformation.transform(MacroTransformation.java:311)
at org.xwiki.rendering.internal.transformation.DefaultRenderingContext.transformInContext(DefaultRenderingContext.java:183)
at org.xwiki.rendering.async.internal.block.AbstractBlockAsyncRenderer.transform(AbstractBlockAsyncRenderer.java:76)
at org.xwiki.rendering.wikimacro.internal.DefaultWikiMacroRenderer.transform(DefaultWikiMacroRenderer.java:882)
at org.xwiki.rendering.wikimacro.internal.DefaultWikiMacroRenderer.transform(DefaultWikiMacroRenderer.java:868)
at org.xwiki.rendering.wikimacro.internal.DefaultWikiMacroRenderer.transform(DefaultWikiMacroRenderer.java:594)
at org.xwiki.rendering.wikimacro.internal.DefaultWikiMacroRenderer.execute(DefaultWikiMacroRenderer.java:409)
at org.xwiki.rendering.async.internal.block.AbstractBlockAsyncRenderer.render(AbstractBlockAsyncRenderer.java:157)
at org.xwiki.rendering.async.internal.block.AbstractBlockAsyncRenderer.render(AbstractBlockAsyncRenderer.java:54)
at org.xwiki.rendering.async.internal.DefaultAsyncRendererExecutor.lambda$syncRender$0(DefaultAsyncRendererExecutor.java:284)
at com.xpn.xwiki.internal.security.authorization.DefaultAuthorExecutor.call(DefaultAuthorExecutor.java:98)
at org.xwiki.rendering.async.internal.DefaultAsyncRendererExecutor.syncRender(DefaultAsyncRendererExecutor.java:284)
at org.xwiki.rendering.async.internal.DefaultAsyncRendererExecutor.render(DefaultAsyncRendererExecutor.java:267)
at org.xwiki.rendering.async.internal.block.DefaultBlockAsyncRendererExecutor.execute(DefaultBlockAsyncRendererExecutor.java:125)
at org.xwiki.rendering.wikimacro.internal.DefaultWikiMacro.execute(DefaultWikiMacro.java:129)
at org.xwiki.rendering.wikimacro.internal.DefaultWikiMacro.execute(DefaultWikiMacro.java:61)
at org.xwiki.rendering.internal.transformation.macro.MacroTransformation.transform(MacroTransformation.java:311)
at org.xwiki.rendering.internal.transformation.DefaultRenderingContext.transformInContext(DefaultRenderingContext.java:183)
at org.xwiki.rendering.internal.transformation.DefaultTransformationManager.performTransformations(DefaultTransformationManager.java:88)
at org.xwiki.display.internal.DocumentContentAsyncExecutor.executeInCurrentExecutionContext(DocumentContentAsyncExecutor.java:396)
at org.xwiki.display.internal.DocumentContentAsyncExecutor.execute(DocumentContentAsyncExecutor.java:269)
at org.xwiki.display.internal.DocumentContentAsyncRenderer.execute(DocumentContentAsyncRenderer.java:112)
at org.xwiki.rendering.async.internal.block.AbstractBlockAsyncRenderer.render(AbstractBlockAsyncRenderer.java:157)
at org.xwiki.rendering.async.internal.block.AbstractBlockAsyncRenderer.render(AbstractBlockAsyncRenderer.java:54)
at org.xwiki.rendering.async.internal.DefaultAsyncRendererExecutor.syncRender(DefaultAsyncRendererExecutor.java:290)
at org.xwiki.rendering.async.internal.DefaultAsyncRendererExecutor.render(DefaultAsyncRendererExecutor.java:267)
at org.xwiki.rendering.async.internal.block.DefaultBlockAsyncRendererExecutor.execute(DefaultBlockAsyncRendererExecutor.java:125)
at org.xwiki.display.internal.DocumentContentDisplayer.display(DocumentContentDisplayer.java:67)
at org.xwiki.display.internal.DocumentContentDisplayer.display(DocumentContentDisplayer.java:43)
at org.xwiki.display.internal.DefaultDocumentDisplayer.display(DefaultDocumentDisplayer.java:96)
at org.xwiki.display.internal.DefaultDocumentDisplayer.display(DefaultDocumentDisplayer.java:39)
at org.xwiki.sheet.internal.SheetDocumentDisplayer.display(SheetDocumentDisplayer.java:123)
at org.xwiki.sheet.internal.SheetDocumentDisplayer.display(SheetDocumentDisplayer.java:52)
at org.xwiki.display.internal.ConfiguredDocumentDisplayer.display(ConfiguredDocumentDisplayer.java:68)
at org.xwiki.display.internal.ConfiguredDocumentDisplayer.display(ConfiguredDocumentDisplayer.java:42)
at com.xpn.xwiki.doc.XWikiDocument.display(XWikiDocument.java:1428)
at com.xpn.xwiki.doc.XWikiDocument.getRenderedContent(XWikiDocument.java:1564)
at com.xpn.xwiki.doc.XWikiDocument.displayDocument(XWikiDocument.java:1514)
at com.xpn.xwiki.doc.XWikiDocument.displayDocument(XWikiDocument.java:1483)
at com.xpn.xwiki.api.Document.displayDocument(Document.java:821)
at jdk.internal.reflect.GeneratedMethodAccessor653.invoke(Unknown Source)
at java.base/jdk.internal.reflect.DelegatingMethodAccessorImpl.invoke(DelegatingMethodAccessorImpl.java:43)
at java.base/java.lang.reflect.Method.invoke(Method.java:569)
at org.apache.velocity.util.introspection.UberspectImpl$VelMethodImpl.doInvoke(UberspectImpl.java:571)
at org.apache.velocity.util.introspection.UberspectImpl$VelMethodImpl.invoke(UberspectImpl.java:554)
at org.apache.velocity.runtime.parser.node.ASTMethod.execute(ASTMethod.java:221)
at org.apache.velocity.runtime.parser.node.ASTReference.execute(ASTReference.java:368)
at org.apache.velocity.runtime.parser.node.ASTReference.value(ASTReference.java:704)
at org.apache.velocity.runtime.parser.node.ASTExpression.value(ASTExpression.java:75)
at org.apache.velocity.runtime.parser.node.ASTSetDirective.render(ASTSetDirective.java:242)
at org.apache.velocity.runtime.parser.node.ASTBlock.render(ASTBlock.java:147)
at org.apache.velocity.runtime.parser.node.SimpleNode.render(SimpleNode.java:439)
at org.apache.velocity.runtime.parser.node.ASTIfStatement.render(ASTIfStatement.java:190)
at org.apache.velocity.runtime.parser.node.ASTBlock.render(ASTBlock.java:147)
at org.xwiki.velocity.internal.directive.TryCatchDirective.render(TryCatchDirective.java:86)
at org.apache.velocity.runtime.parser.node.ASTDirective.render(ASTDirective.java:304)
at org.apache.velocity.runtime.parser.node.SimpleNode.render(SimpleNode.java:439)
at org.apache.velocity.Template.merge(Template.java:358)
at org.apache.velocity.Template.merge(Template.java:262)
at org.xwiki.velocity.internal.InternalVelocityEngine.evaluate(InternalVelocityEngine.java:233)
at com.xpn.xwiki.internal.template.VelocityTemplateEvaluator.evaluateContent(VelocityTemplateEvaluator.java:107)
at com.xpn.xwiki.internal.template.TemplateAsyncRenderer.evaluateContent(TemplateAsyncRenderer.java:219)
at com.xpn.xwiki.internal.template.TemplateAsyncRenderer.renderVelocity(TemplateAsyncRenderer.java:174)
at com.xpn.xwiki.internal.template.TemplateAsyncRenderer.render(TemplateAsyncRenderer.java:135)
at com.xpn.xwiki.internal.template.TemplateAsyncRenderer.render(TemplateAsyncRenderer.java:54)
at org.xwiki.rendering.async.internal.DefaultAsyncRendererExecutor.lambda$syncRender$0(DefaultAsyncRendererExecutor.java:284)
at com.xpn.xwiki.internal.security.authorization.DefaultAuthorExecutor.call(DefaultAuthorExecutor.java:98)
at org.xwiki.rendering.async.internal.DefaultAsyncRendererExecutor.syncRender(DefaultAsyncRendererExecutor.java:284)
at org.xwiki.rendering.async.internal.DefaultAsyncRendererExecutor.render(DefaultAsyncRendererExecutor.java:267)
at org.xwiki.rendering.async.internal.block.DefaultBlockAsyncRendererExecutor.render(DefaultBlockAsyncRendererExecutor.java:154)
at com.xpn.xwiki.internal.template.InternalTemplateManager.render(InternalTemplateManager.java:904)
at com.xpn.xwiki.internal.template.InternalTemplateManager.renderFromSkin(InternalTemplateManager.java:866)
at com.xpn.xwiki.internal.template.InternalTemplateManager.render(InternalTemplateManager.java:853)
at com.xpn.xwiki.internal.template.InternalTemplateManager.renderNoException(InternalTemplateManager.java:808)
at com.xpn.xwiki.internal.template.InternalTemplateManager.renderNoException(InternalTemplateManager.java:800)
at com.xpn.xwiki.internal.template.DefaultTemplateManager.renderNoException(DefaultTemplateManager.java:79)
at com.xpn.xwiki.internal.template.DefaultTemplateManager.renderNoException(DefaultTemplateManager.java:73)
at org.xwiki.template.script.TemplateScriptService.render(TemplateScriptService.java:54)
at jdk.internal.reflect.GeneratedMethodAccessor207.invoke(Unknown Source)
at java.base/jdk.internal.reflect.DelegatingMethodAccessorImpl.invoke(DelegatingMethodAccessorImpl.java:43)
at java.base/java.lang.reflect.Method.invoke(Method.java:569)
at org.apache.velocity.util.introspection.UberspectImpl$VelMethodImpl.doInvoke(UberspectImpl.java:571)
at org.apache.velocity.util.introspection.UberspectImpl$VelMethodImpl.invoke(UberspectImpl.java:554)
at org.apache.velocity.runtime.parser.node.ASTMethod.execute(ASTMethod.java:221)
at org.apache.velocity.runtime.parser.node.ASTReference.execute(ASTReference.java:368)
at org.apache.velocity.runtime.parser.node.ASTReference.render(ASTReference.java:492)
at org.apache.velocity.runtime.parser.node.ASTBlock.render(ASTBlock.java:147)
at org.apache.velocity.runtime.directive.VelocimacroProxy.render(VelocimacroProxy.java:217)
at org.apache.velocity.runtime.directive.RuntimeMacro.render(RuntimeMacro.java:331)
at org.apache.velocity.runtime.directive.RuntimeMacro.render(RuntimeMacro.java:261)
at org.apache.velocity.runtime.parser.node.ASTDirective.render(ASTDirective.java:304)
at org.apache.velocity.runtime.parser.node.SimpleNode.render(SimpleNode.java:439)
at org.apache.velocity.Template.merge(Template.java:358)
at org.apache.velocity.Template.merge(Template.java:262)
at org.xwiki.velocity.internal.InternalVelocityEngine.evaluate(InternalVelocityEngine.java:233)
at com.xpn.xwiki.internal.template.VelocityTemplateEvaluator.evaluateContent(VelocityTemplateEvaluator.java:107)
at com.xpn.xwiki.internal.template.TemplateAsyncRenderer.evaluateContent(TemplateAsyncRenderer.java:219)
at com.xpn.xwiki.internal.template.TemplateAsyncRenderer.renderVelocity(TemplateAsyncRenderer.java:174)
at com.xpn.xwiki.internal.template.TemplateAsyncRenderer.render(TemplateAsyncRenderer.java:135)
at com.xpn.xwiki.internal.template.TemplateAsyncRenderer.render(TemplateAsyncRenderer.java:54)
at org.xwiki.rendering.async.internal.DefaultAsyncRendererExecutor.lambda$syncRender$0(DefaultAsyncRendererExecutor.java:284)
at com.xpn.xwiki.internal.security.authorization.DefaultAuthorExecutor.call(DefaultAuthorExecutor.java:98)
at org.xwiki.rendering.async.internal.DefaultAsyncRendererExecutor.syncRender(DefaultAsyncRendererExecutor.java:284)
at org.xwiki.rendering.async.internal.DefaultAsyncRendererExecutor.render(DefaultAsyncRendererExecutor.java:267)
at org.xwiki.rendering.async.internal.block.DefaultBlockAsyncRendererExecutor.render(DefaultBlockAsyncRendererExecutor.java:154)
at com.xpn.xwiki.internal.template.InternalTemplateManager.render(InternalTemplateManager.java:904)
at com.xpn.xwiki.internal.template.InternalTemplateManager.renderFromSkin(InternalTemplateManager.java:866)
at com.xpn.xwiki.internal.template.InternalTemplateManager.render(InternalTemplateManager.java:853)
at com.xpn.xwiki.internal.template.InternalTemplateManager.renderNoException(InternalTemplateManager.java:808)
at com.xpn.xwiki.internal.template.InternalTemplateManager.renderNoException(InternalTemplateManager.java:800)
at com.xpn.xwiki.internal.template.DefaultTemplateManager.renderNoException(DefaultTemplateManager.java:79)
at com.xpn.xwiki.internal.template.DefaultTemplateManager.renderNoException(DefaultTemplateManager.java:73)
at org.xwiki.template.script.TemplateScriptService.render(TemplateScriptService.java:54)
at jdk.internal.reflect.GeneratedMethodAccessor207.invoke(Unknown Source)
at java.base/jdk.internal.reflect.DelegatingMethodAccessorImpl.invoke(DelegatingMethodAccessorImpl.java:43)
at java.base/java.lang.reflect.Method.invoke(Method.java:569)
at org.apache.velocity.util.introspection.UberspectImpl$VelMethodImpl.doInvoke(UberspectImpl.java:571)
at org.apache.velocity.util.introspection.UberspectImpl$VelMethodImpl.invoke(UberspectImpl.java:554)
at org.apache.velocity.runtime.parser.node.ASTMethod.execute(ASTMethod.java:221)
at org.apache.velocity.runtime.parser.node.ASTReference.execute(ASTReference.java:368)
at org.apache.velocity.runtime.parser.node.ASTReference.render(ASTReference.java:492)
at org.apache.velocity.runtime.parser.node.ASTBlock.render(ASTBlock.java:147)
at org.apache.velocity.runtime.directive.VelocimacroProxy.render(VelocimacroProxy.java:217)
at org.apache.velocity.runtime.directive.RuntimeMacro.render(RuntimeMacro.java:331)
at org.apache.velocity.runtime.directive.RuntimeMacro.render(RuntimeMacro.java:261)
at org.apache.velocity.runtime.parser.node.ASTDirective.render(ASTDirective.java:304)
at org.apache.velocity.runtime.parser.node.ASTBlock.render(ASTBlock.java:147)
at org.apache.velocity.runtime.parser.node.ASTIfStatement.render(ASTIfStatement.java:171)
at org.apache.velocity.runtime.parser.node.ASTBlock.render(ASTBlock.java:147)
at org.apache.velocity.runtime.parser.node.SimpleNode.render(SimpleNode.java:439)
at org.apache.velocity.runtime.parser.node.ASTIfStatement.render(ASTIfStatement.java:190)
at org.apache.velocity.runtime.parser.node.SimpleNode.render(SimpleNode.java:439)
at org.apache.velocity.Template.merge(Template.java:358)
at org.apache.velocity.Template.merge(Template.java:262)
at org.xwiki.velocity.internal.InternalVelocityEngine.evaluate(InternalVelocityEngine.java:233)
at com.xpn.xwiki.internal.template.VelocityTemplateEvaluator.evaluateContent(VelocityTemplateEvaluator.java:107)
at com.xpn.xwiki.internal.template.TemplateAsyncRenderer.evaluateContent(TemplateAsyncRenderer.java:219)
at com.xpn.xwiki.internal.template.TemplateAsyncRenderer.renderVelocity(TemplateAsyncRenderer.java:174)
at com.xpn.xwiki.internal.template.TemplateAsyncRenderer.render(TemplateAsyncRenderer.java:135)
at com.xpn.xwiki.internal.template.TemplateAsyncRenderer.render(TemplateAsyncRenderer.java:54)
at org.xwiki.rendering.async.internal.DefaultAsyncRendererExecutor.lambda$syncRender$0(DefaultAsyncRendererExecutor.java:284)
at com.xpn.xwiki.internal.security.authorization.DefaultAuthorExecutor.call(DefaultAuthorExecutor.java:98)
at org.xwiki.rendering.async.internal.DefaultAsyncRendererExecutor.syncRender(DefaultAsyncRendererExecutor.java:284)
at org.xwiki.rendering.async.internal.DefaultAsyncRendererExecutor.render(DefaultAsyncRendererExecutor.java:267)
at org.xwiki.rendering.async.internal.block.DefaultBlockAsyncRendererExecutor.render(DefaultBlockAsyncRendererExecutor.java:154)
at com.xpn.xwiki.internal.template.InternalTemplateManager.render(InternalTemplateManager.java:904)
at com.xpn.xwiki.internal.template.InternalTemplateManager.renderFromSkin(InternalTemplateManager.java:866)
at com.xpn.xwiki.internal.template.InternalTemplateManager.renderFromSkin(InternalTemplateManager.java:846)
at com.xpn.xwiki.internal.template.InternalTemplateManager.render(InternalTemplateManager.java:832)
at com.xpn.xwiki.internal.template.DefaultTemplateManager.render(DefaultTemplateManager.java:91)
at com.xpn.xwiki.internal.template.DefaultTemplateManager.render(DefaultTemplateManager.java:85)
at com.xpn.xwiki.XWiki.evaluateTemplate(XWiki.java:2569)
at com.xpn.xwiki.web.Utils.parseTemplate(Utils.java:180)
at com.xpn.xwiki.web.XWikiAction.execute(XWikiAction.java:650)
at com.xpn.xwiki.web.XWikiAction.execute(XWikiAction.java:338)
at com.xpn.xwiki.web.LegacyActionServlet.service(LegacyActionServlet.java:108)
at javax.servlet.http.HttpServlet.service(HttpServlet.java:764)
at org.apache.catalina.core.ApplicationFilterChain.internalDoFilter(ApplicationFilterChain.java:227)
at org.apache.catalina.core.ApplicationFilterChain.doFilter(ApplicationFilterChain.java:162)
at com.xpn.xwiki.web.ActionFilter.doFilter(ActionFilter.java:122)
at org.apache.catalina.core.ApplicationFilterChain.internalDoFilter(ApplicationFilterChain.java:189)
at org.apache.catalina.core.ApplicationFilterChain.doFilter(ApplicationFilterChain.java:162)
at org.xwiki.wysiwyg.filter.ConversionFilter.doFilter(ConversionFilter.java:61)
at org.apache.catalina.core.ApplicationFilterChain.internalDoFilter(ApplicationFilterChain.java:189)
at org.apache.catalina.core.ApplicationFilterChain.doFilter(ApplicationFilterChain.java:162)
at org.apache.tomcat.websocket.server.WsFilter.doFilter(WsFilter.java:53)
at org.apache.catalina.core.ApplicationFilterChain.internalDoFilter(ApplicationFilterChain.java:189)
at org.apache.catalina.core.ApplicationFilterChain.doFilter(ApplicationFilterChain.java:162)
at org.xwiki.container.servlet.filters.internal.SetHTTPHeaderFilter.doFilter(SetHTTPHeaderFilter.java:63)
at org.apache.catalina.core.ApplicationFilterChain.internalDoFilter(ApplicationFilterChain.java:189)
at org.apache.catalina.core.ApplicationFilterChain.doFilter(ApplicationFilterChain.java:162)
at org.xwiki.resource.servlet.RoutingFilter.doFilter(RoutingFilter.java:132)
at org.apache.catalina.core.ApplicationFilterChain.internalDoFilter(ApplicationFilterChain.java:189)
at org.apache.catalina.core.ApplicationFilterChain.doFilter(ApplicationFilterChain.java:162)
at org.xwiki.container.servlet.filters.internal.SavedRequestRestorerFilter.doFilter(SavedRequestRestorerFilter.java:208)
at org.apache.catalina.core.ApplicationFilterChain.internalDoFilter(ApplicationFilterChain.java:189)
at org.apache.catalina.core.ApplicationFilterChain.doFilter(ApplicationFilterChain.java:162)
at org.xwiki.container.servlet.filters.internal.SetCharacterEncodingFilter.doFilter(SetCharacterEncodingFilter.java:117)
at org.apache.catalina.core.ApplicationFilterChain.internalDoFilter(ApplicationFilterChain.java:189)
at org.apache.catalina.core.ApplicationFilterChain.doFilter(ApplicationFilterChain.java:162)
at org.apache.catalina.core.StandardWrapperValve.invoke(StandardWrapperValve.java:197)
at org.apache.catalina.core.StandardContextValve.invoke(StandardContextValve.java:97)
at org.apache.catalina.authenticator.AuthenticatorBase.invoke(AuthenticatorBase.java:541)
at org.apache.catalina.core.StandardHostValve.invoke(StandardHostValve.java:135)
at org.apache.catalina.valves.ErrorReportValve.invoke(ErrorReportValve.java:92)
at org.apache.catalina.valves.AbstractAccessLogValve.invoke(AbstractAccessLogValve.java:687)
at org.apache.catalina.core.StandardEngineValve.invoke(StandardEngineValve.java:78)
at org.apache.catalina.connector.CoyoteAdapter.service(CoyoteAdapter.java:360)
at org.apache.coyote.http11.Http11Processor.service(Http11Processor.java:399)
at org.apache.coyote.AbstractProcessorLight.process(AbstractProcessorLight.java:65)
at org.apache.coyote.AbstractProtocol$ConnectionHandler.process(AbstractProtocol.java:890)
at org.apache.tomcat.util.net.NioEndpoint$SocketProcessor.doRun(NioEndpoint.java:1743)
at org.apache.tomcat.util.net.SocketProcessorBase.run(SocketProcessorBase.java:49)
at org.apache.tomcat.util.threads.ThreadPoolExecutor.runWorker(ThreadPoolExecutor.java:1191)
at org.apache.tomcat.util.threads.ThreadPoolExecutor$Worker.run(ThreadPoolExecutor.java:659)
at org.apache.tomcat.util.threads.TaskThread$WrappingRunnable.run(TaskThread.java:61)
at java.base/java.lang.Thread.run(Thread.java:840)
Setting a request date ensures that when processing duplicates only data in the ONEcount database that is older than data in the import file will be written over. ONEcount will compare the request date to the date of the most recent information in the database and only write over information that is older than the request date. This is done on a field-by-field basis within a record.
For example:
A list is being imported on 01/07/2013, and an import record is identified as a duplicate.
The mapped request date of the import record is 12/01/2012, and the user's last name in the import file is Smith.
The user updated her profile in the ONEcount database by changing her last name from Smith to Jones on 12/31/2012.
- When duplicates are processed, her last name WILL NOT be written over, as she changed it AFTER (12/31/2012) the request date of the import record (12/01/2012).
As of 11/25/2012 her job title in the ONEcount database is "Sales Associate".
In the import record (Request Date 12/01/2012), her job title is "Regional Sales Manager".
When duplicates are processed, her job title WILL be written over, as the data as of the request date (12/01/2012) is more recent than the data in the ONEcount database (11/25/20120.
If no request date is set when importing, the request date will be the date of the import. If this were the case in the example above, both the user's last name and job title would be written over as the request date (01/07/2013, which is the date of the import/transaction) would be more recent than the dates in the ONEcount database.
If there is a blank field in an import file and the corresponding field in the ONEcount database contains data, that field in the ONEcount database will NOT be written over with a blank, even if the Request Date of the import is more recent than the date the information was entered into the ONEcount database.
If "Null" is inserted into a field in the import file and the corresponding field in the ONEcount database contains data, that field in the ONEcount database WILL BE written over with a blank if the request date of the import is more recent than the date the information was entered into the ONEcount database. If the request date is older than the date the information was entered in the database, the corresponding field will NOT be written over with a blank.
7. Select the column/field in your import file to specify the product Expiration Date. (If you don't specify this, the product Expiration Date will be based upon the Transaction Date, which is the date of the import.)
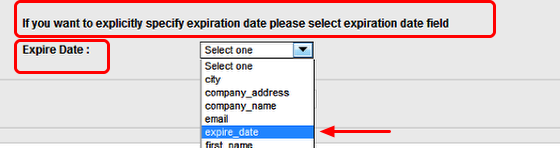
The expiration date is automatically calculated when a user subscribes online based on the transaction date (which is the date of the online subscription). If a subscription transaction with an expiration date is recorded in the system via an import – especially for data conversions when implementing a new ONEcount system – "Expiration Date" (or something similar) should be a field in the CSV import file. If you do not select this field to be recorded as the expiration date in the ONEcount system, the system will set the expiration date based on the transaction date (which isn't an issue for new subscribers being imported into the system.)
For example:
A product has a term of three years.
If a user subscribes online, their subscription will expire three yeasr from the date of their submittal of the subscription form.
If, however – as in the case of an initial data conversion when implementing a new ONEcount system – lists of users who didn't subscribe to the products online via the ONEcount system are being imported, the import files should contain a field with the expiration date based on the actual subscription date, and that field should be selected as the expiration date. Otherwise, the system will look at the date of import (transaction date) and set the expiration date as three-years from then.
Note that if you select Expiration Date and select multiple products when importing, the value of that field for each row of the import file will be used to update the Expiration Date for all of the products selected.
If data for a user already in the ONEcount system is being re-imported (e.g., to append information to his/her ONEcount profile) and:
1) the user is imported to a product he/she is already subscribed to, and
2) Expiration Date is specified
The transaction will show as a renewal to the product and the earlier of the two expiration dates will be ignored. That is, if the expiration date specified in the import file is earlier than the expiration date already in ONEcount, the transaction will appear as a product renewal and the expiration date in ONEcount will not be changed. So, for example, if a user is already subscribed to "Print Magazine" product and the expiration date in ONEcount is 01-01-2015 and that same user is re-imported to that same product with an expiration date in the import file of 01-01-2014, the 01-01-2014 date will be ignored.
8. To link media files for a record to the folder on your server where the media files are stored, select the column/field from your import file and the folder on your server where media files are stored.*
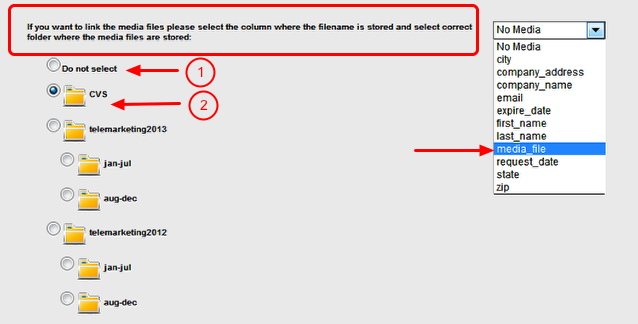
*This server must be connected to ONEcount.
You can link media files, such as audio recordings from telemarketers or scanned subscription/renewal cards, to user records in the ONEcount database. When viewing a user record, the media icon can be clicked on to bring up the actual file.
To link to an external URL/server, e.g. a telemarketers storage of audio recordings, enter the URL to the recording in a column in your import file. The option "Do not select" should be chosen. (1)
To link to a file stored on your server, e.g. scanned subscription/renewal cards, enter the path to the file in a column in your import file. Then select the folder on your server where the files are stored. This information will need to be provided to ONEcount so that it can be configured in the ONEcount back end and the folder selections displayed here.
Set and Import
9. Click the "Set" button.

You can now either Save the Mapping (See "How to Create an Import Mapping Template" lesson), Import the file, or Reset the mapping.
10. Click on the Import button.

The system will begin to process the import, and a Pre-Import Summary and Sample Mapping page will appear. (See screen shots and important information below.)
Clicking on "Reset" will reset only the mapping. Import Title, Description, Source Code, Product(s), and Product Status will not be reset.
Clicking on "Save Mapping Template" will save the mappings to a template. See Mapping Template documentation for more detail.
Pre-Import Summary and Sample Mapping
11. Review the Pre-Import Summary
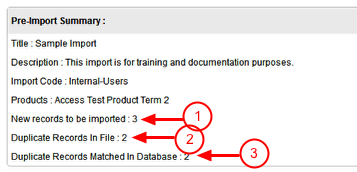
The system will alert you if there are records in your import file that match records in the ONEcount database based on the field(s) you select to check for duplicates. The pre-import summary screen will give you the number of new records to be imported (1), the number of duplicates (if any) in the import file (2), and the number of duplicates matched in the database (3).
Failed to execute the [include] macro. Cause: [Current user [null] doesn't have view rights on document [xwiki:Licenses.Code.VelocityMacros]]. Click on this message for details.
org.xwiki.rendering.macro.MacroExecutionException: Current user [null] doesn't have view rights on document [xwiki:Licenses.Code.VelocityMacros]
at org.xwiki.rendering.internal.macro.include.IncludeMacro.execute(IncludeMacro.java:124)
at org.xwiki.rendering.internal.macro.include.IncludeMacro.execute(IncludeMacro.java:59)
at org.xwiki.rendering.internal.transformation.macro.MacroTransformation.transform(MacroTransformation.java:311)
at org.xwiki.rendering.internal.transformation.DefaultRenderingContext.transformInContext(DefaultRenderingContext.java:183)
at org.xwiki.rendering.async.internal.block.AbstractBlockAsyncRenderer.transform(AbstractBlockAsyncRenderer.java:76)
at org.xwiki.rendering.wikimacro.internal.DefaultWikiMacroRenderer.transform(DefaultWikiMacroRenderer.java:882)
at org.xwiki.rendering.wikimacro.internal.DefaultWikiMacroRenderer.transform(DefaultWikiMacroRenderer.java:868)
at org.xwiki.rendering.wikimacro.internal.DefaultWikiMacroRenderer.transform(DefaultWikiMacroRenderer.java:594)
at org.xwiki.rendering.wikimacro.internal.DefaultWikiMacroRenderer.execute(DefaultWikiMacroRenderer.java:409)
at org.xwiki.rendering.async.internal.block.AbstractBlockAsyncRenderer.render(AbstractBlockAsyncRenderer.java:157)
at org.xwiki.rendering.async.internal.block.AbstractBlockAsyncRenderer.render(AbstractBlockAsyncRenderer.java:54)
at org.xwiki.rendering.async.internal.DefaultAsyncRendererExecutor.lambda$syncRender$0(DefaultAsyncRendererExecutor.java:284)
at com.xpn.xwiki.internal.security.authorization.DefaultAuthorExecutor.call(DefaultAuthorExecutor.java:98)
at org.xwiki.rendering.async.internal.DefaultAsyncRendererExecutor.syncRender(DefaultAsyncRendererExecutor.java:284)
at org.xwiki.rendering.async.internal.DefaultAsyncRendererExecutor.render(DefaultAsyncRendererExecutor.java:267)
at org.xwiki.rendering.async.internal.block.DefaultBlockAsyncRendererExecutor.execute(DefaultBlockAsyncRendererExecutor.java:125)
at org.xwiki.rendering.wikimacro.internal.DefaultWikiMacro.execute(DefaultWikiMacro.java:129)
at org.xwiki.rendering.wikimacro.internal.DefaultWikiMacro.execute(DefaultWikiMacro.java:61)
at org.xwiki.rendering.internal.transformation.macro.MacroTransformation.transform(MacroTransformation.java:311)
at org.xwiki.rendering.internal.transformation.DefaultRenderingContext.transformInContext(DefaultRenderingContext.java:183)
at org.xwiki.rendering.internal.transformation.DefaultTransformationManager.performTransformations(DefaultTransformationManager.java:88)
at org.xwiki.display.internal.DocumentContentAsyncExecutor.executeInCurrentExecutionContext(DocumentContentAsyncExecutor.java:396)
at org.xwiki.display.internal.DocumentContentAsyncExecutor.execute(DocumentContentAsyncExecutor.java:269)
at org.xwiki.display.internal.DocumentContentAsyncRenderer.execute(DocumentContentAsyncRenderer.java:112)
at org.xwiki.rendering.async.internal.block.AbstractBlockAsyncRenderer.render(AbstractBlockAsyncRenderer.java:157)
at org.xwiki.rendering.async.internal.block.AbstractBlockAsyncRenderer.render(AbstractBlockAsyncRenderer.java:54)
at org.xwiki.rendering.async.internal.DefaultAsyncRendererExecutor.syncRender(DefaultAsyncRendererExecutor.java:290)
at org.xwiki.rendering.async.internal.DefaultAsyncRendererExecutor.render(DefaultAsyncRendererExecutor.java:267)
at org.xwiki.rendering.async.internal.block.DefaultBlockAsyncRendererExecutor.execute(DefaultBlockAsyncRendererExecutor.java:125)
at org.xwiki.display.internal.DocumentContentDisplayer.display(DocumentContentDisplayer.java:67)
at org.xwiki.display.internal.DocumentContentDisplayer.display(DocumentContentDisplayer.java:43)
at org.xwiki.display.internal.DefaultDocumentDisplayer.display(DefaultDocumentDisplayer.java:96)
at org.xwiki.display.internal.DefaultDocumentDisplayer.display(DefaultDocumentDisplayer.java:39)
at org.xwiki.sheet.internal.SheetDocumentDisplayer.display(SheetDocumentDisplayer.java:123)
at org.xwiki.sheet.internal.SheetDocumentDisplayer.display(SheetDocumentDisplayer.java:52)
at org.xwiki.display.internal.ConfiguredDocumentDisplayer.display(ConfiguredDocumentDisplayer.java:68)
at org.xwiki.display.internal.ConfiguredDocumentDisplayer.display(ConfiguredDocumentDisplayer.java:42)
at com.xpn.xwiki.doc.XWikiDocument.display(XWikiDocument.java:1428)
at com.xpn.xwiki.doc.XWikiDocument.getRenderedContent(XWikiDocument.java:1564)
at com.xpn.xwiki.doc.XWikiDocument.displayDocument(XWikiDocument.java:1514)
at com.xpn.xwiki.doc.XWikiDocument.displayDocument(XWikiDocument.java:1483)
at com.xpn.xwiki.api.Document.displayDocument(Document.java:821)
at jdk.internal.reflect.GeneratedMethodAccessor653.invoke(Unknown Source)
at java.base/jdk.internal.reflect.DelegatingMethodAccessorImpl.invoke(DelegatingMethodAccessorImpl.java:43)
at java.base/java.lang.reflect.Method.invoke(Method.java:569)
at org.apache.velocity.util.introspection.UberspectImpl$VelMethodImpl.doInvoke(UberspectImpl.java:571)
at org.apache.velocity.util.introspection.UberspectImpl$VelMethodImpl.invoke(UberspectImpl.java:554)
at org.apache.velocity.runtime.parser.node.ASTMethod.execute(ASTMethod.java:221)
at org.apache.velocity.runtime.parser.node.ASTReference.execute(ASTReference.java:368)
at org.apache.velocity.runtime.parser.node.ASTReference.value(ASTReference.java:704)
at org.apache.velocity.runtime.parser.node.ASTExpression.value(ASTExpression.java:75)
at org.apache.velocity.runtime.parser.node.ASTSetDirective.render(ASTSetDirective.java:242)
at org.apache.velocity.runtime.parser.node.ASTBlock.render(ASTBlock.java:147)
at org.apache.velocity.runtime.parser.node.SimpleNode.render(SimpleNode.java:439)
at org.apache.velocity.runtime.parser.node.ASTIfStatement.render(ASTIfStatement.java:190)
at org.apache.velocity.runtime.parser.node.ASTBlock.render(ASTBlock.java:147)
at org.xwiki.velocity.internal.directive.TryCatchDirective.render(TryCatchDirective.java:86)
at org.apache.velocity.runtime.parser.node.ASTDirective.render(ASTDirective.java:304)
at org.apache.velocity.runtime.parser.node.SimpleNode.render(SimpleNode.java:439)
at org.apache.velocity.Template.merge(Template.java:358)
at org.apache.velocity.Template.merge(Template.java:262)
at org.xwiki.velocity.internal.InternalVelocityEngine.evaluate(InternalVelocityEngine.java:233)
at com.xpn.xwiki.internal.template.VelocityTemplateEvaluator.evaluateContent(VelocityTemplateEvaluator.java:107)
at com.xpn.xwiki.internal.template.TemplateAsyncRenderer.evaluateContent(TemplateAsyncRenderer.java:219)
at com.xpn.xwiki.internal.template.TemplateAsyncRenderer.renderVelocity(TemplateAsyncRenderer.java:174)
at com.xpn.xwiki.internal.template.TemplateAsyncRenderer.render(TemplateAsyncRenderer.java:135)
at com.xpn.xwiki.internal.template.TemplateAsyncRenderer.render(TemplateAsyncRenderer.java:54)
at org.xwiki.rendering.async.internal.DefaultAsyncRendererExecutor.lambda$syncRender$0(DefaultAsyncRendererExecutor.java:284)
at com.xpn.xwiki.internal.security.authorization.DefaultAuthorExecutor.call(DefaultAuthorExecutor.java:98)
at org.xwiki.rendering.async.internal.DefaultAsyncRendererExecutor.syncRender(DefaultAsyncRendererExecutor.java:284)
at org.xwiki.rendering.async.internal.DefaultAsyncRendererExecutor.render(DefaultAsyncRendererExecutor.java:267)
at org.xwiki.rendering.async.internal.block.DefaultBlockAsyncRendererExecutor.render(DefaultBlockAsyncRendererExecutor.java:154)
at com.xpn.xwiki.internal.template.InternalTemplateManager.render(InternalTemplateManager.java:904)
at com.xpn.xwiki.internal.template.InternalTemplateManager.renderFromSkin(InternalTemplateManager.java:866)
at com.xpn.xwiki.internal.template.InternalTemplateManager.render(InternalTemplateManager.java:853)
at com.xpn.xwiki.internal.template.InternalTemplateManager.renderNoException(InternalTemplateManager.java:808)
at com.xpn.xwiki.internal.template.InternalTemplateManager.renderNoException(InternalTemplateManager.java:800)
at com.xpn.xwiki.internal.template.DefaultTemplateManager.renderNoException(DefaultTemplateManager.java:79)
at com.xpn.xwiki.internal.template.DefaultTemplateManager.renderNoException(DefaultTemplateManager.java:73)
at org.xwiki.template.script.TemplateScriptService.render(TemplateScriptService.java:54)
at jdk.internal.reflect.GeneratedMethodAccessor207.invoke(Unknown Source)
at java.base/jdk.internal.reflect.DelegatingMethodAccessorImpl.invoke(DelegatingMethodAccessorImpl.java:43)
at java.base/java.lang.reflect.Method.invoke(Method.java:569)
at org.apache.velocity.util.introspection.UberspectImpl$VelMethodImpl.doInvoke(UberspectImpl.java:571)
at org.apache.velocity.util.introspection.UberspectImpl$VelMethodImpl.invoke(UberspectImpl.java:554)
at org.apache.velocity.runtime.parser.node.ASTMethod.execute(ASTMethod.java:221)
at org.apache.velocity.runtime.parser.node.ASTReference.execute(ASTReference.java:368)
at org.apache.velocity.runtime.parser.node.ASTReference.render(ASTReference.java:492)
at org.apache.velocity.runtime.parser.node.ASTBlock.render(ASTBlock.java:147)
at org.apache.velocity.runtime.directive.VelocimacroProxy.render(VelocimacroProxy.java:217)
at org.apache.velocity.runtime.directive.RuntimeMacro.render(RuntimeMacro.java:331)
at org.apache.velocity.runtime.directive.RuntimeMacro.render(RuntimeMacro.java:261)
at org.apache.velocity.runtime.parser.node.ASTDirective.render(ASTDirective.java:304)
at org.apache.velocity.runtime.parser.node.SimpleNode.render(SimpleNode.java:439)
at org.apache.velocity.Template.merge(Template.java:358)
at org.apache.velocity.Template.merge(Template.java:262)
at org.xwiki.velocity.internal.InternalVelocityEngine.evaluate(InternalVelocityEngine.java:233)
at com.xpn.xwiki.internal.template.VelocityTemplateEvaluator.evaluateContent(VelocityTemplateEvaluator.java:107)
at com.xpn.xwiki.internal.template.TemplateAsyncRenderer.evaluateContent(TemplateAsyncRenderer.java:219)
at com.xpn.xwiki.internal.template.TemplateAsyncRenderer.renderVelocity(TemplateAsyncRenderer.java:174)
at com.xpn.xwiki.internal.template.TemplateAsyncRenderer.render(TemplateAsyncRenderer.java:135)
at com.xpn.xwiki.internal.template.TemplateAsyncRenderer.render(TemplateAsyncRenderer.java:54)
at org.xwiki.rendering.async.internal.DefaultAsyncRendererExecutor.lambda$syncRender$0(DefaultAsyncRendererExecutor.java:284)
at com.xpn.xwiki.internal.security.authorization.DefaultAuthorExecutor.call(DefaultAuthorExecutor.java:98)
at org.xwiki.rendering.async.internal.DefaultAsyncRendererExecutor.syncRender(DefaultAsyncRendererExecutor.java:284)
at org.xwiki.rendering.async.internal.DefaultAsyncRendererExecutor.render(DefaultAsyncRendererExecutor.java:267)
at org.xwiki.rendering.async.internal.block.DefaultBlockAsyncRendererExecutor.render(DefaultBlockAsyncRendererExecutor.java:154)
at com.xpn.xwiki.internal.template.InternalTemplateManager.render(InternalTemplateManager.java:904)
at com.xpn.xwiki.internal.template.InternalTemplateManager.renderFromSkin(InternalTemplateManager.java:866)
at com.xpn.xwiki.internal.template.InternalTemplateManager.render(InternalTemplateManager.java:853)
at com.xpn.xwiki.internal.template.InternalTemplateManager.renderNoException(InternalTemplateManager.java:808)
at com.xpn.xwiki.internal.template.InternalTemplateManager.renderNoException(InternalTemplateManager.java:800)
at com.xpn.xwiki.internal.template.DefaultTemplateManager.renderNoException(DefaultTemplateManager.java:79)
at com.xpn.xwiki.internal.template.DefaultTemplateManager.renderNoException(DefaultTemplateManager.java:73)
at org.xwiki.template.script.TemplateScriptService.render(TemplateScriptService.java:54)
at jdk.internal.reflect.GeneratedMethodAccessor207.invoke(Unknown Source)
at java.base/jdk.internal.reflect.DelegatingMethodAccessorImpl.invoke(DelegatingMethodAccessorImpl.java:43)
at java.base/java.lang.reflect.Method.invoke(Method.java:569)
at org.apache.velocity.util.introspection.UberspectImpl$VelMethodImpl.doInvoke(UberspectImpl.java:571)
at org.apache.velocity.util.introspection.UberspectImpl$VelMethodImpl.invoke(UberspectImpl.java:554)
at org.apache.velocity.runtime.parser.node.ASTMethod.execute(ASTMethod.java:221)
at org.apache.velocity.runtime.parser.node.ASTReference.execute(ASTReference.java:368)
at org.apache.velocity.runtime.parser.node.ASTReference.render(ASTReference.java:492)
at org.apache.velocity.runtime.parser.node.ASTBlock.render(ASTBlock.java:147)
at org.apache.velocity.runtime.directive.VelocimacroProxy.render(VelocimacroProxy.java:217)
at org.apache.velocity.runtime.directive.RuntimeMacro.render(RuntimeMacro.java:331)
at org.apache.velocity.runtime.directive.RuntimeMacro.render(RuntimeMacro.java:261)
at org.apache.velocity.runtime.parser.node.ASTDirective.render(ASTDirective.java:304)
at org.apache.velocity.runtime.parser.node.ASTBlock.render(ASTBlock.java:147)
at org.apache.velocity.runtime.parser.node.ASTIfStatement.render(ASTIfStatement.java:171)
at org.apache.velocity.runtime.parser.node.ASTBlock.render(ASTBlock.java:147)
at org.apache.velocity.runtime.parser.node.SimpleNode.render(SimpleNode.java:439)
at org.apache.velocity.runtime.parser.node.ASTIfStatement.render(ASTIfStatement.java:190)
at org.apache.velocity.runtime.parser.node.SimpleNode.render(SimpleNode.java:439)
at org.apache.velocity.Template.merge(Template.java:358)
at org.apache.velocity.Template.merge(Template.java:262)
at org.xwiki.velocity.internal.InternalVelocityEngine.evaluate(InternalVelocityEngine.java:233)
at com.xpn.xwiki.internal.template.VelocityTemplateEvaluator.evaluateContent(VelocityTemplateEvaluator.java:107)
at com.xpn.xwiki.internal.template.TemplateAsyncRenderer.evaluateContent(TemplateAsyncRenderer.java:219)
at com.xpn.xwiki.internal.template.TemplateAsyncRenderer.renderVelocity(TemplateAsyncRenderer.java:174)
at com.xpn.xwiki.internal.template.TemplateAsyncRenderer.render(TemplateAsyncRenderer.java:135)
at com.xpn.xwiki.internal.template.TemplateAsyncRenderer.render(TemplateAsyncRenderer.java:54)
at org.xwiki.rendering.async.internal.DefaultAsyncRendererExecutor.lambda$syncRender$0(DefaultAsyncRendererExecutor.java:284)
at com.xpn.xwiki.internal.security.authorization.DefaultAuthorExecutor.call(DefaultAuthorExecutor.java:98)
at org.xwiki.rendering.async.internal.DefaultAsyncRendererExecutor.syncRender(DefaultAsyncRendererExecutor.java:284)
at org.xwiki.rendering.async.internal.DefaultAsyncRendererExecutor.render(DefaultAsyncRendererExecutor.java:267)
at org.xwiki.rendering.async.internal.block.DefaultBlockAsyncRendererExecutor.render(DefaultBlockAsyncRendererExecutor.java:154)
at com.xpn.xwiki.internal.template.InternalTemplateManager.render(InternalTemplateManager.java:904)
at com.xpn.xwiki.internal.template.InternalTemplateManager.renderFromSkin(InternalTemplateManager.java:866)
at com.xpn.xwiki.internal.template.InternalTemplateManager.renderFromSkin(InternalTemplateManager.java:846)
at com.xpn.xwiki.internal.template.InternalTemplateManager.render(InternalTemplateManager.java:832)
at com.xpn.xwiki.internal.template.DefaultTemplateManager.render(DefaultTemplateManager.java:91)
at com.xpn.xwiki.internal.template.DefaultTemplateManager.render(DefaultTemplateManager.java:85)
at com.xpn.xwiki.XWiki.evaluateTemplate(XWiki.java:2569)
at com.xpn.xwiki.web.Utils.parseTemplate(Utils.java:180)
at com.xpn.xwiki.web.XWikiAction.execute(XWikiAction.java:650)
at com.xpn.xwiki.web.XWikiAction.execute(XWikiAction.java:338)
at com.xpn.xwiki.web.LegacyActionServlet.service(LegacyActionServlet.java:108)
at javax.servlet.http.HttpServlet.service(HttpServlet.java:764)
at org.apache.catalina.core.ApplicationFilterChain.internalDoFilter(ApplicationFilterChain.java:227)
at org.apache.catalina.core.ApplicationFilterChain.doFilter(ApplicationFilterChain.java:162)
at com.xpn.xwiki.web.ActionFilter.doFilter(ActionFilter.java:122)
at org.apache.catalina.core.ApplicationFilterChain.internalDoFilter(ApplicationFilterChain.java:189)
at org.apache.catalina.core.ApplicationFilterChain.doFilter(ApplicationFilterChain.java:162)
at org.xwiki.wysiwyg.filter.ConversionFilter.doFilter(ConversionFilter.java:61)
at org.apache.catalina.core.ApplicationFilterChain.internalDoFilter(ApplicationFilterChain.java:189)
at org.apache.catalina.core.ApplicationFilterChain.doFilter(ApplicationFilterChain.java:162)
at org.apache.tomcat.websocket.server.WsFilter.doFilter(WsFilter.java:53)
at org.apache.catalina.core.ApplicationFilterChain.internalDoFilter(ApplicationFilterChain.java:189)
at org.apache.catalina.core.ApplicationFilterChain.doFilter(ApplicationFilterChain.java:162)
at org.xwiki.container.servlet.filters.internal.SetHTTPHeaderFilter.doFilter(SetHTTPHeaderFilter.java:63)
at org.apache.catalina.core.ApplicationFilterChain.internalDoFilter(ApplicationFilterChain.java:189)
at org.apache.catalina.core.ApplicationFilterChain.doFilter(ApplicationFilterChain.java:162)
at org.xwiki.resource.servlet.RoutingFilter.doFilter(RoutingFilter.java:132)
at org.apache.catalina.core.ApplicationFilterChain.internalDoFilter(ApplicationFilterChain.java:189)
at org.apache.catalina.core.ApplicationFilterChain.doFilter(ApplicationFilterChain.java:162)
at org.xwiki.container.servlet.filters.internal.SavedRequestRestorerFilter.doFilter(SavedRequestRestorerFilter.java:208)
at org.apache.catalina.core.ApplicationFilterChain.internalDoFilter(ApplicationFilterChain.java:189)
at org.apache.catalina.core.ApplicationFilterChain.doFilter(ApplicationFilterChain.java:162)
at org.xwiki.container.servlet.filters.internal.SetCharacterEncodingFilter.doFilter(SetCharacterEncodingFilter.java:117)
at org.apache.catalina.core.ApplicationFilterChain.internalDoFilter(ApplicationFilterChain.java:189)
at org.apache.catalina.core.ApplicationFilterChain.doFilter(ApplicationFilterChain.java:162)
at org.apache.catalina.core.StandardWrapperValve.invoke(StandardWrapperValve.java:197)
at org.apache.catalina.core.StandardContextValve.invoke(StandardContextValve.java:97)
at org.apache.catalina.authenticator.AuthenticatorBase.invoke(AuthenticatorBase.java:541)
at org.apache.catalina.core.StandardHostValve.invoke(StandardHostValve.java:135)
at org.apache.catalina.valves.ErrorReportValve.invoke(ErrorReportValve.java:92)
at org.apache.catalina.valves.AbstractAccessLogValve.invoke(AbstractAccessLogValve.java:687)
at org.apache.catalina.core.StandardEngineValve.invoke(StandardEngineValve.java:78)
at org.apache.catalina.connector.CoyoteAdapter.service(CoyoteAdapter.java:360)
at org.apache.coyote.http11.Http11Processor.service(Http11Processor.java:399)
at org.apache.coyote.AbstractProcessorLight.process(AbstractProcessorLight.java:65)
at org.apache.coyote.AbstractProtocol$ConnectionHandler.process(AbstractProtocol.java:890)
at org.apache.tomcat.util.net.NioEndpoint$SocketProcessor.doRun(NioEndpoint.java:1743)
at org.apache.tomcat.util.net.SocketProcessorBase.run(SocketProcessorBase.java:49)
at org.apache.tomcat.util.threads.ThreadPoolExecutor.runWorker(ThreadPoolExecutor.java:1191)
at org.apache.tomcat.util.threads.ThreadPoolExecutor$Worker.run(ThreadPoolExecutor.java:659)
at org.apache.tomcat.util.threads.TaskThread$WrappingRunnable.run(TaskThread.java:61)
at java.base/java.lang.Thread.run(Thread.java:840)
The number of "Duplicate Records in File" is how many records within the import file are already in the ONEcount database based on your selected field(s) to check for duplicates. THIS IS NOT A COUNT OF THE NUMBER OF RECORDS WITHIN THE IMPORT FILE THAT ARE DUPLICATES.
Failed to execute the [include] macro. Cause: [Current user [null] doesn't have view rights on document [xwiki:Licenses.Code.VelocityMacros]]. Click on this message for details.
org.xwiki.rendering.macro.MacroExecutionException: Current user [null] doesn't have view rights on document [xwiki:Licenses.Code.VelocityMacros]
at org.xwiki.rendering.internal.macro.include.IncludeMacro.execute(IncludeMacro.java:124)
at org.xwiki.rendering.internal.macro.include.IncludeMacro.execute(IncludeMacro.java:59)
at org.xwiki.rendering.internal.transformation.macro.MacroTransformation.transform(MacroTransformation.java:311)
at org.xwiki.rendering.internal.transformation.DefaultRenderingContext.transformInContext(DefaultRenderingContext.java:183)
at org.xwiki.rendering.async.internal.block.AbstractBlockAsyncRenderer.transform(AbstractBlockAsyncRenderer.java:76)
at org.xwiki.rendering.wikimacro.internal.DefaultWikiMacroRenderer.transform(DefaultWikiMacroRenderer.java:882)
at org.xwiki.rendering.wikimacro.internal.DefaultWikiMacroRenderer.transform(DefaultWikiMacroRenderer.java:868)
at org.xwiki.rendering.wikimacro.internal.DefaultWikiMacroRenderer.transform(DefaultWikiMacroRenderer.java:594)
at org.xwiki.rendering.wikimacro.internal.DefaultWikiMacroRenderer.execute(DefaultWikiMacroRenderer.java:409)
at org.xwiki.rendering.async.internal.block.AbstractBlockAsyncRenderer.render(AbstractBlockAsyncRenderer.java:157)
at org.xwiki.rendering.async.internal.block.AbstractBlockAsyncRenderer.render(AbstractBlockAsyncRenderer.java:54)
at org.xwiki.rendering.async.internal.DefaultAsyncRendererExecutor.lambda$syncRender$0(DefaultAsyncRendererExecutor.java:284)
at com.xpn.xwiki.internal.security.authorization.DefaultAuthorExecutor.call(DefaultAuthorExecutor.java:98)
at org.xwiki.rendering.async.internal.DefaultAsyncRendererExecutor.syncRender(DefaultAsyncRendererExecutor.java:284)
at org.xwiki.rendering.async.internal.DefaultAsyncRendererExecutor.render(DefaultAsyncRendererExecutor.java:267)
at org.xwiki.rendering.async.internal.block.DefaultBlockAsyncRendererExecutor.execute(DefaultBlockAsyncRendererExecutor.java:125)
at org.xwiki.rendering.wikimacro.internal.DefaultWikiMacro.execute(DefaultWikiMacro.java:129)
at org.xwiki.rendering.wikimacro.internal.DefaultWikiMacro.execute(DefaultWikiMacro.java:61)
at org.xwiki.rendering.internal.transformation.macro.MacroTransformation.transform(MacroTransformation.java:311)
at org.xwiki.rendering.internal.transformation.DefaultRenderingContext.transformInContext(DefaultRenderingContext.java:183)
at org.xwiki.rendering.internal.transformation.DefaultTransformationManager.performTransformations(DefaultTransformationManager.java:88)
at org.xwiki.display.internal.DocumentContentAsyncExecutor.executeInCurrentExecutionContext(DocumentContentAsyncExecutor.java:396)
at org.xwiki.display.internal.DocumentContentAsyncExecutor.execute(DocumentContentAsyncExecutor.java:269)
at org.xwiki.display.internal.DocumentContentAsyncRenderer.execute(DocumentContentAsyncRenderer.java:112)
at org.xwiki.rendering.async.internal.block.AbstractBlockAsyncRenderer.render(AbstractBlockAsyncRenderer.java:157)
at org.xwiki.rendering.async.internal.block.AbstractBlockAsyncRenderer.render(AbstractBlockAsyncRenderer.java:54)
at org.xwiki.rendering.async.internal.DefaultAsyncRendererExecutor.syncRender(DefaultAsyncRendererExecutor.java:290)
at org.xwiki.rendering.async.internal.DefaultAsyncRendererExecutor.render(DefaultAsyncRendererExecutor.java:267)
at org.xwiki.rendering.async.internal.block.DefaultBlockAsyncRendererExecutor.execute(DefaultBlockAsyncRendererExecutor.java:125)
at org.xwiki.display.internal.DocumentContentDisplayer.display(DocumentContentDisplayer.java:67)
at org.xwiki.display.internal.DocumentContentDisplayer.display(DocumentContentDisplayer.java:43)
at org.xwiki.display.internal.DefaultDocumentDisplayer.display(DefaultDocumentDisplayer.java:96)
at org.xwiki.display.internal.DefaultDocumentDisplayer.display(DefaultDocumentDisplayer.java:39)
at org.xwiki.sheet.internal.SheetDocumentDisplayer.display(SheetDocumentDisplayer.java:123)
at org.xwiki.sheet.internal.SheetDocumentDisplayer.display(SheetDocumentDisplayer.java:52)
at org.xwiki.display.internal.ConfiguredDocumentDisplayer.display(ConfiguredDocumentDisplayer.java:68)
at org.xwiki.display.internal.ConfiguredDocumentDisplayer.display(ConfiguredDocumentDisplayer.java:42)
at com.xpn.xwiki.doc.XWikiDocument.display(XWikiDocument.java:1428)
at com.xpn.xwiki.doc.XWikiDocument.getRenderedContent(XWikiDocument.java:1564)
at com.xpn.xwiki.doc.XWikiDocument.displayDocument(XWikiDocument.java:1514)
at com.xpn.xwiki.doc.XWikiDocument.displayDocument(XWikiDocument.java:1483)
at com.xpn.xwiki.api.Document.displayDocument(Document.java:821)
at jdk.internal.reflect.GeneratedMethodAccessor653.invoke(Unknown Source)
at java.base/jdk.internal.reflect.DelegatingMethodAccessorImpl.invoke(DelegatingMethodAccessorImpl.java:43)
at java.base/java.lang.reflect.Method.invoke(Method.java:569)
at org.apache.velocity.util.introspection.UberspectImpl$VelMethodImpl.doInvoke(UberspectImpl.java:571)
at org.apache.velocity.util.introspection.UberspectImpl$VelMethodImpl.invoke(UberspectImpl.java:554)
at org.apache.velocity.runtime.parser.node.ASTMethod.execute(ASTMethod.java:221)
at org.apache.velocity.runtime.parser.node.ASTReference.execute(ASTReference.java:368)
at org.apache.velocity.runtime.parser.node.ASTReference.value(ASTReference.java:704)
at org.apache.velocity.runtime.parser.node.ASTExpression.value(ASTExpression.java:75)
at org.apache.velocity.runtime.parser.node.ASTSetDirective.render(ASTSetDirective.java:242)
at org.apache.velocity.runtime.parser.node.ASTBlock.render(ASTBlock.java:147)
at org.apache.velocity.runtime.parser.node.SimpleNode.render(SimpleNode.java:439)
at org.apache.velocity.runtime.parser.node.ASTIfStatement.render(ASTIfStatement.java:190)
at org.apache.velocity.runtime.parser.node.ASTBlock.render(ASTBlock.java:147)
at org.xwiki.velocity.internal.directive.TryCatchDirective.render(TryCatchDirective.java:86)
at org.apache.velocity.runtime.parser.node.ASTDirective.render(ASTDirective.java:304)
at org.apache.velocity.runtime.parser.node.SimpleNode.render(SimpleNode.java:439)
at org.apache.velocity.Template.merge(Template.java:358)
at org.apache.velocity.Template.merge(Template.java:262)
at org.xwiki.velocity.internal.InternalVelocityEngine.evaluate(InternalVelocityEngine.java:233)
at com.xpn.xwiki.internal.template.VelocityTemplateEvaluator.evaluateContent(VelocityTemplateEvaluator.java:107)
at com.xpn.xwiki.internal.template.TemplateAsyncRenderer.evaluateContent(TemplateAsyncRenderer.java:219)
at com.xpn.xwiki.internal.template.TemplateAsyncRenderer.renderVelocity(TemplateAsyncRenderer.java:174)
at com.xpn.xwiki.internal.template.TemplateAsyncRenderer.render(TemplateAsyncRenderer.java:135)
at com.xpn.xwiki.internal.template.TemplateAsyncRenderer.render(TemplateAsyncRenderer.java:54)
at org.xwiki.rendering.async.internal.DefaultAsyncRendererExecutor.lambda$syncRender$0(DefaultAsyncRendererExecutor.java:284)
at com.xpn.xwiki.internal.security.authorization.DefaultAuthorExecutor.call(DefaultAuthorExecutor.java:98)
at org.xwiki.rendering.async.internal.DefaultAsyncRendererExecutor.syncRender(DefaultAsyncRendererExecutor.java:284)
at org.xwiki.rendering.async.internal.DefaultAsyncRendererExecutor.render(DefaultAsyncRendererExecutor.java:267)
at org.xwiki.rendering.async.internal.block.DefaultBlockAsyncRendererExecutor.render(DefaultBlockAsyncRendererExecutor.java:154)
at com.xpn.xwiki.internal.template.InternalTemplateManager.render(InternalTemplateManager.java:904)
at com.xpn.xwiki.internal.template.InternalTemplateManager.renderFromSkin(InternalTemplateManager.java:866)
at com.xpn.xwiki.internal.template.InternalTemplateManager.render(InternalTemplateManager.java:853)
at com.xpn.xwiki.internal.template.InternalTemplateManager.renderNoException(InternalTemplateManager.java:808)
at com.xpn.xwiki.internal.template.InternalTemplateManager.renderNoException(InternalTemplateManager.java:800)
at com.xpn.xwiki.internal.template.DefaultTemplateManager.renderNoException(DefaultTemplateManager.java:79)
at com.xpn.xwiki.internal.template.DefaultTemplateManager.renderNoException(DefaultTemplateManager.java:73)
at org.xwiki.template.script.TemplateScriptService.render(TemplateScriptService.java:54)
at jdk.internal.reflect.GeneratedMethodAccessor207.invoke(Unknown Source)
at java.base/jdk.internal.reflect.DelegatingMethodAccessorImpl.invoke(DelegatingMethodAccessorImpl.java:43)
at java.base/java.lang.reflect.Method.invoke(Method.java:569)
at org.apache.velocity.util.introspection.UberspectImpl$VelMethodImpl.doInvoke(UberspectImpl.java:571)
at org.apache.velocity.util.introspection.UberspectImpl$VelMethodImpl.invoke(UberspectImpl.java:554)
at org.apache.velocity.runtime.parser.node.ASTMethod.execute(ASTMethod.java:221)
at org.apache.velocity.runtime.parser.node.ASTReference.execute(ASTReference.java:368)
at org.apache.velocity.runtime.parser.node.ASTReference.render(ASTReference.java:492)
at org.apache.velocity.runtime.parser.node.ASTBlock.render(ASTBlock.java:147)
at org.apache.velocity.runtime.directive.VelocimacroProxy.render(VelocimacroProxy.java:217)
at org.apache.velocity.runtime.directive.RuntimeMacro.render(RuntimeMacro.java:331)
at org.apache.velocity.runtime.directive.RuntimeMacro.render(RuntimeMacro.java:261)
at org.apache.velocity.runtime.parser.node.ASTDirective.render(ASTDirective.java:304)
at org.apache.velocity.runtime.parser.node.SimpleNode.render(SimpleNode.java:439)
at org.apache.velocity.Template.merge(Template.java:358)
at org.apache.velocity.Template.merge(Template.java:262)
at org.xwiki.velocity.internal.InternalVelocityEngine.evaluate(InternalVelocityEngine.java:233)
at com.xpn.xwiki.internal.template.VelocityTemplateEvaluator.evaluateContent(VelocityTemplateEvaluator.java:107)
at com.xpn.xwiki.internal.template.TemplateAsyncRenderer.evaluateContent(TemplateAsyncRenderer.java:219)
at com.xpn.xwiki.internal.template.TemplateAsyncRenderer.renderVelocity(TemplateAsyncRenderer.java:174)
at com.xpn.xwiki.internal.template.TemplateAsyncRenderer.render(TemplateAsyncRenderer.java:135)
at com.xpn.xwiki.internal.template.TemplateAsyncRenderer.render(TemplateAsyncRenderer.java:54)
at org.xwiki.rendering.async.internal.DefaultAsyncRendererExecutor.lambda$syncRender$0(DefaultAsyncRendererExecutor.java:284)
at com.xpn.xwiki.internal.security.authorization.DefaultAuthorExecutor.call(DefaultAuthorExecutor.java:98)
at org.xwiki.rendering.async.internal.DefaultAsyncRendererExecutor.syncRender(DefaultAsyncRendererExecutor.java:284)
at org.xwiki.rendering.async.internal.DefaultAsyncRendererExecutor.render(DefaultAsyncRendererExecutor.java:267)
at org.xwiki.rendering.async.internal.block.DefaultBlockAsyncRendererExecutor.render(DefaultBlockAsyncRendererExecutor.java:154)
at com.xpn.xwiki.internal.template.InternalTemplateManager.render(InternalTemplateManager.java:904)
at com.xpn.xwiki.internal.template.InternalTemplateManager.renderFromSkin(InternalTemplateManager.java:866)
at com.xpn.xwiki.internal.template.InternalTemplateManager.render(InternalTemplateManager.java:853)
at com.xpn.xwiki.internal.template.InternalTemplateManager.renderNoException(InternalTemplateManager.java:808)
at com.xpn.xwiki.internal.template.InternalTemplateManager.renderNoException(InternalTemplateManager.java:800)
at com.xpn.xwiki.internal.template.DefaultTemplateManager.renderNoException(DefaultTemplateManager.java:79)
at com.xpn.xwiki.internal.template.DefaultTemplateManager.renderNoException(DefaultTemplateManager.java:73)
at org.xwiki.template.script.TemplateScriptService.render(TemplateScriptService.java:54)
at jdk.internal.reflect.GeneratedMethodAccessor207.invoke(Unknown Source)
at java.base/jdk.internal.reflect.DelegatingMethodAccessorImpl.invoke(DelegatingMethodAccessorImpl.java:43)
at java.base/java.lang.reflect.Method.invoke(Method.java:569)
at org.apache.velocity.util.introspection.UberspectImpl$VelMethodImpl.doInvoke(UberspectImpl.java:571)
at org.apache.velocity.util.introspection.UberspectImpl$VelMethodImpl.invoke(UberspectImpl.java:554)
at org.apache.velocity.runtime.parser.node.ASTMethod.execute(ASTMethod.java:221)
at org.apache.velocity.runtime.parser.node.ASTReference.execute(ASTReference.java:368)
at org.apache.velocity.runtime.parser.node.ASTReference.render(ASTReference.java:492)
at org.apache.velocity.runtime.parser.node.ASTBlock.render(ASTBlock.java:147)
at org.apache.velocity.runtime.directive.VelocimacroProxy.render(VelocimacroProxy.java:217)
at org.apache.velocity.runtime.directive.RuntimeMacro.render(RuntimeMacro.java:331)
at org.apache.velocity.runtime.directive.RuntimeMacro.render(RuntimeMacro.java:261)
at org.apache.velocity.runtime.parser.node.ASTDirective.render(ASTDirective.java:304)
at org.apache.velocity.runtime.parser.node.ASTBlock.render(ASTBlock.java:147)
at org.apache.velocity.runtime.parser.node.ASTIfStatement.render(ASTIfStatement.java:171)
at org.apache.velocity.runtime.parser.node.ASTBlock.render(ASTBlock.java:147)
at org.apache.velocity.runtime.parser.node.SimpleNode.render(SimpleNode.java:439)
at org.apache.velocity.runtime.parser.node.ASTIfStatement.render(ASTIfStatement.java:190)
at org.apache.velocity.runtime.parser.node.SimpleNode.render(SimpleNode.java:439)
at org.apache.velocity.Template.merge(Template.java:358)
at org.apache.velocity.Template.merge(Template.java:262)
at org.xwiki.velocity.internal.InternalVelocityEngine.evaluate(InternalVelocityEngine.java:233)
at com.xpn.xwiki.internal.template.VelocityTemplateEvaluator.evaluateContent(VelocityTemplateEvaluator.java:107)
at com.xpn.xwiki.internal.template.TemplateAsyncRenderer.evaluateContent(TemplateAsyncRenderer.java:219)
at com.xpn.xwiki.internal.template.TemplateAsyncRenderer.renderVelocity(TemplateAsyncRenderer.java:174)
at com.xpn.xwiki.internal.template.TemplateAsyncRenderer.render(TemplateAsyncRenderer.java:135)
at com.xpn.xwiki.internal.template.TemplateAsyncRenderer.render(TemplateAsyncRenderer.java:54)
at org.xwiki.rendering.async.internal.DefaultAsyncRendererExecutor.lambda$syncRender$0(DefaultAsyncRendererExecutor.java:284)
at com.xpn.xwiki.internal.security.authorization.DefaultAuthorExecutor.call(DefaultAuthorExecutor.java:98)
at org.xwiki.rendering.async.internal.DefaultAsyncRendererExecutor.syncRender(DefaultAsyncRendererExecutor.java:284)
at org.xwiki.rendering.async.internal.DefaultAsyncRendererExecutor.render(DefaultAsyncRendererExecutor.java:267)
at org.xwiki.rendering.async.internal.block.DefaultBlockAsyncRendererExecutor.render(DefaultBlockAsyncRendererExecutor.java:154)
at com.xpn.xwiki.internal.template.InternalTemplateManager.render(InternalTemplateManager.java:904)
at com.xpn.xwiki.internal.template.InternalTemplateManager.renderFromSkin(InternalTemplateManager.java:866)
at com.xpn.xwiki.internal.template.InternalTemplateManager.renderFromSkin(InternalTemplateManager.java:846)
at com.xpn.xwiki.internal.template.InternalTemplateManager.render(InternalTemplateManager.java:832)
at com.xpn.xwiki.internal.template.DefaultTemplateManager.render(DefaultTemplateManager.java:91)
at com.xpn.xwiki.internal.template.DefaultTemplateManager.render(DefaultTemplateManager.java:85)
at com.xpn.xwiki.XWiki.evaluateTemplate(XWiki.java:2569)
at com.xpn.xwiki.web.Utils.parseTemplate(Utils.java:180)
at com.xpn.xwiki.web.XWikiAction.execute(XWikiAction.java:650)
at com.xpn.xwiki.web.XWikiAction.execute(XWikiAction.java:338)
at com.xpn.xwiki.web.LegacyActionServlet.service(LegacyActionServlet.java:108)
at javax.servlet.http.HttpServlet.service(HttpServlet.java:764)
at org.apache.catalina.core.ApplicationFilterChain.internalDoFilter(ApplicationFilterChain.java:227)
at org.apache.catalina.core.ApplicationFilterChain.doFilter(ApplicationFilterChain.java:162)
at com.xpn.xwiki.web.ActionFilter.doFilter(ActionFilter.java:122)
at org.apache.catalina.core.ApplicationFilterChain.internalDoFilter(ApplicationFilterChain.java:189)
at org.apache.catalina.core.ApplicationFilterChain.doFilter(ApplicationFilterChain.java:162)
at org.xwiki.wysiwyg.filter.ConversionFilter.doFilter(ConversionFilter.java:61)
at org.apache.catalina.core.ApplicationFilterChain.internalDoFilter(ApplicationFilterChain.java:189)
at org.apache.catalina.core.ApplicationFilterChain.doFilter(ApplicationFilterChain.java:162)
at org.apache.tomcat.websocket.server.WsFilter.doFilter(WsFilter.java:53)
at org.apache.catalina.core.ApplicationFilterChain.internalDoFilter(ApplicationFilterChain.java:189)
at org.apache.catalina.core.ApplicationFilterChain.doFilter(ApplicationFilterChain.java:162)
at org.xwiki.container.servlet.filters.internal.SetHTTPHeaderFilter.doFilter(SetHTTPHeaderFilter.java:63)
at org.apache.catalina.core.ApplicationFilterChain.internalDoFilter(ApplicationFilterChain.java:189)
at org.apache.catalina.core.ApplicationFilterChain.doFilter(ApplicationFilterChain.java:162)
at org.xwiki.resource.servlet.RoutingFilter.doFilter(RoutingFilter.java:132)
at org.apache.catalina.core.ApplicationFilterChain.internalDoFilter(ApplicationFilterChain.java:189)
at org.apache.catalina.core.ApplicationFilterChain.doFilter(ApplicationFilterChain.java:162)
at org.xwiki.container.servlet.filters.internal.SavedRequestRestorerFilter.doFilter(SavedRequestRestorerFilter.java:208)
at org.apache.catalina.core.ApplicationFilterChain.internalDoFilter(ApplicationFilterChain.java:189)
at org.apache.catalina.core.ApplicationFilterChain.doFilter(ApplicationFilterChain.java:162)
at org.xwiki.container.servlet.filters.internal.SetCharacterEncodingFilter.doFilter(SetCharacterEncodingFilter.java:117)
at org.apache.catalina.core.ApplicationFilterChain.internalDoFilter(ApplicationFilterChain.java:189)
at org.apache.catalina.core.ApplicationFilterChain.doFilter(ApplicationFilterChain.java:162)
at org.apache.catalina.core.StandardWrapperValve.invoke(StandardWrapperValve.java:197)
at org.apache.catalina.core.StandardContextValve.invoke(StandardContextValve.java:97)
at org.apache.catalina.authenticator.AuthenticatorBase.invoke(AuthenticatorBase.java:541)
at org.apache.catalina.core.StandardHostValve.invoke(StandardHostValve.java:135)
at org.apache.catalina.valves.ErrorReportValve.invoke(ErrorReportValve.java:92)
at org.apache.catalina.valves.AbstractAccessLogValve.invoke(AbstractAccessLogValve.java:687)
at org.apache.catalina.core.StandardEngineValve.invoke(StandardEngineValve.java:78)
at org.apache.catalina.connector.CoyoteAdapter.service(CoyoteAdapter.java:360)
at org.apache.coyote.http11.Http11Processor.service(Http11Processor.java:399)
at org.apache.coyote.AbstractProcessorLight.process(AbstractProcessorLight.java:65)
at org.apache.coyote.AbstractProtocol$ConnectionHandler.process(AbstractProtocol.java:890)
at org.apache.tomcat.util.net.NioEndpoint$SocketProcessor.doRun(NioEndpoint.java:1743)
at org.apache.tomcat.util.net.SocketProcessorBase.run(SocketProcessorBase.java:49)
at org.apache.tomcat.util.threads.ThreadPoolExecutor.runWorker(ThreadPoolExecutor.java:1191)
at org.apache.tomcat.util.threads.ThreadPoolExecutor$Worker.run(ThreadPoolExecutor.java:659)
at org.apache.tomcat.util.threads.TaskThread$WrappingRunnable.run(TaskThread.java:61)
at java.base/java.lang.Thread.run(Thread.java:840)
The number of "Duplicate Records Matched in Database" is the number of records within the database that match the field(s) you selected to check for duplicates.
The number of duplicates in the file and matched in the database should be the same. If there is a difference in the numbers, it's recommended NOT to process the duplicates but instead to go back and select an additional field(s) to check for duplicates or import the new records and download the duplicates for review prior to processing. (See example and screenshot below.)
EXAMPLE:
You check for duplicates across email.
The import file contains one record with a blank email field and three records that are already in the ONEcount database.
There are six records with blank email fields in the ONEcount database.
ONEcount will identify the one record in the import file and the six recordsin ONEcount as duplicates (because they all have a blank email, which matches the record being imported).
The system will also identify the three records in the import file that already exist in the ONEcount database as duplicates.
The pre-import summary would say:
Duplicate records in file = 4 (the 1 with the blank email and the 3 already in the ONEcount database), and
Duplicate records matched in the database = 9 (the 6 records with blank emails in the ONEcount database plus the 3 records that are already in the ONEcount database). See screenshot below.
If you check across at least one other field, say last name, a record in the upload file and a record in the ONEcount database – each with an empty email field but with a last name – will not be considered duplicates unless they have an empty email field AND the same last name.
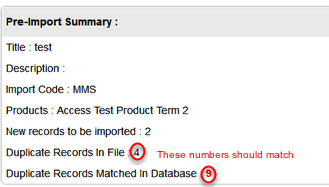
12. Review the Sample Mapping
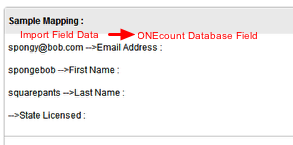
Sample Mapping gives you a preview of the data import. Five records will be displayed, each including the data from the import file and the field within ONEcount that it will be imported to. In the example above, the email address "spongy@bob.com" will be imported into the Email Address field in the ONEcount database, the first name "spongebob" will be imported into the First Name field in the ONEcout database, and the last name "squarepants" will be imported into the Last Name field in the ONEcount database. No data is shown in the "State Licensed" field, indicating that that field in the import file was empty.
Failed to execute the [include] macro. Cause: [Current user [null] doesn't have view rights on document [xwiki:Licenses.Code.VelocityMacros]]. Click on this message for details.
org.xwiki.rendering.macro.MacroExecutionException: Current user [null] doesn't have view rights on document [xwiki:Licenses.Code.VelocityMacros]
at org.xwiki.rendering.internal.macro.include.IncludeMacro.execute(IncludeMacro.java:124)
at org.xwiki.rendering.internal.macro.include.IncludeMacro.execute(IncludeMacro.java:59)
at org.xwiki.rendering.internal.transformation.macro.MacroTransformation.transform(MacroTransformation.java:311)
at org.xwiki.rendering.internal.transformation.DefaultRenderingContext.transformInContext(DefaultRenderingContext.java:183)
at org.xwiki.rendering.async.internal.block.AbstractBlockAsyncRenderer.transform(AbstractBlockAsyncRenderer.java:76)
at org.xwiki.rendering.wikimacro.internal.DefaultWikiMacroRenderer.transform(DefaultWikiMacroRenderer.java:882)
at org.xwiki.rendering.wikimacro.internal.DefaultWikiMacroRenderer.transform(DefaultWikiMacroRenderer.java:868)
at org.xwiki.rendering.wikimacro.internal.DefaultWikiMacroRenderer.transform(DefaultWikiMacroRenderer.java:594)
at org.xwiki.rendering.wikimacro.internal.DefaultWikiMacroRenderer.execute(DefaultWikiMacroRenderer.java:409)
at org.xwiki.rendering.async.internal.block.AbstractBlockAsyncRenderer.render(AbstractBlockAsyncRenderer.java:157)
at org.xwiki.rendering.async.internal.block.AbstractBlockAsyncRenderer.render(AbstractBlockAsyncRenderer.java:54)
at org.xwiki.rendering.async.internal.DefaultAsyncRendererExecutor.lambda$syncRender$0(DefaultAsyncRendererExecutor.java:284)
at com.xpn.xwiki.internal.security.authorization.DefaultAuthorExecutor.call(DefaultAuthorExecutor.java:98)
at org.xwiki.rendering.async.internal.DefaultAsyncRendererExecutor.syncRender(DefaultAsyncRendererExecutor.java:284)
at org.xwiki.rendering.async.internal.DefaultAsyncRendererExecutor.render(DefaultAsyncRendererExecutor.java:267)
at org.xwiki.rendering.async.internal.block.DefaultBlockAsyncRendererExecutor.execute(DefaultBlockAsyncRendererExecutor.java:125)
at org.xwiki.rendering.wikimacro.internal.DefaultWikiMacro.execute(DefaultWikiMacro.java:129)
at org.xwiki.rendering.wikimacro.internal.DefaultWikiMacro.execute(DefaultWikiMacro.java:61)
at org.xwiki.rendering.internal.transformation.macro.MacroTransformation.transform(MacroTransformation.java:311)
at org.xwiki.rendering.internal.transformation.DefaultRenderingContext.transformInContext(DefaultRenderingContext.java:183)
at org.xwiki.rendering.internal.transformation.DefaultTransformationManager.performTransformations(DefaultTransformationManager.java:88)
at org.xwiki.display.internal.DocumentContentAsyncExecutor.executeInCurrentExecutionContext(DocumentContentAsyncExecutor.java:396)
at org.xwiki.display.internal.DocumentContentAsyncExecutor.execute(DocumentContentAsyncExecutor.java:269)
at org.xwiki.display.internal.DocumentContentAsyncRenderer.execute(DocumentContentAsyncRenderer.java:112)
at org.xwiki.rendering.async.internal.block.AbstractBlockAsyncRenderer.render(AbstractBlockAsyncRenderer.java:157)
at org.xwiki.rendering.async.internal.block.AbstractBlockAsyncRenderer.render(AbstractBlockAsyncRenderer.java:54)
at org.xwiki.rendering.async.internal.DefaultAsyncRendererExecutor.syncRender(DefaultAsyncRendererExecutor.java:290)
at org.xwiki.rendering.async.internal.DefaultAsyncRendererExecutor.render(DefaultAsyncRendererExecutor.java:267)
at org.xwiki.rendering.async.internal.block.DefaultBlockAsyncRendererExecutor.execute(DefaultBlockAsyncRendererExecutor.java:125)
at org.xwiki.display.internal.DocumentContentDisplayer.display(DocumentContentDisplayer.java:67)
at org.xwiki.display.internal.DocumentContentDisplayer.display(DocumentContentDisplayer.java:43)
at org.xwiki.display.internal.DefaultDocumentDisplayer.display(DefaultDocumentDisplayer.java:96)
at org.xwiki.display.internal.DefaultDocumentDisplayer.display(DefaultDocumentDisplayer.java:39)
at org.xwiki.sheet.internal.SheetDocumentDisplayer.display(SheetDocumentDisplayer.java:123)
at org.xwiki.sheet.internal.SheetDocumentDisplayer.display(SheetDocumentDisplayer.java:52)
at org.xwiki.display.internal.ConfiguredDocumentDisplayer.display(ConfiguredDocumentDisplayer.java:68)
at org.xwiki.display.internal.ConfiguredDocumentDisplayer.display(ConfiguredDocumentDisplayer.java:42)
at com.xpn.xwiki.doc.XWikiDocument.display(XWikiDocument.java:1428)
at com.xpn.xwiki.doc.XWikiDocument.getRenderedContent(XWikiDocument.java:1564)
at com.xpn.xwiki.doc.XWikiDocument.displayDocument(XWikiDocument.java:1514)
at com.xpn.xwiki.doc.XWikiDocument.displayDocument(XWikiDocument.java:1483)
at com.xpn.xwiki.api.Document.displayDocument(Document.java:821)
at jdk.internal.reflect.GeneratedMethodAccessor653.invoke(Unknown Source)
at java.base/jdk.internal.reflect.DelegatingMethodAccessorImpl.invoke(DelegatingMethodAccessorImpl.java:43)
at java.base/java.lang.reflect.Method.invoke(Method.java:569)
at org.apache.velocity.util.introspection.UberspectImpl$VelMethodImpl.doInvoke(UberspectImpl.java:571)
at org.apache.velocity.util.introspection.UberspectImpl$VelMethodImpl.invoke(UberspectImpl.java:554)
at org.apache.velocity.runtime.parser.node.ASTMethod.execute(ASTMethod.java:221)
at org.apache.velocity.runtime.parser.node.ASTReference.execute(ASTReference.java:368)
at org.apache.velocity.runtime.parser.node.ASTReference.value(ASTReference.java:704)
at org.apache.velocity.runtime.parser.node.ASTExpression.value(ASTExpression.java:75)
at org.apache.velocity.runtime.parser.node.ASTSetDirective.render(ASTSetDirective.java:242)
at org.apache.velocity.runtime.parser.node.ASTBlock.render(ASTBlock.java:147)
at org.apache.velocity.runtime.parser.node.SimpleNode.render(SimpleNode.java:439)
at org.apache.velocity.runtime.parser.node.ASTIfStatement.render(ASTIfStatement.java:190)
at org.apache.velocity.runtime.parser.node.ASTBlock.render(ASTBlock.java:147)
at org.xwiki.velocity.internal.directive.TryCatchDirective.render(TryCatchDirective.java:86)
at org.apache.velocity.runtime.parser.node.ASTDirective.render(ASTDirective.java:304)
at org.apache.velocity.runtime.parser.node.SimpleNode.render(SimpleNode.java:439)
at org.apache.velocity.Template.merge(Template.java:358)
at org.apache.velocity.Template.merge(Template.java:262)
at org.xwiki.velocity.internal.InternalVelocityEngine.evaluate(InternalVelocityEngine.java:233)
at com.xpn.xwiki.internal.template.VelocityTemplateEvaluator.evaluateContent(VelocityTemplateEvaluator.java:107)
at com.xpn.xwiki.internal.template.TemplateAsyncRenderer.evaluateContent(TemplateAsyncRenderer.java:219)
at com.xpn.xwiki.internal.template.TemplateAsyncRenderer.renderVelocity(TemplateAsyncRenderer.java:174)
at com.xpn.xwiki.internal.template.TemplateAsyncRenderer.render(TemplateAsyncRenderer.java:135)
at com.xpn.xwiki.internal.template.TemplateAsyncRenderer.render(TemplateAsyncRenderer.java:54)
at org.xwiki.rendering.async.internal.DefaultAsyncRendererExecutor.lambda$syncRender$0(DefaultAsyncRendererExecutor.java:284)
at com.xpn.xwiki.internal.security.authorization.DefaultAuthorExecutor.call(DefaultAuthorExecutor.java:98)
at org.xwiki.rendering.async.internal.DefaultAsyncRendererExecutor.syncRender(DefaultAsyncRendererExecutor.java:284)
at org.xwiki.rendering.async.internal.DefaultAsyncRendererExecutor.render(DefaultAsyncRendererExecutor.java:267)
at org.xwiki.rendering.async.internal.block.DefaultBlockAsyncRendererExecutor.render(DefaultBlockAsyncRendererExecutor.java:154)
at com.xpn.xwiki.internal.template.InternalTemplateManager.render(InternalTemplateManager.java:904)
at com.xpn.xwiki.internal.template.InternalTemplateManager.renderFromSkin(InternalTemplateManager.java:866)
at com.xpn.xwiki.internal.template.InternalTemplateManager.render(InternalTemplateManager.java:853)
at com.xpn.xwiki.internal.template.InternalTemplateManager.renderNoException(InternalTemplateManager.java:808)
at com.xpn.xwiki.internal.template.InternalTemplateManager.renderNoException(InternalTemplateManager.java:800)
at com.xpn.xwiki.internal.template.DefaultTemplateManager.renderNoException(DefaultTemplateManager.java:79)
at com.xpn.xwiki.internal.template.DefaultTemplateManager.renderNoException(DefaultTemplateManager.java:73)
at org.xwiki.template.script.TemplateScriptService.render(TemplateScriptService.java:54)
at jdk.internal.reflect.GeneratedMethodAccessor207.invoke(Unknown Source)
at java.base/jdk.internal.reflect.DelegatingMethodAccessorImpl.invoke(DelegatingMethodAccessorImpl.java:43)
at java.base/java.lang.reflect.Method.invoke(Method.java:569)
at org.apache.velocity.util.introspection.UberspectImpl$VelMethodImpl.doInvoke(UberspectImpl.java:571)
at org.apache.velocity.util.introspection.UberspectImpl$VelMethodImpl.invoke(UberspectImpl.java:554)
at org.apache.velocity.runtime.parser.node.ASTMethod.execute(ASTMethod.java:221)
at org.apache.velocity.runtime.parser.node.ASTReference.execute(ASTReference.java:368)
at org.apache.velocity.runtime.parser.node.ASTReference.render(ASTReference.java:492)
at org.apache.velocity.runtime.parser.node.ASTBlock.render(ASTBlock.java:147)
at org.apache.velocity.runtime.directive.VelocimacroProxy.render(VelocimacroProxy.java:217)
at org.apache.velocity.runtime.directive.RuntimeMacro.render(RuntimeMacro.java:331)
at org.apache.velocity.runtime.directive.RuntimeMacro.render(RuntimeMacro.java:261)
at org.apache.velocity.runtime.parser.node.ASTDirective.render(ASTDirective.java:304)
at org.apache.velocity.runtime.parser.node.SimpleNode.render(SimpleNode.java:439)
at org.apache.velocity.Template.merge(Template.java:358)
at org.apache.velocity.Template.merge(Template.java:262)
at org.xwiki.velocity.internal.InternalVelocityEngine.evaluate(InternalVelocityEngine.java:233)
at com.xpn.xwiki.internal.template.VelocityTemplateEvaluator.evaluateContent(VelocityTemplateEvaluator.java:107)
at com.xpn.xwiki.internal.template.TemplateAsyncRenderer.evaluateContent(TemplateAsyncRenderer.java:219)
at com.xpn.xwiki.internal.template.TemplateAsyncRenderer.renderVelocity(TemplateAsyncRenderer.java:174)
at com.xpn.xwiki.internal.template.TemplateAsyncRenderer.render(TemplateAsyncRenderer.java:135)
at com.xpn.xwiki.internal.template.TemplateAsyncRenderer.render(TemplateAsyncRenderer.java:54)
at org.xwiki.rendering.async.internal.DefaultAsyncRendererExecutor.lambda$syncRender$0(DefaultAsyncRendererExecutor.java:284)
at com.xpn.xwiki.internal.security.authorization.DefaultAuthorExecutor.call(DefaultAuthorExecutor.java:98)
at org.xwiki.rendering.async.internal.DefaultAsyncRendererExecutor.syncRender(DefaultAsyncRendererExecutor.java:284)
at org.xwiki.rendering.async.internal.DefaultAsyncRendererExecutor.render(DefaultAsyncRendererExecutor.java:267)
at org.xwiki.rendering.async.internal.block.DefaultBlockAsyncRendererExecutor.render(DefaultBlockAsyncRendererExecutor.java:154)
at com.xpn.xwiki.internal.template.InternalTemplateManager.render(InternalTemplateManager.java:904)
at com.xpn.xwiki.internal.template.InternalTemplateManager.renderFromSkin(InternalTemplateManager.java:866)
at com.xpn.xwiki.internal.template.InternalTemplateManager.render(InternalTemplateManager.java:853)
at com.xpn.xwiki.internal.template.InternalTemplateManager.renderNoException(InternalTemplateManager.java:808)
at com.xpn.xwiki.internal.template.InternalTemplateManager.renderNoException(InternalTemplateManager.java:800)
at com.xpn.xwiki.internal.template.DefaultTemplateManager.renderNoException(DefaultTemplateManager.java:79)
at com.xpn.xwiki.internal.template.DefaultTemplateManager.renderNoException(DefaultTemplateManager.java:73)
at org.xwiki.template.script.TemplateScriptService.render(TemplateScriptService.java:54)
at jdk.internal.reflect.GeneratedMethodAccessor207.invoke(Unknown Source)
at java.base/jdk.internal.reflect.DelegatingMethodAccessorImpl.invoke(DelegatingMethodAccessorImpl.java:43)
at java.base/java.lang.reflect.Method.invoke(Method.java:569)
at org.apache.velocity.util.introspection.UberspectImpl$VelMethodImpl.doInvoke(UberspectImpl.java:571)
at org.apache.velocity.util.introspection.UberspectImpl$VelMethodImpl.invoke(UberspectImpl.java:554)
at org.apache.velocity.runtime.parser.node.ASTMethod.execute(ASTMethod.java:221)
at org.apache.velocity.runtime.parser.node.ASTReference.execute(ASTReference.java:368)
at org.apache.velocity.runtime.parser.node.ASTReference.render(ASTReference.java:492)
at org.apache.velocity.runtime.parser.node.ASTBlock.render(ASTBlock.java:147)
at org.apache.velocity.runtime.directive.VelocimacroProxy.render(VelocimacroProxy.java:217)
at org.apache.velocity.runtime.directive.RuntimeMacro.render(RuntimeMacro.java:331)
at org.apache.velocity.runtime.directive.RuntimeMacro.render(RuntimeMacro.java:261)
at org.apache.velocity.runtime.parser.node.ASTDirective.render(ASTDirective.java:304)
at org.apache.velocity.runtime.parser.node.ASTBlock.render(ASTBlock.java:147)
at org.apache.velocity.runtime.parser.node.ASTIfStatement.render(ASTIfStatement.java:171)
at org.apache.velocity.runtime.parser.node.ASTBlock.render(ASTBlock.java:147)
at org.apache.velocity.runtime.parser.node.SimpleNode.render(SimpleNode.java:439)
at org.apache.velocity.runtime.parser.node.ASTIfStatement.render(ASTIfStatement.java:190)
at org.apache.velocity.runtime.parser.node.SimpleNode.render(SimpleNode.java:439)
at org.apache.velocity.Template.merge(Template.java:358)
at org.apache.velocity.Template.merge(Template.java:262)
at org.xwiki.velocity.internal.InternalVelocityEngine.evaluate(InternalVelocityEngine.java:233)
at com.xpn.xwiki.internal.template.VelocityTemplateEvaluator.evaluateContent(VelocityTemplateEvaluator.java:107)
at com.xpn.xwiki.internal.template.TemplateAsyncRenderer.evaluateContent(TemplateAsyncRenderer.java:219)
at com.xpn.xwiki.internal.template.TemplateAsyncRenderer.renderVelocity(TemplateAsyncRenderer.java:174)
at com.xpn.xwiki.internal.template.TemplateAsyncRenderer.render(TemplateAsyncRenderer.java:135)
at com.xpn.xwiki.internal.template.TemplateAsyncRenderer.render(TemplateAsyncRenderer.java:54)
at org.xwiki.rendering.async.internal.DefaultAsyncRendererExecutor.lambda$syncRender$0(DefaultAsyncRendererExecutor.java:284)
at com.xpn.xwiki.internal.security.authorization.DefaultAuthorExecutor.call(DefaultAuthorExecutor.java:98)
at org.xwiki.rendering.async.internal.DefaultAsyncRendererExecutor.syncRender(DefaultAsyncRendererExecutor.java:284)
at org.xwiki.rendering.async.internal.DefaultAsyncRendererExecutor.render(DefaultAsyncRendererExecutor.java:267)
at org.xwiki.rendering.async.internal.block.DefaultBlockAsyncRendererExecutor.render(DefaultBlockAsyncRendererExecutor.java:154)
at com.xpn.xwiki.internal.template.InternalTemplateManager.render(InternalTemplateManager.java:904)
at com.xpn.xwiki.internal.template.InternalTemplateManager.renderFromSkin(InternalTemplateManager.java:866)
at com.xpn.xwiki.internal.template.InternalTemplateManager.renderFromSkin(InternalTemplateManager.java:846)
at com.xpn.xwiki.internal.template.InternalTemplateManager.render(InternalTemplateManager.java:832)
at com.xpn.xwiki.internal.template.DefaultTemplateManager.render(DefaultTemplateManager.java:91)
at com.xpn.xwiki.internal.template.DefaultTemplateManager.render(DefaultTemplateManager.java:85)
at com.xpn.xwiki.XWiki.evaluateTemplate(XWiki.java:2569)
at com.xpn.xwiki.web.Utils.parseTemplate(Utils.java:180)
at com.xpn.xwiki.web.XWikiAction.execute(XWikiAction.java:650)
at com.xpn.xwiki.web.XWikiAction.execute(XWikiAction.java:338)
at com.xpn.xwiki.web.LegacyActionServlet.service(LegacyActionServlet.java:108)
at javax.servlet.http.HttpServlet.service(HttpServlet.java:764)
at org.apache.catalina.core.ApplicationFilterChain.internalDoFilter(ApplicationFilterChain.java:227)
at org.apache.catalina.core.ApplicationFilterChain.doFilter(ApplicationFilterChain.java:162)
at com.xpn.xwiki.web.ActionFilter.doFilter(ActionFilter.java:122)
at org.apache.catalina.core.ApplicationFilterChain.internalDoFilter(ApplicationFilterChain.java:189)
at org.apache.catalina.core.ApplicationFilterChain.doFilter(ApplicationFilterChain.java:162)
at org.xwiki.wysiwyg.filter.ConversionFilter.doFilter(ConversionFilter.java:61)
at org.apache.catalina.core.ApplicationFilterChain.internalDoFilter(ApplicationFilterChain.java:189)
at org.apache.catalina.core.ApplicationFilterChain.doFilter(ApplicationFilterChain.java:162)
at org.apache.tomcat.websocket.server.WsFilter.doFilter(WsFilter.java:53)
at org.apache.catalina.core.ApplicationFilterChain.internalDoFilter(ApplicationFilterChain.java:189)
at org.apache.catalina.core.ApplicationFilterChain.doFilter(ApplicationFilterChain.java:162)
at org.xwiki.container.servlet.filters.internal.SetHTTPHeaderFilter.doFilter(SetHTTPHeaderFilter.java:63)
at org.apache.catalina.core.ApplicationFilterChain.internalDoFilter(ApplicationFilterChain.java:189)
at org.apache.catalina.core.ApplicationFilterChain.doFilter(ApplicationFilterChain.java:162)
at org.xwiki.resource.servlet.RoutingFilter.doFilter(RoutingFilter.java:132)
at org.apache.catalina.core.ApplicationFilterChain.internalDoFilter(ApplicationFilterChain.java:189)
at org.apache.catalina.core.ApplicationFilterChain.doFilter(ApplicationFilterChain.java:162)
at org.xwiki.container.servlet.filters.internal.SavedRequestRestorerFilter.doFilter(SavedRequestRestorerFilter.java:208)
at org.apache.catalina.core.ApplicationFilterChain.internalDoFilter(ApplicationFilterChain.java:189)
at org.apache.catalina.core.ApplicationFilterChain.doFilter(ApplicationFilterChain.java:162)
at org.xwiki.container.servlet.filters.internal.SetCharacterEncodingFilter.doFilter(SetCharacterEncodingFilter.java:117)
at org.apache.catalina.core.ApplicationFilterChain.internalDoFilter(ApplicationFilterChain.java:189)
at org.apache.catalina.core.ApplicationFilterChain.doFilter(ApplicationFilterChain.java:162)
at org.apache.catalina.core.StandardWrapperValve.invoke(StandardWrapperValve.java:197)
at org.apache.catalina.core.StandardContextValve.invoke(StandardContextValve.java:97)
at org.apache.catalina.authenticator.AuthenticatorBase.invoke(AuthenticatorBase.java:541)
at org.apache.catalina.core.StandardHostValve.invoke(StandardHostValve.java:135)
at org.apache.catalina.valves.ErrorReportValve.invoke(ErrorReportValve.java:92)
at org.apache.catalina.valves.AbstractAccessLogValve.invoke(AbstractAccessLogValve.java:687)
at org.apache.catalina.core.StandardEngineValve.invoke(StandardEngineValve.java:78)
at org.apache.catalina.connector.CoyoteAdapter.service(CoyoteAdapter.java:360)
at org.apache.coyote.http11.Http11Processor.service(Http11Processor.java:399)
at org.apache.coyote.AbstractProcessorLight.process(AbstractProcessorLight.java:65)
at org.apache.coyote.AbstractProtocol$ConnectionHandler.process(AbstractProtocol.java:890)
at org.apache.tomcat.util.net.NioEndpoint$SocketProcessor.doRun(NioEndpoint.java:1743)
at org.apache.tomcat.util.net.SocketProcessorBase.run(SocketProcessorBase.java:49)
at org.apache.tomcat.util.threads.ThreadPoolExecutor.runWorker(ThreadPoolExecutor.java:1191)
at org.apache.tomcat.util.threads.ThreadPoolExecutor$Worker.run(ThreadPoolExecutor.java:659)
at org.apache.tomcat.util.threads.TaskThread$WrappingRunnable.run(TaskThread.java:61)
at java.base/java.lang.Thread.run(Thread.java:840)
If a record(s) has a blank field in an import file and the record already exists in ONEcount with data in that same field, the data in the corresponding field in ONEcount will NOT be written over with a blank, even if the Request Date of the import is more recent than the date the information was entered into the ONEcount database.
Failed to execute the [include] macro. Cause: [Current user [null] doesn't have view rights on document [xwiki:Licenses.Code.VelocityMacros]]. Click on this message for details.
org.xwiki.rendering.macro.MacroExecutionException: Current user [null] doesn't have view rights on document [xwiki:Licenses.Code.VelocityMacros]
at org.xwiki.rendering.internal.macro.include.IncludeMacro.execute(IncludeMacro.java:124)
at org.xwiki.rendering.internal.macro.include.IncludeMacro.execute(IncludeMacro.java:59)
at org.xwiki.rendering.internal.transformation.macro.MacroTransformation.transform(MacroTransformation.java:311)
at org.xwiki.rendering.internal.transformation.DefaultRenderingContext.transformInContext(DefaultRenderingContext.java:183)
at org.xwiki.rendering.async.internal.block.AbstractBlockAsyncRenderer.transform(AbstractBlockAsyncRenderer.java:76)
at org.xwiki.rendering.wikimacro.internal.DefaultWikiMacroRenderer.transform(DefaultWikiMacroRenderer.java:882)
at org.xwiki.rendering.wikimacro.internal.DefaultWikiMacroRenderer.transform(DefaultWikiMacroRenderer.java:868)
at org.xwiki.rendering.wikimacro.internal.DefaultWikiMacroRenderer.transform(DefaultWikiMacroRenderer.java:594)
at org.xwiki.rendering.wikimacro.internal.DefaultWikiMacroRenderer.execute(DefaultWikiMacroRenderer.java:409)
at org.xwiki.rendering.async.internal.block.AbstractBlockAsyncRenderer.render(AbstractBlockAsyncRenderer.java:157)
at org.xwiki.rendering.async.internal.block.AbstractBlockAsyncRenderer.render(AbstractBlockAsyncRenderer.java:54)
at org.xwiki.rendering.async.internal.DefaultAsyncRendererExecutor.lambda$syncRender$0(DefaultAsyncRendererExecutor.java:284)
at com.xpn.xwiki.internal.security.authorization.DefaultAuthorExecutor.call(DefaultAuthorExecutor.java:98)
at org.xwiki.rendering.async.internal.DefaultAsyncRendererExecutor.syncRender(DefaultAsyncRendererExecutor.java:284)
at org.xwiki.rendering.async.internal.DefaultAsyncRendererExecutor.render(DefaultAsyncRendererExecutor.java:267)
at org.xwiki.rendering.async.internal.block.DefaultBlockAsyncRendererExecutor.execute(DefaultBlockAsyncRendererExecutor.java:125)
at org.xwiki.rendering.wikimacro.internal.DefaultWikiMacro.execute(DefaultWikiMacro.java:129)
at org.xwiki.rendering.wikimacro.internal.DefaultWikiMacro.execute(DefaultWikiMacro.java:61)
at org.xwiki.rendering.internal.transformation.macro.MacroTransformation.transform(MacroTransformation.java:311)
at org.xwiki.rendering.internal.transformation.DefaultRenderingContext.transformInContext(DefaultRenderingContext.java:183)
at org.xwiki.rendering.internal.transformation.DefaultTransformationManager.performTransformations(DefaultTransformationManager.java:88)
at org.xwiki.display.internal.DocumentContentAsyncExecutor.executeInCurrentExecutionContext(DocumentContentAsyncExecutor.java:396)
at org.xwiki.display.internal.DocumentContentAsyncExecutor.execute(DocumentContentAsyncExecutor.java:269)
at org.xwiki.display.internal.DocumentContentAsyncRenderer.execute(DocumentContentAsyncRenderer.java:112)
at org.xwiki.rendering.async.internal.block.AbstractBlockAsyncRenderer.render(AbstractBlockAsyncRenderer.java:157)
at org.xwiki.rendering.async.internal.block.AbstractBlockAsyncRenderer.render(AbstractBlockAsyncRenderer.java:54)
at org.xwiki.rendering.async.internal.DefaultAsyncRendererExecutor.syncRender(DefaultAsyncRendererExecutor.java:290)
at org.xwiki.rendering.async.internal.DefaultAsyncRendererExecutor.render(DefaultAsyncRendererExecutor.java:267)
at org.xwiki.rendering.async.internal.block.DefaultBlockAsyncRendererExecutor.execute(DefaultBlockAsyncRendererExecutor.java:125)
at org.xwiki.display.internal.DocumentContentDisplayer.display(DocumentContentDisplayer.java:67)
at org.xwiki.display.internal.DocumentContentDisplayer.display(DocumentContentDisplayer.java:43)
at org.xwiki.display.internal.DefaultDocumentDisplayer.display(DefaultDocumentDisplayer.java:96)
at org.xwiki.display.internal.DefaultDocumentDisplayer.display(DefaultDocumentDisplayer.java:39)
at org.xwiki.sheet.internal.SheetDocumentDisplayer.display(SheetDocumentDisplayer.java:123)
at org.xwiki.sheet.internal.SheetDocumentDisplayer.display(SheetDocumentDisplayer.java:52)
at org.xwiki.display.internal.ConfiguredDocumentDisplayer.display(ConfiguredDocumentDisplayer.java:68)
at org.xwiki.display.internal.ConfiguredDocumentDisplayer.display(ConfiguredDocumentDisplayer.java:42)
at com.xpn.xwiki.doc.XWikiDocument.display(XWikiDocument.java:1428)
at com.xpn.xwiki.doc.XWikiDocument.getRenderedContent(XWikiDocument.java:1564)
at com.xpn.xwiki.doc.XWikiDocument.displayDocument(XWikiDocument.java:1514)
at com.xpn.xwiki.doc.XWikiDocument.displayDocument(XWikiDocument.java:1483)
at com.xpn.xwiki.api.Document.displayDocument(Document.java:821)
at jdk.internal.reflect.GeneratedMethodAccessor653.invoke(Unknown Source)
at java.base/jdk.internal.reflect.DelegatingMethodAccessorImpl.invoke(DelegatingMethodAccessorImpl.java:43)
at java.base/java.lang.reflect.Method.invoke(Method.java:569)
at org.apache.velocity.util.introspection.UberspectImpl$VelMethodImpl.doInvoke(UberspectImpl.java:571)
at org.apache.velocity.util.introspection.UberspectImpl$VelMethodImpl.invoke(UberspectImpl.java:554)
at org.apache.velocity.runtime.parser.node.ASTMethod.execute(ASTMethod.java:221)
at org.apache.velocity.runtime.parser.node.ASTReference.execute(ASTReference.java:368)
at org.apache.velocity.runtime.parser.node.ASTReference.value(ASTReference.java:704)
at org.apache.velocity.runtime.parser.node.ASTExpression.value(ASTExpression.java:75)
at org.apache.velocity.runtime.parser.node.ASTSetDirective.render(ASTSetDirective.java:242)
at org.apache.velocity.runtime.parser.node.ASTBlock.render(ASTBlock.java:147)
at org.apache.velocity.runtime.parser.node.SimpleNode.render(SimpleNode.java:439)
at org.apache.velocity.runtime.parser.node.ASTIfStatement.render(ASTIfStatement.java:190)
at org.apache.velocity.runtime.parser.node.ASTBlock.render(ASTBlock.java:147)
at org.xwiki.velocity.internal.directive.TryCatchDirective.render(TryCatchDirective.java:86)
at org.apache.velocity.runtime.parser.node.ASTDirective.render(ASTDirective.java:304)
at org.apache.velocity.runtime.parser.node.SimpleNode.render(SimpleNode.java:439)
at org.apache.velocity.Template.merge(Template.java:358)
at org.apache.velocity.Template.merge(Template.java:262)
at org.xwiki.velocity.internal.InternalVelocityEngine.evaluate(InternalVelocityEngine.java:233)
at com.xpn.xwiki.internal.template.VelocityTemplateEvaluator.evaluateContent(VelocityTemplateEvaluator.java:107)
at com.xpn.xwiki.internal.template.TemplateAsyncRenderer.evaluateContent(TemplateAsyncRenderer.java:219)
at com.xpn.xwiki.internal.template.TemplateAsyncRenderer.renderVelocity(TemplateAsyncRenderer.java:174)
at com.xpn.xwiki.internal.template.TemplateAsyncRenderer.render(TemplateAsyncRenderer.java:135)
at com.xpn.xwiki.internal.template.TemplateAsyncRenderer.render(TemplateAsyncRenderer.java:54)
at org.xwiki.rendering.async.internal.DefaultAsyncRendererExecutor.lambda$syncRender$0(DefaultAsyncRendererExecutor.java:284)
at com.xpn.xwiki.internal.security.authorization.DefaultAuthorExecutor.call(DefaultAuthorExecutor.java:98)
at org.xwiki.rendering.async.internal.DefaultAsyncRendererExecutor.syncRender(DefaultAsyncRendererExecutor.java:284)
at org.xwiki.rendering.async.internal.DefaultAsyncRendererExecutor.render(DefaultAsyncRendererExecutor.java:267)
at org.xwiki.rendering.async.internal.block.DefaultBlockAsyncRendererExecutor.render(DefaultBlockAsyncRendererExecutor.java:154)
at com.xpn.xwiki.internal.template.InternalTemplateManager.render(InternalTemplateManager.java:904)
at com.xpn.xwiki.internal.template.InternalTemplateManager.renderFromSkin(InternalTemplateManager.java:866)
at com.xpn.xwiki.internal.template.InternalTemplateManager.render(InternalTemplateManager.java:853)
at com.xpn.xwiki.internal.template.InternalTemplateManager.renderNoException(InternalTemplateManager.java:808)
at com.xpn.xwiki.internal.template.InternalTemplateManager.renderNoException(InternalTemplateManager.java:800)
at com.xpn.xwiki.internal.template.DefaultTemplateManager.renderNoException(DefaultTemplateManager.java:79)
at com.xpn.xwiki.internal.template.DefaultTemplateManager.renderNoException(DefaultTemplateManager.java:73)
at org.xwiki.template.script.TemplateScriptService.render(TemplateScriptService.java:54)
at jdk.internal.reflect.GeneratedMethodAccessor207.invoke(Unknown Source)
at java.base/jdk.internal.reflect.DelegatingMethodAccessorImpl.invoke(DelegatingMethodAccessorImpl.java:43)
at java.base/java.lang.reflect.Method.invoke(Method.java:569)
at org.apache.velocity.util.introspection.UberspectImpl$VelMethodImpl.doInvoke(UberspectImpl.java:571)
at org.apache.velocity.util.introspection.UberspectImpl$VelMethodImpl.invoke(UberspectImpl.java:554)
at org.apache.velocity.runtime.parser.node.ASTMethod.execute(ASTMethod.java:221)
at org.apache.velocity.runtime.parser.node.ASTReference.execute(ASTReference.java:368)
at org.apache.velocity.runtime.parser.node.ASTReference.render(ASTReference.java:492)
at org.apache.velocity.runtime.parser.node.ASTBlock.render(ASTBlock.java:147)
at org.apache.velocity.runtime.directive.VelocimacroProxy.render(VelocimacroProxy.java:217)
at org.apache.velocity.runtime.directive.RuntimeMacro.render(RuntimeMacro.java:331)
at org.apache.velocity.runtime.directive.RuntimeMacro.render(RuntimeMacro.java:261)
at org.apache.velocity.runtime.parser.node.ASTDirective.render(ASTDirective.java:304)
at org.apache.velocity.runtime.parser.node.SimpleNode.render(SimpleNode.java:439)
at org.apache.velocity.Template.merge(Template.java:358)
at org.apache.velocity.Template.merge(Template.java:262)
at org.xwiki.velocity.internal.InternalVelocityEngine.evaluate(InternalVelocityEngine.java:233)
at com.xpn.xwiki.internal.template.VelocityTemplateEvaluator.evaluateContent(VelocityTemplateEvaluator.java:107)
at com.xpn.xwiki.internal.template.TemplateAsyncRenderer.evaluateContent(TemplateAsyncRenderer.java:219)
at com.xpn.xwiki.internal.template.TemplateAsyncRenderer.renderVelocity(TemplateAsyncRenderer.java:174)
at com.xpn.xwiki.internal.template.TemplateAsyncRenderer.render(TemplateAsyncRenderer.java:135)
at com.xpn.xwiki.internal.template.TemplateAsyncRenderer.render(TemplateAsyncRenderer.java:54)
at org.xwiki.rendering.async.internal.DefaultAsyncRendererExecutor.lambda$syncRender$0(DefaultAsyncRendererExecutor.java:284)
at com.xpn.xwiki.internal.security.authorization.DefaultAuthorExecutor.call(DefaultAuthorExecutor.java:98)
at org.xwiki.rendering.async.internal.DefaultAsyncRendererExecutor.syncRender(DefaultAsyncRendererExecutor.java:284)
at org.xwiki.rendering.async.internal.DefaultAsyncRendererExecutor.render(DefaultAsyncRendererExecutor.java:267)
at org.xwiki.rendering.async.internal.block.DefaultBlockAsyncRendererExecutor.render(DefaultBlockAsyncRendererExecutor.java:154)
at com.xpn.xwiki.internal.template.InternalTemplateManager.render(InternalTemplateManager.java:904)
at com.xpn.xwiki.internal.template.InternalTemplateManager.renderFromSkin(InternalTemplateManager.java:866)
at com.xpn.xwiki.internal.template.InternalTemplateManager.render(InternalTemplateManager.java:853)
at com.xpn.xwiki.internal.template.InternalTemplateManager.renderNoException(InternalTemplateManager.java:808)
at com.xpn.xwiki.internal.template.InternalTemplateManager.renderNoException(InternalTemplateManager.java:800)
at com.xpn.xwiki.internal.template.DefaultTemplateManager.renderNoException(DefaultTemplateManager.java:79)
at com.xpn.xwiki.internal.template.DefaultTemplateManager.renderNoException(DefaultTemplateManager.java:73)
at org.xwiki.template.script.TemplateScriptService.render(TemplateScriptService.java:54)
at jdk.internal.reflect.GeneratedMethodAccessor207.invoke(Unknown Source)
at java.base/jdk.internal.reflect.DelegatingMethodAccessorImpl.invoke(DelegatingMethodAccessorImpl.java:43)
at java.base/java.lang.reflect.Method.invoke(Method.java:569)
at org.apache.velocity.util.introspection.UberspectImpl$VelMethodImpl.doInvoke(UberspectImpl.java:571)
at org.apache.velocity.util.introspection.UberspectImpl$VelMethodImpl.invoke(UberspectImpl.java:554)
at org.apache.velocity.runtime.parser.node.ASTMethod.execute(ASTMethod.java:221)
at org.apache.velocity.runtime.parser.node.ASTReference.execute(ASTReference.java:368)
at org.apache.velocity.runtime.parser.node.ASTReference.render(ASTReference.java:492)
at org.apache.velocity.runtime.parser.node.ASTBlock.render(ASTBlock.java:147)
at org.apache.velocity.runtime.directive.VelocimacroProxy.render(VelocimacroProxy.java:217)
at org.apache.velocity.runtime.directive.RuntimeMacro.render(RuntimeMacro.java:331)
at org.apache.velocity.runtime.directive.RuntimeMacro.render(RuntimeMacro.java:261)
at org.apache.velocity.runtime.parser.node.ASTDirective.render(ASTDirective.java:304)
at org.apache.velocity.runtime.parser.node.ASTBlock.render(ASTBlock.java:147)
at org.apache.velocity.runtime.parser.node.ASTIfStatement.render(ASTIfStatement.java:171)
at org.apache.velocity.runtime.parser.node.ASTBlock.render(ASTBlock.java:147)
at org.apache.velocity.runtime.parser.node.SimpleNode.render(SimpleNode.java:439)
at org.apache.velocity.runtime.parser.node.ASTIfStatement.render(ASTIfStatement.java:190)
at org.apache.velocity.runtime.parser.node.SimpleNode.render(SimpleNode.java:439)
at org.apache.velocity.Template.merge(Template.java:358)
at org.apache.velocity.Template.merge(Template.java:262)
at org.xwiki.velocity.internal.InternalVelocityEngine.evaluate(InternalVelocityEngine.java:233)
at com.xpn.xwiki.internal.template.VelocityTemplateEvaluator.evaluateContent(VelocityTemplateEvaluator.java:107)
at com.xpn.xwiki.internal.template.TemplateAsyncRenderer.evaluateContent(TemplateAsyncRenderer.java:219)
at com.xpn.xwiki.internal.template.TemplateAsyncRenderer.renderVelocity(TemplateAsyncRenderer.java:174)
at com.xpn.xwiki.internal.template.TemplateAsyncRenderer.render(TemplateAsyncRenderer.java:135)
at com.xpn.xwiki.internal.template.TemplateAsyncRenderer.render(TemplateAsyncRenderer.java:54)
at org.xwiki.rendering.async.internal.DefaultAsyncRendererExecutor.lambda$syncRender$0(DefaultAsyncRendererExecutor.java:284)
at com.xpn.xwiki.internal.security.authorization.DefaultAuthorExecutor.call(DefaultAuthorExecutor.java:98)
at org.xwiki.rendering.async.internal.DefaultAsyncRendererExecutor.syncRender(DefaultAsyncRendererExecutor.java:284)
at org.xwiki.rendering.async.internal.DefaultAsyncRendererExecutor.render(DefaultAsyncRendererExecutor.java:267)
at org.xwiki.rendering.async.internal.block.DefaultBlockAsyncRendererExecutor.render(DefaultBlockAsyncRendererExecutor.java:154)
at com.xpn.xwiki.internal.template.InternalTemplateManager.render(InternalTemplateManager.java:904)
at com.xpn.xwiki.internal.template.InternalTemplateManager.renderFromSkin(InternalTemplateManager.java:866)
at com.xpn.xwiki.internal.template.InternalTemplateManager.renderFromSkin(InternalTemplateManager.java:846)
at com.xpn.xwiki.internal.template.InternalTemplateManager.render(InternalTemplateManager.java:832)
at com.xpn.xwiki.internal.template.DefaultTemplateManager.render(DefaultTemplateManager.java:91)
at com.xpn.xwiki.internal.template.DefaultTemplateManager.render(DefaultTemplateManager.java:85)
at com.xpn.xwiki.XWiki.evaluateTemplate(XWiki.java:2569)
at com.xpn.xwiki.web.Utils.parseTemplate(Utils.java:180)
at com.xpn.xwiki.web.XWikiAction.execute(XWikiAction.java:650)
at com.xpn.xwiki.web.XWikiAction.execute(XWikiAction.java:338)
at com.xpn.xwiki.web.LegacyActionServlet.service(LegacyActionServlet.java:108)
at javax.servlet.http.HttpServlet.service(HttpServlet.java:764)
at org.apache.catalina.core.ApplicationFilterChain.internalDoFilter(ApplicationFilterChain.java:227)
at org.apache.catalina.core.ApplicationFilterChain.doFilter(ApplicationFilterChain.java:162)
at com.xpn.xwiki.web.ActionFilter.doFilter(ActionFilter.java:122)
at org.apache.catalina.core.ApplicationFilterChain.internalDoFilter(ApplicationFilterChain.java:189)
at org.apache.catalina.core.ApplicationFilterChain.doFilter(ApplicationFilterChain.java:162)
at org.xwiki.wysiwyg.filter.ConversionFilter.doFilter(ConversionFilter.java:61)
at org.apache.catalina.core.ApplicationFilterChain.internalDoFilter(ApplicationFilterChain.java:189)
at org.apache.catalina.core.ApplicationFilterChain.doFilter(ApplicationFilterChain.java:162)
at org.apache.tomcat.websocket.server.WsFilter.doFilter(WsFilter.java:53)
at org.apache.catalina.core.ApplicationFilterChain.internalDoFilter(ApplicationFilterChain.java:189)
at org.apache.catalina.core.ApplicationFilterChain.doFilter(ApplicationFilterChain.java:162)
at org.xwiki.container.servlet.filters.internal.SetHTTPHeaderFilter.doFilter(SetHTTPHeaderFilter.java:63)
at org.apache.catalina.core.ApplicationFilterChain.internalDoFilter(ApplicationFilterChain.java:189)
at org.apache.catalina.core.ApplicationFilterChain.doFilter(ApplicationFilterChain.java:162)
at org.xwiki.resource.servlet.RoutingFilter.doFilter(RoutingFilter.java:132)
at org.apache.catalina.core.ApplicationFilterChain.internalDoFilter(ApplicationFilterChain.java:189)
at org.apache.catalina.core.ApplicationFilterChain.doFilter(ApplicationFilterChain.java:162)
at org.xwiki.container.servlet.filters.internal.SavedRequestRestorerFilter.doFilter(SavedRequestRestorerFilter.java:208)
at org.apache.catalina.core.ApplicationFilterChain.internalDoFilter(ApplicationFilterChain.java:189)
at org.apache.catalina.core.ApplicationFilterChain.doFilter(ApplicationFilterChain.java:162)
at org.xwiki.container.servlet.filters.internal.SetCharacterEncodingFilter.doFilter(SetCharacterEncodingFilter.java:117)
at org.apache.catalina.core.ApplicationFilterChain.internalDoFilter(ApplicationFilterChain.java:189)
at org.apache.catalina.core.ApplicationFilterChain.doFilter(ApplicationFilterChain.java:162)
at org.apache.catalina.core.StandardWrapperValve.invoke(StandardWrapperValve.java:197)
at org.apache.catalina.core.StandardContextValve.invoke(StandardContextValve.java:97)
at org.apache.catalina.authenticator.AuthenticatorBase.invoke(AuthenticatorBase.java:541)
at org.apache.catalina.core.StandardHostValve.invoke(StandardHostValve.java:135)
at org.apache.catalina.valves.ErrorReportValve.invoke(ErrorReportValve.java:92)
at org.apache.catalina.valves.AbstractAccessLogValve.invoke(AbstractAccessLogValve.java:687)
at org.apache.catalina.core.StandardEngineValve.invoke(StandardEngineValve.java:78)
at org.apache.catalina.connector.CoyoteAdapter.service(CoyoteAdapter.java:360)
at org.apache.coyote.http11.Http11Processor.service(Http11Processor.java:399)
at org.apache.coyote.AbstractProcessorLight.process(AbstractProcessorLight.java:65)
at org.apache.coyote.AbstractProtocol$ConnectionHandler.process(AbstractProtocol.java:890)
at org.apache.tomcat.util.net.NioEndpoint$SocketProcessor.doRun(NioEndpoint.java:1743)
at org.apache.tomcat.util.net.SocketProcessorBase.run(SocketProcessorBase.java:49)
at org.apache.tomcat.util.threads.ThreadPoolExecutor.runWorker(ThreadPoolExecutor.java:1191)
at org.apache.tomcat.util.threads.ThreadPoolExecutor$Worker.run(ThreadPoolExecutor.java:659)
at org.apache.tomcat.util.threads.TaskThread$WrappingRunnable.run(TaskThread.java:61)
at java.base/java.lang.Thread.run(Thread.java:840)
If a record has "Null" in a field in the import file and the record already exists in ONEcount with data in that same field, the data in the corresponding field in the ONEcount database WILL BE written over with a blank if the request date of the import is more recent than the date the informaton was entered into the ONEcount database. If the request date is older than the date the information was entered in the database, the corresponding field will NOT be written over with a blank.
13. If everything looks good in the Sample Mapping, click the "Proceed" button at the bottom of the page.

All new records will be imported into ONEcount, and a post-import summary will be displayed.
Post-Import Summary
14. Review the Post-Import Summary and Download Lists of Duplicates and/or Process Duplicates. (See important information below.)
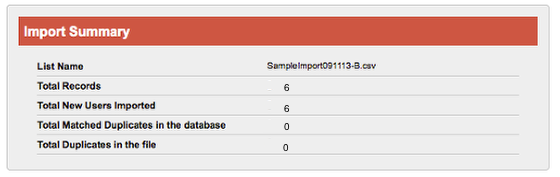
The screenshot above shows a post-import summary without any duplicates, so at this point the import is complete.
The screenshot below shows a post-import summary with duplicates, and the total matched duplicates in the database and the total duplicates in the file don't match. At this point, you have the option to either Download Duplicates in the File, Download Duplicates in ONEcount, or Process Duplicates.
a. "Download Duplicates in file" and "Download Duplicates in ONEcount"
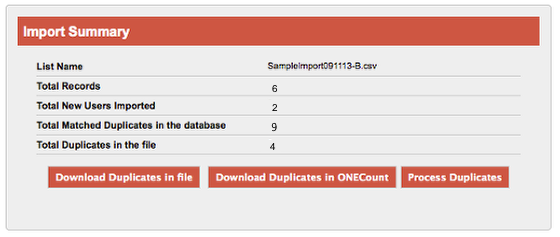
Download Duplicates in file will create a .csv file of all the records in the import file that have been identified as duplicates of records in the ONEcount database, based on the field(s) you selected to check duplicates.
Download Duplicates in ONEount will create a .csv file of all the records in ONEcount that have been identified as duplicates of records in the import file, based on the field(s) you selected to check duplicates.
You can download duplicates both in the file and in ONEcount and review. This window will remain open, so after review you can either process the duplicates or quit if you don't want to process at that time.
Note that if you leave the window open for too long, you'll be logged out of ONEcount and will need to log back in to continue.
Using the Example from Step 11 above:
"Download Duplicates in ONEcount" will create a .csv file of the 9 records in ONEcount that are identified as duplicates of records in the import file.
Using the example in Step 11 above, 6 of the duplicates will have a blank email field (which matches the one record in the import file without an email) and 3 will be records that match the email addresses of 3 records in the import file.
"Download Duplicates in the file" will create a .csv file of the 4 records in the import file that are already in the ONEcount database: the 1 record with the blank email (whicht matches the 6 records with blank email field in ONEcount) and the 3 that match the email addresses of 3 records already in the ONEcount database.
The import window will remain open so you can process the duplicates after reviewing the list if you choose to do so.
It is recommended to review the list of duplicates both in the file and in ONEcount prior to processing them in a situation where the numbers of Total Matched Duplicates in the Database and the Total Duplicates in the File don't match.
If you didn't set a Request Date or the Request Date you selected is newer than the information in the ONEcount database and then you opt to "Process Duplicates", all of the mapped fields for the six records with a blank email field in the ONEcount database will be written over with the information from the ONE record with the blank email field in the upload file, AND the three records identified by email as already being in the ONEcount database will be written over with the corresponding data for those records in the import file.
Failed to execute the [include] macro. Cause: [Current user [null] doesn't have view rights on document [xwiki:Licenses.Code.VelocityMacros]]. Click on this message for details.
org.xwiki.rendering.macro.MacroExecutionException: Current user [null] doesn't have view rights on document [xwiki:Licenses.Code.VelocityMacros]
at org.xwiki.rendering.internal.macro.include.IncludeMacro.execute(IncludeMacro.java:124)
at org.xwiki.rendering.internal.macro.include.IncludeMacro.execute(IncludeMacro.java:59)
at org.xwiki.rendering.internal.transformation.macro.MacroTransformation.transform(MacroTransformation.java:311)
at org.xwiki.rendering.internal.transformation.DefaultRenderingContext.transformInContext(DefaultRenderingContext.java:183)
at org.xwiki.rendering.async.internal.block.AbstractBlockAsyncRenderer.transform(AbstractBlockAsyncRenderer.java:76)
at org.xwiki.rendering.wikimacro.internal.DefaultWikiMacroRenderer.transform(DefaultWikiMacroRenderer.java:882)
at org.xwiki.rendering.wikimacro.internal.DefaultWikiMacroRenderer.transform(DefaultWikiMacroRenderer.java:868)
at org.xwiki.rendering.wikimacro.internal.DefaultWikiMacroRenderer.transform(DefaultWikiMacroRenderer.java:594)
at org.xwiki.rendering.wikimacro.internal.DefaultWikiMacroRenderer.execute(DefaultWikiMacroRenderer.java:409)
at org.xwiki.rendering.async.internal.block.AbstractBlockAsyncRenderer.render(AbstractBlockAsyncRenderer.java:157)
at org.xwiki.rendering.async.internal.block.AbstractBlockAsyncRenderer.render(AbstractBlockAsyncRenderer.java:54)
at org.xwiki.rendering.async.internal.DefaultAsyncRendererExecutor.lambda$syncRender$0(DefaultAsyncRendererExecutor.java:284)
at com.xpn.xwiki.internal.security.authorization.DefaultAuthorExecutor.call(DefaultAuthorExecutor.java:98)
at org.xwiki.rendering.async.internal.DefaultAsyncRendererExecutor.syncRender(DefaultAsyncRendererExecutor.java:284)
at org.xwiki.rendering.async.internal.DefaultAsyncRendererExecutor.render(DefaultAsyncRendererExecutor.java:267)
at org.xwiki.rendering.async.internal.block.DefaultBlockAsyncRendererExecutor.execute(DefaultBlockAsyncRendererExecutor.java:125)
at org.xwiki.rendering.wikimacro.internal.DefaultWikiMacro.execute(DefaultWikiMacro.java:129)
at org.xwiki.rendering.wikimacro.internal.DefaultWikiMacro.execute(DefaultWikiMacro.java:61)
at org.xwiki.rendering.internal.transformation.macro.MacroTransformation.transform(MacroTransformation.java:311)
at org.xwiki.rendering.internal.transformation.DefaultRenderingContext.transformInContext(DefaultRenderingContext.java:183)
at org.xwiki.rendering.internal.transformation.DefaultTransformationManager.performTransformations(DefaultTransformationManager.java:88)
at org.xwiki.display.internal.DocumentContentAsyncExecutor.executeInCurrentExecutionContext(DocumentContentAsyncExecutor.java:396)
at org.xwiki.display.internal.DocumentContentAsyncExecutor.execute(DocumentContentAsyncExecutor.java:269)
at org.xwiki.display.internal.DocumentContentAsyncRenderer.execute(DocumentContentAsyncRenderer.java:112)
at org.xwiki.rendering.async.internal.block.AbstractBlockAsyncRenderer.render(AbstractBlockAsyncRenderer.java:157)
at org.xwiki.rendering.async.internal.block.AbstractBlockAsyncRenderer.render(AbstractBlockAsyncRenderer.java:54)
at org.xwiki.rendering.async.internal.DefaultAsyncRendererExecutor.syncRender(DefaultAsyncRendererExecutor.java:290)
at org.xwiki.rendering.async.internal.DefaultAsyncRendererExecutor.render(DefaultAsyncRendererExecutor.java:267)
at org.xwiki.rendering.async.internal.block.DefaultBlockAsyncRendererExecutor.execute(DefaultBlockAsyncRendererExecutor.java:125)
at org.xwiki.display.internal.DocumentContentDisplayer.display(DocumentContentDisplayer.java:67)
at org.xwiki.display.internal.DocumentContentDisplayer.display(DocumentContentDisplayer.java:43)
at org.xwiki.display.internal.DefaultDocumentDisplayer.display(DefaultDocumentDisplayer.java:96)
at org.xwiki.display.internal.DefaultDocumentDisplayer.display(DefaultDocumentDisplayer.java:39)
at org.xwiki.sheet.internal.SheetDocumentDisplayer.display(SheetDocumentDisplayer.java:123)
at org.xwiki.sheet.internal.SheetDocumentDisplayer.display(SheetDocumentDisplayer.java:52)
at org.xwiki.display.internal.ConfiguredDocumentDisplayer.display(ConfiguredDocumentDisplayer.java:68)
at org.xwiki.display.internal.ConfiguredDocumentDisplayer.display(ConfiguredDocumentDisplayer.java:42)
at com.xpn.xwiki.doc.XWikiDocument.display(XWikiDocument.java:1428)
at com.xpn.xwiki.doc.XWikiDocument.getRenderedContent(XWikiDocument.java:1564)
at com.xpn.xwiki.doc.XWikiDocument.displayDocument(XWikiDocument.java:1514)
at com.xpn.xwiki.doc.XWikiDocument.displayDocument(XWikiDocument.java:1483)
at com.xpn.xwiki.api.Document.displayDocument(Document.java:821)
at jdk.internal.reflect.GeneratedMethodAccessor653.invoke(Unknown Source)
at java.base/jdk.internal.reflect.DelegatingMethodAccessorImpl.invoke(DelegatingMethodAccessorImpl.java:43)
at java.base/java.lang.reflect.Method.invoke(Method.java:569)
at org.apache.velocity.util.introspection.UberspectImpl$VelMethodImpl.doInvoke(UberspectImpl.java:571)
at org.apache.velocity.util.introspection.UberspectImpl$VelMethodImpl.invoke(UberspectImpl.java:554)
at org.apache.velocity.runtime.parser.node.ASTMethod.execute(ASTMethod.java:221)
at org.apache.velocity.runtime.parser.node.ASTReference.execute(ASTReference.java:368)
at org.apache.velocity.runtime.parser.node.ASTReference.value(ASTReference.java:704)
at org.apache.velocity.runtime.parser.node.ASTExpression.value(ASTExpression.java:75)
at org.apache.velocity.runtime.parser.node.ASTSetDirective.render(ASTSetDirective.java:242)
at org.apache.velocity.runtime.parser.node.ASTBlock.render(ASTBlock.java:147)
at org.apache.velocity.runtime.parser.node.SimpleNode.render(SimpleNode.java:439)
at org.apache.velocity.runtime.parser.node.ASTIfStatement.render(ASTIfStatement.java:190)
at org.apache.velocity.runtime.parser.node.ASTBlock.render(ASTBlock.java:147)
at org.xwiki.velocity.internal.directive.TryCatchDirective.render(TryCatchDirective.java:86)
at org.apache.velocity.runtime.parser.node.ASTDirective.render(ASTDirective.java:304)
at org.apache.velocity.runtime.parser.node.SimpleNode.render(SimpleNode.java:439)
at org.apache.velocity.Template.merge(Template.java:358)
at org.apache.velocity.Template.merge(Template.java:262)
at org.xwiki.velocity.internal.InternalVelocityEngine.evaluate(InternalVelocityEngine.java:233)
at com.xpn.xwiki.internal.template.VelocityTemplateEvaluator.evaluateContent(VelocityTemplateEvaluator.java:107)
at com.xpn.xwiki.internal.template.TemplateAsyncRenderer.evaluateContent(TemplateAsyncRenderer.java:219)
at com.xpn.xwiki.internal.template.TemplateAsyncRenderer.renderVelocity(TemplateAsyncRenderer.java:174)
at com.xpn.xwiki.internal.template.TemplateAsyncRenderer.render(TemplateAsyncRenderer.java:135)
at com.xpn.xwiki.internal.template.TemplateAsyncRenderer.render(TemplateAsyncRenderer.java:54)
at org.xwiki.rendering.async.internal.DefaultAsyncRendererExecutor.lambda$syncRender$0(DefaultAsyncRendererExecutor.java:284)
at com.xpn.xwiki.internal.security.authorization.DefaultAuthorExecutor.call(DefaultAuthorExecutor.java:98)
at org.xwiki.rendering.async.internal.DefaultAsyncRendererExecutor.syncRender(DefaultAsyncRendererExecutor.java:284)
at org.xwiki.rendering.async.internal.DefaultAsyncRendererExecutor.render(DefaultAsyncRendererExecutor.java:267)
at org.xwiki.rendering.async.internal.block.DefaultBlockAsyncRendererExecutor.render(DefaultBlockAsyncRendererExecutor.java:154)
at com.xpn.xwiki.internal.template.InternalTemplateManager.render(InternalTemplateManager.java:904)
at com.xpn.xwiki.internal.template.InternalTemplateManager.renderFromSkin(InternalTemplateManager.java:866)
at com.xpn.xwiki.internal.template.InternalTemplateManager.render(InternalTemplateManager.java:853)
at com.xpn.xwiki.internal.template.InternalTemplateManager.renderNoException(InternalTemplateManager.java:808)
at com.xpn.xwiki.internal.template.InternalTemplateManager.renderNoException(InternalTemplateManager.java:800)
at com.xpn.xwiki.internal.template.DefaultTemplateManager.renderNoException(DefaultTemplateManager.java:79)
at com.xpn.xwiki.internal.template.DefaultTemplateManager.renderNoException(DefaultTemplateManager.java:73)
at org.xwiki.template.script.TemplateScriptService.render(TemplateScriptService.java:54)
at jdk.internal.reflect.GeneratedMethodAccessor207.invoke(Unknown Source)
at java.base/jdk.internal.reflect.DelegatingMethodAccessorImpl.invoke(DelegatingMethodAccessorImpl.java:43)
at java.base/java.lang.reflect.Method.invoke(Method.java:569)
at org.apache.velocity.util.introspection.UberspectImpl$VelMethodImpl.doInvoke(UberspectImpl.java:571)
at org.apache.velocity.util.introspection.UberspectImpl$VelMethodImpl.invoke(UberspectImpl.java:554)
at org.apache.velocity.runtime.parser.node.ASTMethod.execute(ASTMethod.java:221)
at org.apache.velocity.runtime.parser.node.ASTReference.execute(ASTReference.java:368)
at org.apache.velocity.runtime.parser.node.ASTReference.render(ASTReference.java:492)
at org.apache.velocity.runtime.parser.node.ASTBlock.render(ASTBlock.java:147)
at org.apache.velocity.runtime.directive.VelocimacroProxy.render(VelocimacroProxy.java:217)
at org.apache.velocity.runtime.directive.RuntimeMacro.render(RuntimeMacro.java:331)
at org.apache.velocity.runtime.directive.RuntimeMacro.render(RuntimeMacro.java:261)
at org.apache.velocity.runtime.parser.node.ASTDirective.render(ASTDirective.java:304)
at org.apache.velocity.runtime.parser.node.SimpleNode.render(SimpleNode.java:439)
at org.apache.velocity.Template.merge(Template.java:358)
at org.apache.velocity.Template.merge(Template.java:262)
at org.xwiki.velocity.internal.InternalVelocityEngine.evaluate(InternalVelocityEngine.java:233)
at com.xpn.xwiki.internal.template.VelocityTemplateEvaluator.evaluateContent(VelocityTemplateEvaluator.java:107)
at com.xpn.xwiki.internal.template.TemplateAsyncRenderer.evaluateContent(TemplateAsyncRenderer.java:219)
at com.xpn.xwiki.internal.template.TemplateAsyncRenderer.renderVelocity(TemplateAsyncRenderer.java:174)
at com.xpn.xwiki.internal.template.TemplateAsyncRenderer.render(TemplateAsyncRenderer.java:135)
at com.xpn.xwiki.internal.template.TemplateAsyncRenderer.render(TemplateAsyncRenderer.java:54)
at org.xwiki.rendering.async.internal.DefaultAsyncRendererExecutor.lambda$syncRender$0(DefaultAsyncRendererExecutor.java:284)
at com.xpn.xwiki.internal.security.authorization.DefaultAuthorExecutor.call(DefaultAuthorExecutor.java:98)
at org.xwiki.rendering.async.internal.DefaultAsyncRendererExecutor.syncRender(DefaultAsyncRendererExecutor.java:284)
at org.xwiki.rendering.async.internal.DefaultAsyncRendererExecutor.render(DefaultAsyncRendererExecutor.java:267)
at org.xwiki.rendering.async.internal.block.DefaultBlockAsyncRendererExecutor.render(DefaultBlockAsyncRendererExecutor.java:154)
at com.xpn.xwiki.internal.template.InternalTemplateManager.render(InternalTemplateManager.java:904)
at com.xpn.xwiki.internal.template.InternalTemplateManager.renderFromSkin(InternalTemplateManager.java:866)
at com.xpn.xwiki.internal.template.InternalTemplateManager.render(InternalTemplateManager.java:853)
at com.xpn.xwiki.internal.template.InternalTemplateManager.renderNoException(InternalTemplateManager.java:808)
at com.xpn.xwiki.internal.template.InternalTemplateManager.renderNoException(InternalTemplateManager.java:800)
at com.xpn.xwiki.internal.template.DefaultTemplateManager.renderNoException(DefaultTemplateManager.java:79)
at com.xpn.xwiki.internal.template.DefaultTemplateManager.renderNoException(DefaultTemplateManager.java:73)
at org.xwiki.template.script.TemplateScriptService.render(TemplateScriptService.java:54)
at jdk.internal.reflect.GeneratedMethodAccessor207.invoke(Unknown Source)
at java.base/jdk.internal.reflect.DelegatingMethodAccessorImpl.invoke(DelegatingMethodAccessorImpl.java:43)
at java.base/java.lang.reflect.Method.invoke(Method.java:569)
at org.apache.velocity.util.introspection.UberspectImpl$VelMethodImpl.doInvoke(UberspectImpl.java:571)
at org.apache.velocity.util.introspection.UberspectImpl$VelMethodImpl.invoke(UberspectImpl.java:554)
at org.apache.velocity.runtime.parser.node.ASTMethod.execute(ASTMethod.java:221)
at org.apache.velocity.runtime.parser.node.ASTReference.execute(ASTReference.java:368)
at org.apache.velocity.runtime.parser.node.ASTReference.render(ASTReference.java:492)
at org.apache.velocity.runtime.parser.node.ASTBlock.render(ASTBlock.java:147)
at org.apache.velocity.runtime.directive.VelocimacroProxy.render(VelocimacroProxy.java:217)
at org.apache.velocity.runtime.directive.RuntimeMacro.render(RuntimeMacro.java:331)
at org.apache.velocity.runtime.directive.RuntimeMacro.render(RuntimeMacro.java:261)
at org.apache.velocity.runtime.parser.node.ASTDirective.render(ASTDirective.java:304)
at org.apache.velocity.runtime.parser.node.ASTBlock.render(ASTBlock.java:147)
at org.apache.velocity.runtime.parser.node.ASTIfStatement.render(ASTIfStatement.java:171)
at org.apache.velocity.runtime.parser.node.ASTBlock.render(ASTBlock.java:147)
at org.apache.velocity.runtime.parser.node.SimpleNode.render(SimpleNode.java:439)
at org.apache.velocity.runtime.parser.node.ASTIfStatement.render(ASTIfStatement.java:190)
at org.apache.velocity.runtime.parser.node.SimpleNode.render(SimpleNode.java:439)
at org.apache.velocity.Template.merge(Template.java:358)
at org.apache.velocity.Template.merge(Template.java:262)
at org.xwiki.velocity.internal.InternalVelocityEngine.evaluate(InternalVelocityEngine.java:233)
at com.xpn.xwiki.internal.template.VelocityTemplateEvaluator.evaluateContent(VelocityTemplateEvaluator.java:107)
at com.xpn.xwiki.internal.template.TemplateAsyncRenderer.evaluateContent(TemplateAsyncRenderer.java:219)
at com.xpn.xwiki.internal.template.TemplateAsyncRenderer.renderVelocity(TemplateAsyncRenderer.java:174)
at com.xpn.xwiki.internal.template.TemplateAsyncRenderer.render(TemplateAsyncRenderer.java:135)
at com.xpn.xwiki.internal.template.TemplateAsyncRenderer.render(TemplateAsyncRenderer.java:54)
at org.xwiki.rendering.async.internal.DefaultAsyncRendererExecutor.lambda$syncRender$0(DefaultAsyncRendererExecutor.java:284)
at com.xpn.xwiki.internal.security.authorization.DefaultAuthorExecutor.call(DefaultAuthorExecutor.java:98)
at org.xwiki.rendering.async.internal.DefaultAsyncRendererExecutor.syncRender(DefaultAsyncRendererExecutor.java:284)
at org.xwiki.rendering.async.internal.DefaultAsyncRendererExecutor.render(DefaultAsyncRendererExecutor.java:267)
at org.xwiki.rendering.async.internal.block.DefaultBlockAsyncRendererExecutor.render(DefaultBlockAsyncRendererExecutor.java:154)
at com.xpn.xwiki.internal.template.InternalTemplateManager.render(InternalTemplateManager.java:904)
at com.xpn.xwiki.internal.template.InternalTemplateManager.renderFromSkin(InternalTemplateManager.java:866)
at com.xpn.xwiki.internal.template.InternalTemplateManager.renderFromSkin(InternalTemplateManager.java:846)
at com.xpn.xwiki.internal.template.InternalTemplateManager.render(InternalTemplateManager.java:832)
at com.xpn.xwiki.internal.template.DefaultTemplateManager.render(DefaultTemplateManager.java:91)
at com.xpn.xwiki.internal.template.DefaultTemplateManager.render(DefaultTemplateManager.java:85)
at com.xpn.xwiki.XWiki.evaluateTemplate(XWiki.java:2569)
at com.xpn.xwiki.web.Utils.parseTemplate(Utils.java:180)
at com.xpn.xwiki.web.XWikiAction.execute(XWikiAction.java:650)
at com.xpn.xwiki.web.XWikiAction.execute(XWikiAction.java:338)
at com.xpn.xwiki.web.LegacyActionServlet.service(LegacyActionServlet.java:108)
at javax.servlet.http.HttpServlet.service(HttpServlet.java:764)
at org.apache.catalina.core.ApplicationFilterChain.internalDoFilter(ApplicationFilterChain.java:227)
at org.apache.catalina.core.ApplicationFilterChain.doFilter(ApplicationFilterChain.java:162)
at com.xpn.xwiki.web.ActionFilter.doFilter(ActionFilter.java:122)
at org.apache.catalina.core.ApplicationFilterChain.internalDoFilter(ApplicationFilterChain.java:189)
at org.apache.catalina.core.ApplicationFilterChain.doFilter(ApplicationFilterChain.java:162)
at org.xwiki.wysiwyg.filter.ConversionFilter.doFilter(ConversionFilter.java:61)
at org.apache.catalina.core.ApplicationFilterChain.internalDoFilter(ApplicationFilterChain.java:189)
at org.apache.catalina.core.ApplicationFilterChain.doFilter(ApplicationFilterChain.java:162)
at org.apache.tomcat.websocket.server.WsFilter.doFilter(WsFilter.java:53)
at org.apache.catalina.core.ApplicationFilterChain.internalDoFilter(ApplicationFilterChain.java:189)
at org.apache.catalina.core.ApplicationFilterChain.doFilter(ApplicationFilterChain.java:162)
at org.xwiki.container.servlet.filters.internal.SetHTTPHeaderFilter.doFilter(SetHTTPHeaderFilter.java:63)
at org.apache.catalina.core.ApplicationFilterChain.internalDoFilter(ApplicationFilterChain.java:189)
at org.apache.catalina.core.ApplicationFilterChain.doFilter(ApplicationFilterChain.java:162)
at org.xwiki.resource.servlet.RoutingFilter.doFilter(RoutingFilter.java:132)
at org.apache.catalina.core.ApplicationFilterChain.internalDoFilter(ApplicationFilterChain.java:189)
at org.apache.catalina.core.ApplicationFilterChain.doFilter(ApplicationFilterChain.java:162)
at org.xwiki.container.servlet.filters.internal.SavedRequestRestorerFilter.doFilter(SavedRequestRestorerFilter.java:208)
at org.apache.catalina.core.ApplicationFilterChain.internalDoFilter(ApplicationFilterChain.java:189)
at org.apache.catalina.core.ApplicationFilterChain.doFilter(ApplicationFilterChain.java:162)
at org.xwiki.container.servlet.filters.internal.SetCharacterEncodingFilter.doFilter(SetCharacterEncodingFilter.java:117)
at org.apache.catalina.core.ApplicationFilterChain.internalDoFilter(ApplicationFilterChain.java:189)
at org.apache.catalina.core.ApplicationFilterChain.doFilter(ApplicationFilterChain.java:162)
at org.apache.catalina.core.StandardWrapperValve.invoke(StandardWrapperValve.java:197)
at org.apache.catalina.core.StandardContextValve.invoke(StandardContextValve.java:97)
at org.apache.catalina.authenticator.AuthenticatorBase.invoke(AuthenticatorBase.java:541)
at org.apache.catalina.core.StandardHostValve.invoke(StandardHostValve.java:135)
at org.apache.catalina.valves.ErrorReportValve.invoke(ErrorReportValve.java:92)
at org.apache.catalina.valves.AbstractAccessLogValve.invoke(AbstractAccessLogValve.java:687)
at org.apache.catalina.core.StandardEngineValve.invoke(StandardEngineValve.java:78)
at org.apache.catalina.connector.CoyoteAdapter.service(CoyoteAdapter.java:360)
at org.apache.coyote.http11.Http11Processor.service(Http11Processor.java:399)
at org.apache.coyote.AbstractProcessorLight.process(AbstractProcessorLight.java:65)
at org.apache.coyote.AbstractProtocol$ConnectionHandler.process(AbstractProtocol.java:890)
at org.apache.tomcat.util.net.NioEndpoint$SocketProcessor.doRun(NioEndpoint.java:1743)
at org.apache.tomcat.util.net.SocketProcessorBase.run(SocketProcessorBase.java:49)
at org.apache.tomcat.util.threads.ThreadPoolExecutor.runWorker(ThreadPoolExecutor.java:1191)
at org.apache.tomcat.util.threads.ThreadPoolExecutor$Worker.run(ThreadPoolExecutor.java:659)
at org.apache.tomcat.util.threads.TaskThread$WrappingRunnable.run(TaskThread.java:61)
at java.base/java.lang.Thread.run(Thread.java:840)
If processing duplicates, selecting a request date on import ensures that only data in the ONEcount database that is older than data in the import file will be written over. ONEcount will compare the request date to the date of the most recent information in the database and only write over information that is older than the request date. This is done on a field-by-field basis within a record.
If there are, say, three records with a blank email field in the import file, then the mapped fields for the six records with a blank email field in the ONEcount database will be written over with the information from the last record with a blank email field in the import file.
b. Process Duplicates
Process Duplicates will update the records in the ONEcount database identified as duplicates of records in the import file.
If you process duplicates, either with or without downloading and reviewing duplicates, the message below will appear when finished processing. At this point, your import is complete.

Failed to execute the [include] macro. Cause: [Current user [null] doesn't have view rights on document [xwiki:Licenses.Code.VelocityMacros]]. Click on this message for details.
org.xwiki.rendering.macro.MacroExecutionException: Current user [null] doesn't have view rights on document [xwiki:Licenses.Code.VelocityMacros]
at org.xwiki.rendering.internal.macro.include.IncludeMacro.execute(IncludeMacro.java:124)
at org.xwiki.rendering.internal.macro.include.IncludeMacro.execute(IncludeMacro.java:59)
at org.xwiki.rendering.internal.transformation.macro.MacroTransformation.transform(MacroTransformation.java:311)
at org.xwiki.rendering.internal.transformation.DefaultRenderingContext.transformInContext(DefaultRenderingContext.java:183)
at org.xwiki.rendering.async.internal.block.AbstractBlockAsyncRenderer.transform(AbstractBlockAsyncRenderer.java:76)
at org.xwiki.rendering.wikimacro.internal.DefaultWikiMacroRenderer.transform(DefaultWikiMacroRenderer.java:882)
at org.xwiki.rendering.wikimacro.internal.DefaultWikiMacroRenderer.transform(DefaultWikiMacroRenderer.java:868)
at org.xwiki.rendering.wikimacro.internal.DefaultWikiMacroRenderer.transform(DefaultWikiMacroRenderer.java:594)
at org.xwiki.rendering.wikimacro.internal.DefaultWikiMacroRenderer.execute(DefaultWikiMacroRenderer.java:409)
at org.xwiki.rendering.async.internal.block.AbstractBlockAsyncRenderer.render(AbstractBlockAsyncRenderer.java:157)
at org.xwiki.rendering.async.internal.block.AbstractBlockAsyncRenderer.render(AbstractBlockAsyncRenderer.java:54)
at org.xwiki.rendering.async.internal.DefaultAsyncRendererExecutor.lambda$syncRender$0(DefaultAsyncRendererExecutor.java:284)
at com.xpn.xwiki.internal.security.authorization.DefaultAuthorExecutor.call(DefaultAuthorExecutor.java:98)
at org.xwiki.rendering.async.internal.DefaultAsyncRendererExecutor.syncRender(DefaultAsyncRendererExecutor.java:284)
at org.xwiki.rendering.async.internal.DefaultAsyncRendererExecutor.render(DefaultAsyncRendererExecutor.java:267)
at org.xwiki.rendering.async.internal.block.DefaultBlockAsyncRendererExecutor.execute(DefaultBlockAsyncRendererExecutor.java:125)
at org.xwiki.rendering.wikimacro.internal.DefaultWikiMacro.execute(DefaultWikiMacro.java:129)
at org.xwiki.rendering.wikimacro.internal.DefaultWikiMacro.execute(DefaultWikiMacro.java:61)
at org.xwiki.rendering.internal.transformation.macro.MacroTransformation.transform(MacroTransformation.java:311)
at org.xwiki.rendering.internal.transformation.DefaultRenderingContext.transformInContext(DefaultRenderingContext.java:183)
at org.xwiki.rendering.internal.transformation.DefaultTransformationManager.performTransformations(DefaultTransformationManager.java:88)
at org.xwiki.display.internal.DocumentContentAsyncExecutor.executeInCurrentExecutionContext(DocumentContentAsyncExecutor.java:396)
at org.xwiki.display.internal.DocumentContentAsyncExecutor.execute(DocumentContentAsyncExecutor.java:269)
at org.xwiki.display.internal.DocumentContentAsyncRenderer.execute(DocumentContentAsyncRenderer.java:112)
at org.xwiki.rendering.async.internal.block.AbstractBlockAsyncRenderer.render(AbstractBlockAsyncRenderer.java:157)
at org.xwiki.rendering.async.internal.block.AbstractBlockAsyncRenderer.render(AbstractBlockAsyncRenderer.java:54)
at org.xwiki.rendering.async.internal.DefaultAsyncRendererExecutor.syncRender(DefaultAsyncRendererExecutor.java:290)
at org.xwiki.rendering.async.internal.DefaultAsyncRendererExecutor.render(DefaultAsyncRendererExecutor.java:267)
at org.xwiki.rendering.async.internal.block.DefaultBlockAsyncRendererExecutor.execute(DefaultBlockAsyncRendererExecutor.java:125)
at org.xwiki.display.internal.DocumentContentDisplayer.display(DocumentContentDisplayer.java:67)
at org.xwiki.display.internal.DocumentContentDisplayer.display(DocumentContentDisplayer.java:43)
at org.xwiki.display.internal.DefaultDocumentDisplayer.display(DefaultDocumentDisplayer.java:96)
at org.xwiki.display.internal.DefaultDocumentDisplayer.display(DefaultDocumentDisplayer.java:39)
at org.xwiki.sheet.internal.SheetDocumentDisplayer.display(SheetDocumentDisplayer.java:123)
at org.xwiki.sheet.internal.SheetDocumentDisplayer.display(SheetDocumentDisplayer.java:52)
at org.xwiki.display.internal.ConfiguredDocumentDisplayer.display(ConfiguredDocumentDisplayer.java:68)
at org.xwiki.display.internal.ConfiguredDocumentDisplayer.display(ConfiguredDocumentDisplayer.java:42)
at com.xpn.xwiki.doc.XWikiDocument.display(XWikiDocument.java:1428)
at com.xpn.xwiki.doc.XWikiDocument.getRenderedContent(XWikiDocument.java:1564)
at com.xpn.xwiki.doc.XWikiDocument.displayDocument(XWikiDocument.java:1514)
at com.xpn.xwiki.doc.XWikiDocument.displayDocument(XWikiDocument.java:1483)
at com.xpn.xwiki.api.Document.displayDocument(Document.java:821)
at jdk.internal.reflect.GeneratedMethodAccessor653.invoke(Unknown Source)
at java.base/jdk.internal.reflect.DelegatingMethodAccessorImpl.invoke(DelegatingMethodAccessorImpl.java:43)
at java.base/java.lang.reflect.Method.invoke(Method.java:569)
at org.apache.velocity.util.introspection.UberspectImpl$VelMethodImpl.doInvoke(UberspectImpl.java:571)
at org.apache.velocity.util.introspection.UberspectImpl$VelMethodImpl.invoke(UberspectImpl.java:554)
at org.apache.velocity.runtime.parser.node.ASTMethod.execute(ASTMethod.java:221)
at org.apache.velocity.runtime.parser.node.ASTReference.execute(ASTReference.java:368)
at org.apache.velocity.runtime.parser.node.ASTReference.value(ASTReference.java:704)
at org.apache.velocity.runtime.parser.node.ASTExpression.value(ASTExpression.java:75)
at org.apache.velocity.runtime.parser.node.ASTSetDirective.render(ASTSetDirective.java:242)
at org.apache.velocity.runtime.parser.node.ASTBlock.render(ASTBlock.java:147)
at org.apache.velocity.runtime.parser.node.SimpleNode.render(SimpleNode.java:439)
at org.apache.velocity.runtime.parser.node.ASTIfStatement.render(ASTIfStatement.java:190)
at org.apache.velocity.runtime.parser.node.ASTBlock.render(ASTBlock.java:147)
at org.xwiki.velocity.internal.directive.TryCatchDirective.render(TryCatchDirective.java:86)
at org.apache.velocity.runtime.parser.node.ASTDirective.render(ASTDirective.java:304)
at org.apache.velocity.runtime.parser.node.SimpleNode.render(SimpleNode.java:439)
at org.apache.velocity.Template.merge(Template.java:358)
at org.apache.velocity.Template.merge(Template.java:262)
at org.xwiki.velocity.internal.InternalVelocityEngine.evaluate(InternalVelocityEngine.java:233)
at com.xpn.xwiki.internal.template.VelocityTemplateEvaluator.evaluateContent(VelocityTemplateEvaluator.java:107)
at com.xpn.xwiki.internal.template.TemplateAsyncRenderer.evaluateContent(TemplateAsyncRenderer.java:219)
at com.xpn.xwiki.internal.template.TemplateAsyncRenderer.renderVelocity(TemplateAsyncRenderer.java:174)
at com.xpn.xwiki.internal.template.TemplateAsyncRenderer.render(TemplateAsyncRenderer.java:135)
at com.xpn.xwiki.internal.template.TemplateAsyncRenderer.render(TemplateAsyncRenderer.java:54)
at org.xwiki.rendering.async.internal.DefaultAsyncRendererExecutor.lambda$syncRender$0(DefaultAsyncRendererExecutor.java:284)
at com.xpn.xwiki.internal.security.authorization.DefaultAuthorExecutor.call(DefaultAuthorExecutor.java:98)
at org.xwiki.rendering.async.internal.DefaultAsyncRendererExecutor.syncRender(DefaultAsyncRendererExecutor.java:284)
at org.xwiki.rendering.async.internal.DefaultAsyncRendererExecutor.render(DefaultAsyncRendererExecutor.java:267)
at org.xwiki.rendering.async.internal.block.DefaultBlockAsyncRendererExecutor.render(DefaultBlockAsyncRendererExecutor.java:154)
at com.xpn.xwiki.internal.template.InternalTemplateManager.render(InternalTemplateManager.java:904)
at com.xpn.xwiki.internal.template.InternalTemplateManager.renderFromSkin(InternalTemplateManager.java:866)
at com.xpn.xwiki.internal.template.InternalTemplateManager.render(InternalTemplateManager.java:853)
at com.xpn.xwiki.internal.template.InternalTemplateManager.renderNoException(InternalTemplateManager.java:808)
at com.xpn.xwiki.internal.template.InternalTemplateManager.renderNoException(InternalTemplateManager.java:800)
at com.xpn.xwiki.internal.template.DefaultTemplateManager.renderNoException(DefaultTemplateManager.java:79)
at com.xpn.xwiki.internal.template.DefaultTemplateManager.renderNoException(DefaultTemplateManager.java:73)
at org.xwiki.template.script.TemplateScriptService.render(TemplateScriptService.java:54)
at jdk.internal.reflect.GeneratedMethodAccessor207.invoke(Unknown Source)
at java.base/jdk.internal.reflect.DelegatingMethodAccessorImpl.invoke(DelegatingMethodAccessorImpl.java:43)
at java.base/java.lang.reflect.Method.invoke(Method.java:569)
at org.apache.velocity.util.introspection.UberspectImpl$VelMethodImpl.doInvoke(UberspectImpl.java:571)
at org.apache.velocity.util.introspection.UberspectImpl$VelMethodImpl.invoke(UberspectImpl.java:554)
at org.apache.velocity.runtime.parser.node.ASTMethod.execute(ASTMethod.java:221)
at org.apache.velocity.runtime.parser.node.ASTReference.execute(ASTReference.java:368)
at org.apache.velocity.runtime.parser.node.ASTReference.render(ASTReference.java:492)
at org.apache.velocity.runtime.parser.node.ASTBlock.render(ASTBlock.java:147)
at org.apache.velocity.runtime.directive.VelocimacroProxy.render(VelocimacroProxy.java:217)
at org.apache.velocity.runtime.directive.RuntimeMacro.render(RuntimeMacro.java:331)
at org.apache.velocity.runtime.directive.RuntimeMacro.render(RuntimeMacro.java:261)
at org.apache.velocity.runtime.parser.node.ASTDirective.render(ASTDirective.java:304)
at org.apache.velocity.runtime.parser.node.SimpleNode.render(SimpleNode.java:439)
at org.apache.velocity.Template.merge(Template.java:358)
at org.apache.velocity.Template.merge(Template.java:262)
at org.xwiki.velocity.internal.InternalVelocityEngine.evaluate(InternalVelocityEngine.java:233)
at com.xpn.xwiki.internal.template.VelocityTemplateEvaluator.evaluateContent(VelocityTemplateEvaluator.java:107)
at com.xpn.xwiki.internal.template.TemplateAsyncRenderer.evaluateContent(TemplateAsyncRenderer.java:219)
at com.xpn.xwiki.internal.template.TemplateAsyncRenderer.renderVelocity(TemplateAsyncRenderer.java:174)
at com.xpn.xwiki.internal.template.TemplateAsyncRenderer.render(TemplateAsyncRenderer.java:135)
at com.xpn.xwiki.internal.template.TemplateAsyncRenderer.render(TemplateAsyncRenderer.java:54)
at org.xwiki.rendering.async.internal.DefaultAsyncRendererExecutor.lambda$syncRender$0(DefaultAsyncRendererExecutor.java:284)
at com.xpn.xwiki.internal.security.authorization.DefaultAuthorExecutor.call(DefaultAuthorExecutor.java:98)
at org.xwiki.rendering.async.internal.DefaultAsyncRendererExecutor.syncRender(DefaultAsyncRendererExecutor.java:284)
at org.xwiki.rendering.async.internal.DefaultAsyncRendererExecutor.render(DefaultAsyncRendererExecutor.java:267)
at org.xwiki.rendering.async.internal.block.DefaultBlockAsyncRendererExecutor.render(DefaultBlockAsyncRendererExecutor.java:154)
at com.xpn.xwiki.internal.template.InternalTemplateManager.render(InternalTemplateManager.java:904)
at com.xpn.xwiki.internal.template.InternalTemplateManager.renderFromSkin(InternalTemplateManager.java:866)
at com.xpn.xwiki.internal.template.InternalTemplateManager.render(InternalTemplateManager.java:853)
at com.xpn.xwiki.internal.template.InternalTemplateManager.renderNoException(InternalTemplateManager.java:808)
at com.xpn.xwiki.internal.template.InternalTemplateManager.renderNoException(InternalTemplateManager.java:800)
at com.xpn.xwiki.internal.template.DefaultTemplateManager.renderNoException(DefaultTemplateManager.java:79)
at com.xpn.xwiki.internal.template.DefaultTemplateManager.renderNoException(DefaultTemplateManager.java:73)
at org.xwiki.template.script.TemplateScriptService.render(TemplateScriptService.java:54)
at jdk.internal.reflect.GeneratedMethodAccessor207.invoke(Unknown Source)
at java.base/jdk.internal.reflect.DelegatingMethodAccessorImpl.invoke(DelegatingMethodAccessorImpl.java:43)
at java.base/java.lang.reflect.Method.invoke(Method.java:569)
at org.apache.velocity.util.introspection.UberspectImpl$VelMethodImpl.doInvoke(UberspectImpl.java:571)
at org.apache.velocity.util.introspection.UberspectImpl$VelMethodImpl.invoke(UberspectImpl.java:554)
at org.apache.velocity.runtime.parser.node.ASTMethod.execute(ASTMethod.java:221)
at org.apache.velocity.runtime.parser.node.ASTReference.execute(ASTReference.java:368)
at org.apache.velocity.runtime.parser.node.ASTReference.render(ASTReference.java:492)
at org.apache.velocity.runtime.parser.node.ASTBlock.render(ASTBlock.java:147)
at org.apache.velocity.runtime.directive.VelocimacroProxy.render(VelocimacroProxy.java:217)
at org.apache.velocity.runtime.directive.RuntimeMacro.render(RuntimeMacro.java:331)
at org.apache.velocity.runtime.directive.RuntimeMacro.render(RuntimeMacro.java:261)
at org.apache.velocity.runtime.parser.node.ASTDirective.render(ASTDirective.java:304)
at org.apache.velocity.runtime.parser.node.ASTBlock.render(ASTBlock.java:147)
at org.apache.velocity.runtime.parser.node.ASTIfStatement.render(ASTIfStatement.java:171)
at org.apache.velocity.runtime.parser.node.ASTBlock.render(ASTBlock.java:147)
at org.apache.velocity.runtime.parser.node.SimpleNode.render(SimpleNode.java:439)
at org.apache.velocity.runtime.parser.node.ASTIfStatement.render(ASTIfStatement.java:190)
at org.apache.velocity.runtime.parser.node.SimpleNode.render(SimpleNode.java:439)
at org.apache.velocity.Template.merge(Template.java:358)
at org.apache.velocity.Template.merge(Template.java:262)
at org.xwiki.velocity.internal.InternalVelocityEngine.evaluate(InternalVelocityEngine.java:233)
at com.xpn.xwiki.internal.template.VelocityTemplateEvaluator.evaluateContent(VelocityTemplateEvaluator.java:107)
at com.xpn.xwiki.internal.template.TemplateAsyncRenderer.evaluateContent(TemplateAsyncRenderer.java:219)
at com.xpn.xwiki.internal.template.TemplateAsyncRenderer.renderVelocity(TemplateAsyncRenderer.java:174)
at com.xpn.xwiki.internal.template.TemplateAsyncRenderer.render(TemplateAsyncRenderer.java:135)
at com.xpn.xwiki.internal.template.TemplateAsyncRenderer.render(TemplateAsyncRenderer.java:54)
at org.xwiki.rendering.async.internal.DefaultAsyncRendererExecutor.lambda$syncRender$0(DefaultAsyncRendererExecutor.java:284)
at com.xpn.xwiki.internal.security.authorization.DefaultAuthorExecutor.call(DefaultAuthorExecutor.java:98)
at org.xwiki.rendering.async.internal.DefaultAsyncRendererExecutor.syncRender(DefaultAsyncRendererExecutor.java:284)
at org.xwiki.rendering.async.internal.DefaultAsyncRendererExecutor.render(DefaultAsyncRendererExecutor.java:267)
at org.xwiki.rendering.async.internal.block.DefaultBlockAsyncRendererExecutor.render(DefaultBlockAsyncRendererExecutor.java:154)
at com.xpn.xwiki.internal.template.InternalTemplateManager.render(InternalTemplateManager.java:904)
at com.xpn.xwiki.internal.template.InternalTemplateManager.renderFromSkin(InternalTemplateManager.java:866)
at com.xpn.xwiki.internal.template.InternalTemplateManager.renderFromSkin(InternalTemplateManager.java:846)
at com.xpn.xwiki.internal.template.InternalTemplateManager.render(InternalTemplateManager.java:832)
at com.xpn.xwiki.internal.template.DefaultTemplateManager.render(DefaultTemplateManager.java:91)
at com.xpn.xwiki.internal.template.DefaultTemplateManager.render(DefaultTemplateManager.java:85)
at com.xpn.xwiki.XWiki.evaluateTemplate(XWiki.java:2569)
at com.xpn.xwiki.web.Utils.parseTemplate(Utils.java:180)
at com.xpn.xwiki.web.XWikiAction.execute(XWikiAction.java:650)
at com.xpn.xwiki.web.XWikiAction.execute(XWikiAction.java:338)
at com.xpn.xwiki.web.LegacyActionServlet.service(LegacyActionServlet.java:108)
at javax.servlet.http.HttpServlet.service(HttpServlet.java:764)
at org.apache.catalina.core.ApplicationFilterChain.internalDoFilter(ApplicationFilterChain.java:227)
at org.apache.catalina.core.ApplicationFilterChain.doFilter(ApplicationFilterChain.java:162)
at com.xpn.xwiki.web.ActionFilter.doFilter(ActionFilter.java:122)
at org.apache.catalina.core.ApplicationFilterChain.internalDoFilter(ApplicationFilterChain.java:189)
at org.apache.catalina.core.ApplicationFilterChain.doFilter(ApplicationFilterChain.java:162)
at org.xwiki.wysiwyg.filter.ConversionFilter.doFilter(ConversionFilter.java:61)
at org.apache.catalina.core.ApplicationFilterChain.internalDoFilter(ApplicationFilterChain.java:189)
at org.apache.catalina.core.ApplicationFilterChain.doFilter(ApplicationFilterChain.java:162)
at org.apache.tomcat.websocket.server.WsFilter.doFilter(WsFilter.java:53)
at org.apache.catalina.core.ApplicationFilterChain.internalDoFilter(ApplicationFilterChain.java:189)
at org.apache.catalina.core.ApplicationFilterChain.doFilter(ApplicationFilterChain.java:162)
at org.xwiki.container.servlet.filters.internal.SetHTTPHeaderFilter.doFilter(SetHTTPHeaderFilter.java:63)
at org.apache.catalina.core.ApplicationFilterChain.internalDoFilter(ApplicationFilterChain.java:189)
at org.apache.catalina.core.ApplicationFilterChain.doFilter(ApplicationFilterChain.java:162)
at org.xwiki.resource.servlet.RoutingFilter.doFilter(RoutingFilter.java:132)
at org.apache.catalina.core.ApplicationFilterChain.internalDoFilter(ApplicationFilterChain.java:189)
at org.apache.catalina.core.ApplicationFilterChain.doFilter(ApplicationFilterChain.java:162)
at org.xwiki.container.servlet.filters.internal.SavedRequestRestorerFilter.doFilter(SavedRequestRestorerFilter.java:208)
at org.apache.catalina.core.ApplicationFilterChain.internalDoFilter(ApplicationFilterChain.java:189)
at org.apache.catalina.core.ApplicationFilterChain.doFilter(ApplicationFilterChain.java:162)
at org.xwiki.container.servlet.filters.internal.SetCharacterEncodingFilter.doFilter(SetCharacterEncodingFilter.java:117)
at org.apache.catalina.core.ApplicationFilterChain.internalDoFilter(ApplicationFilterChain.java:189)
at org.apache.catalina.core.ApplicationFilterChain.doFilter(ApplicationFilterChain.java:162)
at org.apache.catalina.core.StandardWrapperValve.invoke(StandardWrapperValve.java:197)
at org.apache.catalina.core.StandardContextValve.invoke(StandardContextValve.java:97)
at org.apache.catalina.authenticator.AuthenticatorBase.invoke(AuthenticatorBase.java:541)
at org.apache.catalina.core.StandardHostValve.invoke(StandardHostValve.java:135)
at org.apache.catalina.valves.ErrorReportValve.invoke(ErrorReportValve.java:92)
at org.apache.catalina.valves.AbstractAccessLogValve.invoke(AbstractAccessLogValve.java:687)
at org.apache.catalina.core.StandardEngineValve.invoke(StandardEngineValve.java:78)
at org.apache.catalina.connector.CoyoteAdapter.service(CoyoteAdapter.java:360)
at org.apache.coyote.http11.Http11Processor.service(Http11Processor.java:399)
at org.apache.coyote.AbstractProcessorLight.process(AbstractProcessorLight.java:65)
at org.apache.coyote.AbstractProtocol$ConnectionHandler.process(AbstractProtocol.java:890)
at org.apache.tomcat.util.net.NioEndpoint$SocketProcessor.doRun(NioEndpoint.java:1743)
at org.apache.tomcat.util.net.SocketProcessorBase.run(SocketProcessorBase.java:49)
at org.apache.tomcat.util.threads.ThreadPoolExecutor.runWorker(ThreadPoolExecutor.java:1191)
at org.apache.tomcat.util.threads.ThreadPoolExecutor$Worker.run(ThreadPoolExecutor.java:659)
at org.apache.tomcat.util.threads.TaskThread$WrappingRunnable.run(TaskThread.java:61)
at java.base/java.lang.Thread.run(Thread.java:840)
Search All Documentation:
Unknown macro: livesearch. Click on this message for details.
The [livesearch] macro is not in the list of registered macros. Verify the spelling or contact your administrator.
Search USER OPERATIONS Documentation:
Unknown macro: pagetreesearch. Click on this message for details.
The [pagetreesearch] macro is not in the list of registered macros. Verify the spelling or contact your administrator.
On this page:
More USER OPERATIONS Documentation
Click here to expand...
Add Users
How to Create an Import Mapping Template
How to Use an Import Mapping Template
Batch Operations
Bulk Operation - How to Perform a Batch Delete
Bulk Operation - How to Perform a Batch Product Change
Bulk Operation - How to Perform a Batch Status Change
Bulk Operation - How to Perform a Batch Suscribe
Bulk Operation - How to Perform a Batch Unsubscribe
Bulk Operation - How to Perform a Merge of Duplicate Users
Target Audience Segments